I don’t know about you, but the transition from autumn to winter happened so fast it made my head spin! We are well into December and only 3 weeks away from the end of the year. Whoa!
The temp has been dropping here in the Midwest as the season changes. I woke up to a fresh two inches of snow on the ground this morning in northern Michigan. Contrary to most, I really do love this time of year. It gets dark very early so it’s a little easier to snuggle into a chair and crochet the evening away without feeling guilty that the garden or the yardwork is being neglected.
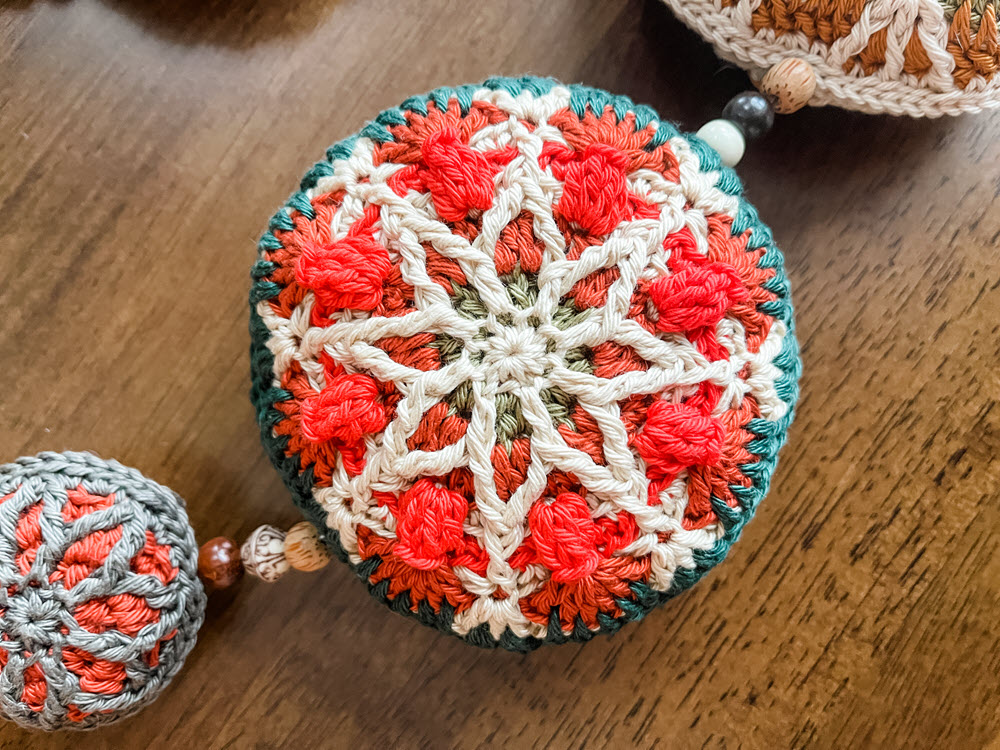
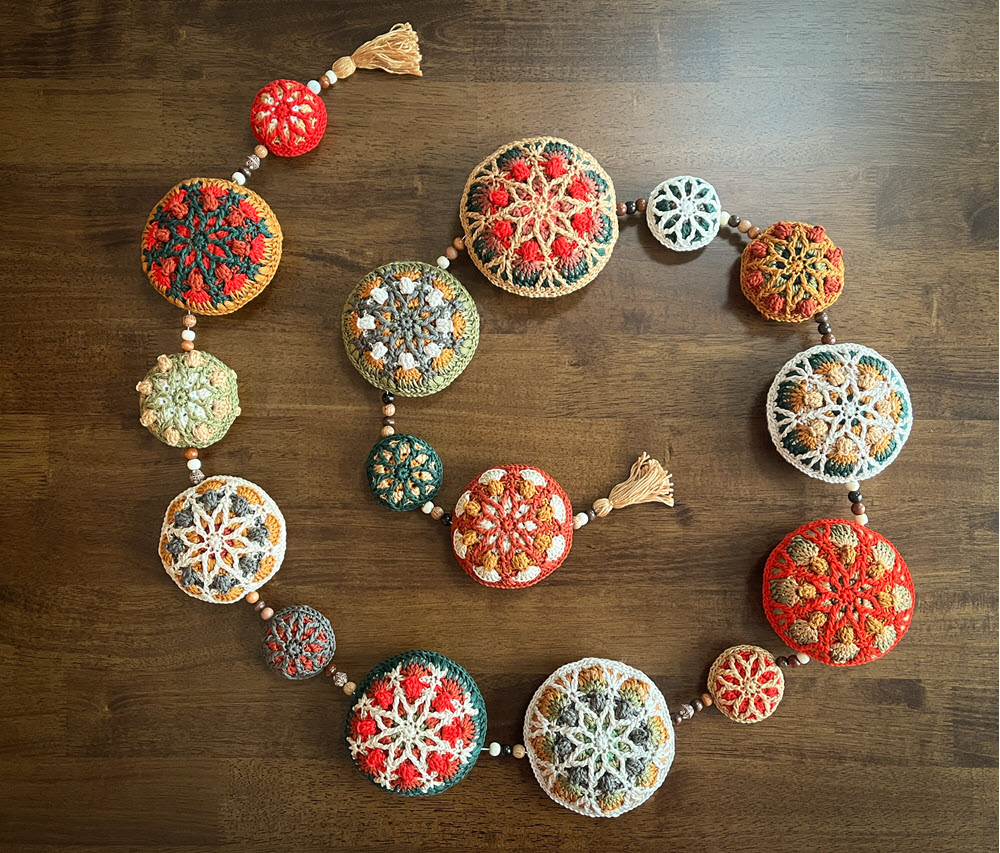
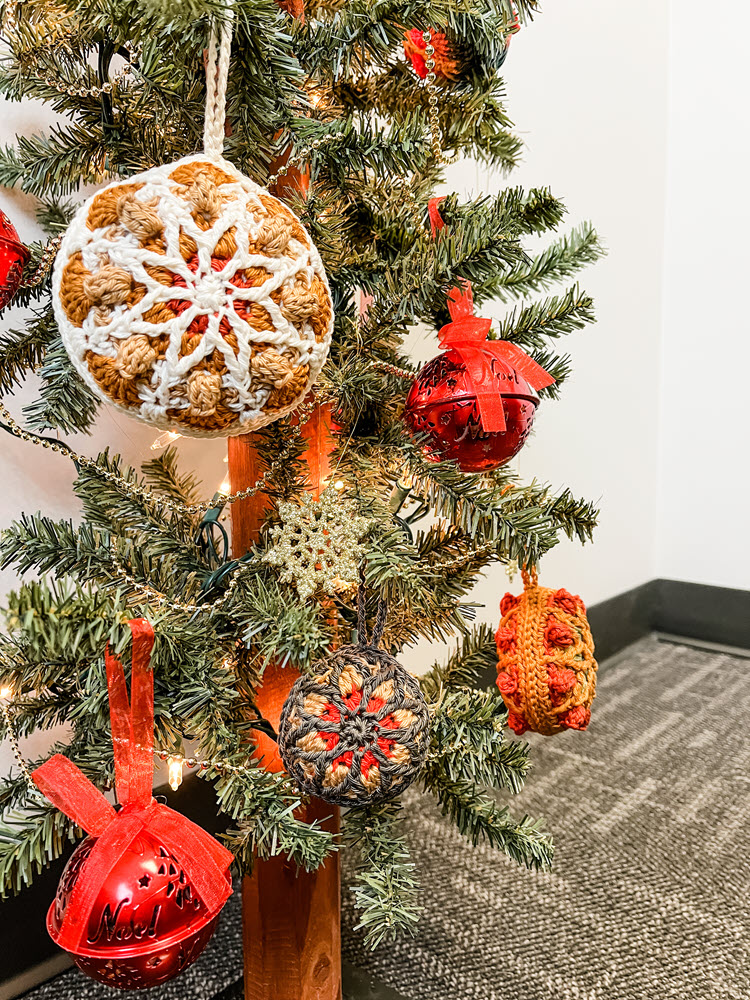
I had so many ideas in my head for this holiday season, but settled on one that has been on the list for quite some time. I have a strong love for mosaic crochet, and while this isn’t technically a mosaic pattern it definitely has some similar characteristics. The Holiday Bunting pattern is extremely versatile. It’s quick, fairly easy, and uses only a small amount of yarn. It’s loaded with texture making it very visually appealing. The individual pattern can be altered to make small, medium, large, or full-size motifs…you just stop after earlier rounds for smaller sizes. These also can be used as ornaments…they look absolutely beautiful hanging from a tree!
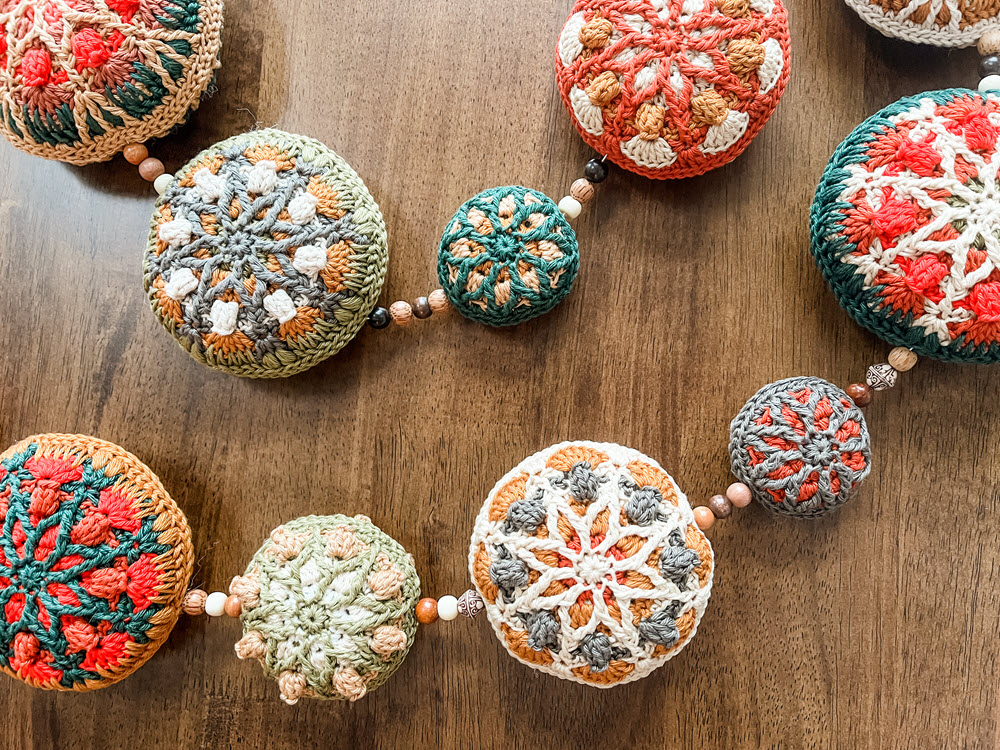
There are 11 total rounds. Each round is finished and fastened off at the end, so color changing is easy. 2 motifs need to be made, then slip stitched together and stuffed to make 1 ornament. The pattern calls for Colors A-D, but you can change up your colors any way you want…you certainly don’t have to follow that format. I would suggest that when your Color A is a darker color, using lighter colors with it makes the pattern stand out better. Likewise, when Color A is a lighter color, you might enjoy using darker colors for your other colors. I found that by choosing 8-10 colors and mixing up the order I used them in I was able to get a really cohesive collection of ornaments for my bunting.
Gauge isn’t important at all for this pattern. The only thing that really matters is that your two motifs end up relatively the same size. For reference though, my full-size ornament ended up approximately 5” in diameter using Scheepjes Catona.
Hook Size:
-Size 5/0 – 3.0mm hook
Yarn:
-I used Scheepjes Catona, because I love the huge color selection, but this is a perfect pattern to bust your stash! Any yarn will work…thinner weight yarn will make smaller motifs, bulkier yarn will make larger motifs. Real chunky yarn could make something as big as a unique throw pillow!
Colors:
The Scheepjes Catona colors I used are: 105-Bridal White, 179-Topaz, 383-Ginger Gold, 387-Dark Olive, 388-Rust, 390-Poppy, 395-Willow, 505-Linen, 525-Fir.
I order my Scheepjes yarn through Wool Warehouse. They are in the UK and are an excellent international supplier, but don’t feel like you need use internationally sourced yarn. Any yarn will work for this project!
Other Materials You’ll Need:
-scissors
-yarn needle
-twine/yarn/string for stringing bunting together (optional)
-wooden beads/felt balls (optional)
-Polyfil (or other stuffing)
Abbreviations:
-st – stitch (sts – stitches)
-sl st – slip stitch
-sk – skip
-mc – magic circle
-sc(s) – single crochet(s)
-blo – back loop only
-hdc(s) – half double crochet(s)
-flo – front loop only
-dc(s) – double crochet(s)
-dc2tog – double crochet 2 stitches together
-fptc2tog – front post treble crochet 2 stitches together
-fpdc(s) – front post double crochet(s)
-ch – chain
-fptc – front post treble crochet
Special Stitches:
-popcorn stitch
-puff stitch
Special Stitches Explained:
-popcorn stitch: work 5 dcs into the same stitch, pull up a little loop once you finish the 5th dc so you don’t lose the active loop and remove hook, insert hook into the top of the first dc you made in the set of 5, grab the active loop you left when you finished the 5th dc and pull it tight around your hook again, sl st the active loop through the top of the 1st dc that’s on your hook to close the popcorn, ch 1 to close
-puff stitch: yarn over and insert your hook into the specified stitch, pull up a longish loop, yarn over and insert your hook into the same stitch, pull up another longish loop, do this two more times for a total of 4 times, yarn over a final time and pull through all 9 loops on your hook (you are basically just stockpiling a bunch of yarn overs on this one, and then pulling through to finish…usually you will also be required to chain 1 to close it)
There’s a lot going on in these rounds, so all stitches and construction are shown with detail in the video tutorial. The video can be found here.
If you would like a PDF download of this pattern, it can be purchased on Etsy here or Ravelry here.
Also, make sure to join our Brooklyn Hookers Crochet Group on Facebook. I’m excited for it to grow into an awesome, supportive community! I do throw a code in that group when I release a new pattern…a free download of the PDF pattern through Ravelry. It’s only good for a limited time so make sure to join the group and not miss out on that. You can find it here.
Motif’s – Make two:
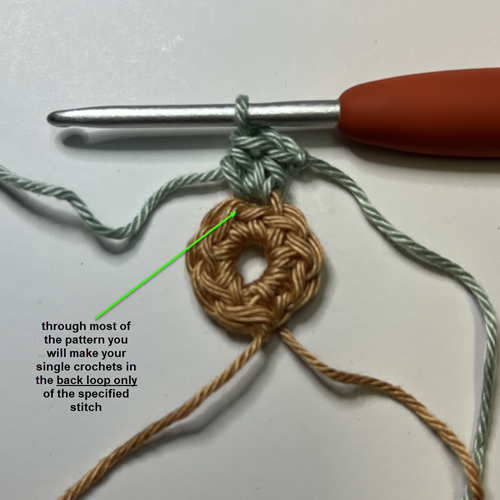
1.Color A – make 8 scs in mc, sl st to top of first sc made, fasten off and cut yarn (8)
2.Color B – attach yarn to blo of any sc with a standing hdc, blo hdc in same st, 2 blo hdcs in each remaining st around, sl st to top of first standing hdc made, fasten off and cut yarn (16)
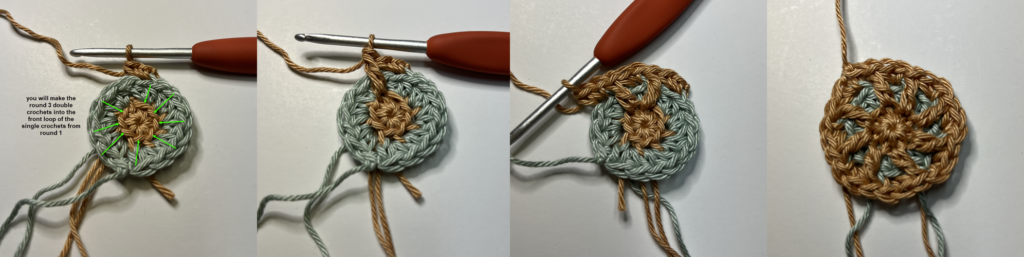
3.Color A – attach yarn to the blo of any hdc with a standing sc, blo sc in same st, dc down in the flo of the sc from round 1 that’s closest below your current st, sk 1 st of round 2, 2 blo scs in next st (in other words, there are two scs in the first st you worked in, then you’re skipping the second st to accommodate the dc, then you’re making 2 scs in the third st), dc down in the flo of the sc from round 1 just to the left of the one you already used, sk 1 st, repeat around the remaining sts, sl st to top of first standing sc, fasten off and cut yarn (24)
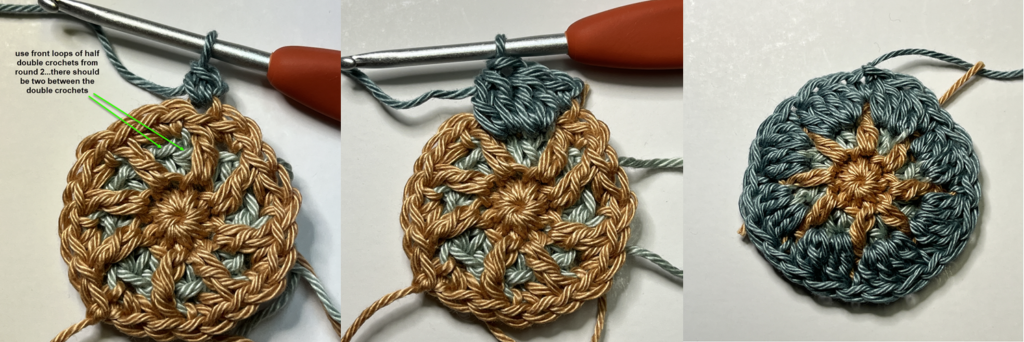
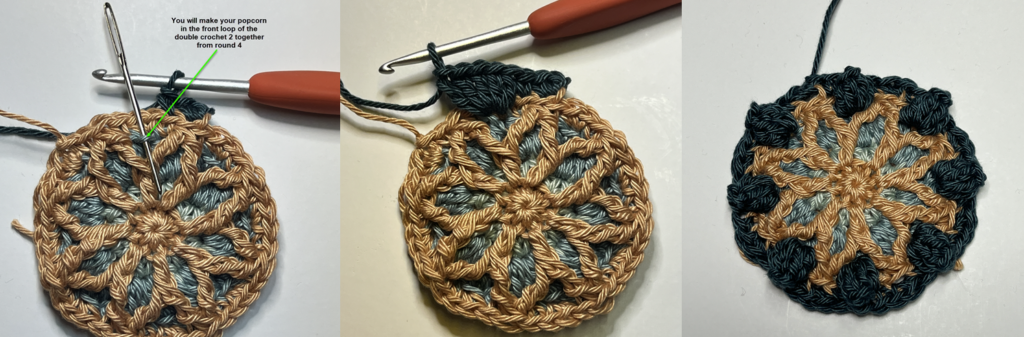
4.Color C – attach yarn to blo of any dc from round 3 with a standing sc, dc2tog in flo of hdc from row 2 closest below your current st, dc2tog in flo of next hdc from round 2 (both these dc2tog sts will be between the first 2 dcs from round 3…sometimes you have to push the dcs out of the way to see the front loops of the hdcs), blo sc in next dc from round 3, dc2tog in flo of hdc from row 2, dc2tog in flo of next hdc from round 2, blo sc in next dc, repeat around the remaining sts, sl st to top of first standing sc, fasten off and cut yarn (24)
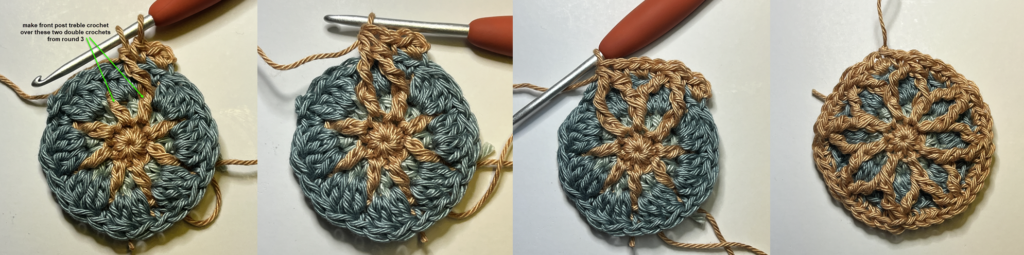
5.Color A – attach yarn to the blo of any sc from round 4 with a standing sc, blo sc in same st, blo sc in next st, fptc2tog over the first and second dcs from round 3, without skipping any sts behind the fptc2tog blo sc in next st, 2 blo scs in next st, blo sc in next st, fptc2tog over the second and third dcs from round 3, without skipping any sts behind the fptc2tog blo sc in next st, 2 blo scs in next st, blo sc in next st, repeat around in the remaining sts, sl st to the top of the first standing sc, fasten off and cut yarn (40)
You can stop here for a small motif.
6.Color D – attach yarn in blo of any fptc2tog with a standing sc, sc again in blo of same st, blo sc in next st, popcorn st in flo of sc from round 4 (remembering the final chain 1 to close the popcorn stitch), sk 2 sts on round 5 and blo sc in next st, 2 blo scs in next st (this should be the top of the next fptc2tog), blo sc in next st, popcorn st in flo of sc from round 4, repeat around the remaining sts, sl st to top of the first standing sc, fasten off and cut yarn (40)
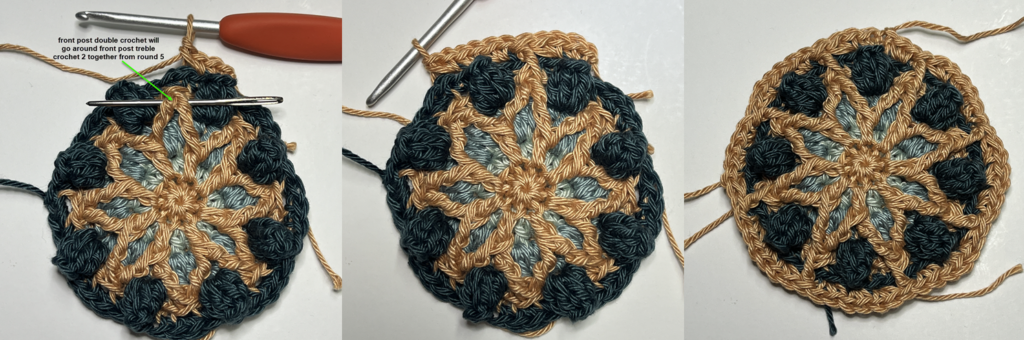
7.Color A – attach yarn in blo of any popcorn st with a standing sc, blo sc again in same st, 2 blo scs in the next st, fpdc around the fptc2tog from round 5, sk 2 sts from round 6 and make 2 blo scs in ea of the next 3 sts (so, 6 blo scs total – 2 in each of the next 3 sts), fpdc around the fptc2tog from round 5, sk 2 sts from round 6 and make 2 blo scs in ea of the next 3 sts, repeat around the remaining sts, sl st to top of the first standing sc, fasten off and cut yarn (56)
You can stop here for a medium motif.
8.Color C – attach yarn in the blo of any fpdc from round 7 with a standing sc, blo sc in same st, 6 flo dcs in popcorn st from round 6, 2 blo scs in next fpdc from round 7, 6 flo dcs in next popcorn st from round 6, repeat around the remaining sts, sl st to top of the first standing sc, fasten off and cut yarn (64)
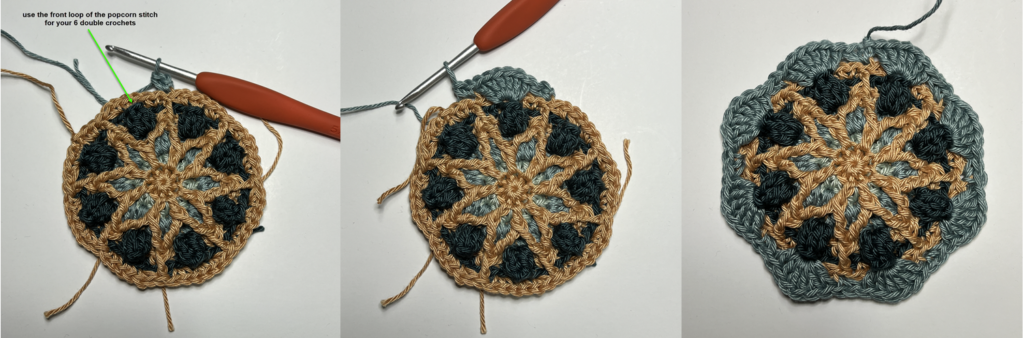
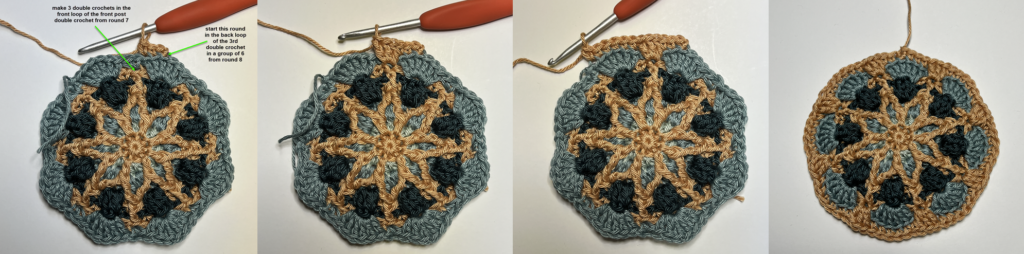
9.Color A – attach yarn in blo of any fourth dc in a group of 6 with a standing sc, blo sc in next 2 sts, 3 flo dcs in fpdc from round 7, sk 2 sts of round 8, blo sc in next 6 sts (should be a group of 6 dcs from round 8), 3 flo dcs in fpdc from round 7, sk 2 sts of round 8, blo sc in next 6 sts, repeat around the remaining sts (your last 3 sts will be blo scs to meet your beginning standing sc), sl st to top of the first standing sc, fasten off and cut yarn (72)
You can stop here for a large motif.
10.Color B – working BETWEEN the posts of the first 2 dcs in a group of 3 dcs from round 9 make a standing puff st, ch 1 to close puff st, make puff st between the post of the second and third dcs, ch 1 to close puff st, working AROUND row 9, make 5 spike style dcs BETWEEN each of the 6 dc posts from round 8 (see picture), you should now be back to to your next group of 3 dcs, make puff st between posts of first and second dcs, ch 1 to close, make puff st between posts of second and third dcs, ch 1 to close, working around row 9, make 5 spike style dcs between each of the 6 dc posts from round 8, repeat around the remaining sts, sl st to top of the first standing puff st, fasten off and cut yarn (72)
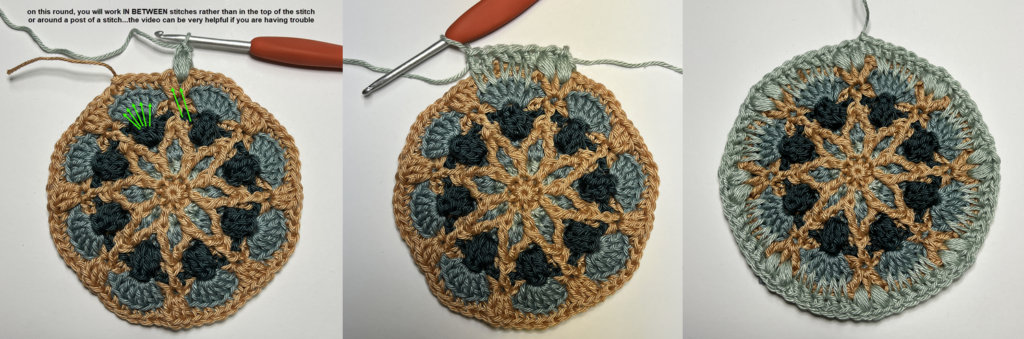
I decided after making a TON of these that this is my favorite place to stop. I love the spike style dcs as the border round. However, here is the final round which also creates a beautiful border.
11.Color A – attach yarn through both loops of third spike style dc in a group of 5 from round 10 with a standing sc, sc in same st, sc in next st, fptc in first dc in group of 3 from round 9, sk 1 st on row 10 and sc in next 2 sts, fpdc in second dc in ground of 3, sc in next 2 sts, fptc in third dc in group of 3, sk 1 st on row 10, sc in next st, 2 scs in next st, sc in next st, fptc in first dc in group of 3 from round 9, sk 1 st on row 10 and sc in next 2 sts, fpdc in second dc in ground of 3, sc in next 2 sts, fptc in third dc in group of 3, sk 1 st on row 10, sc in next st, 2 scs in next st, sc in next st, repeat around remaining sts, sl st to top of the first standing sc, fasten of and cut yarn (88)
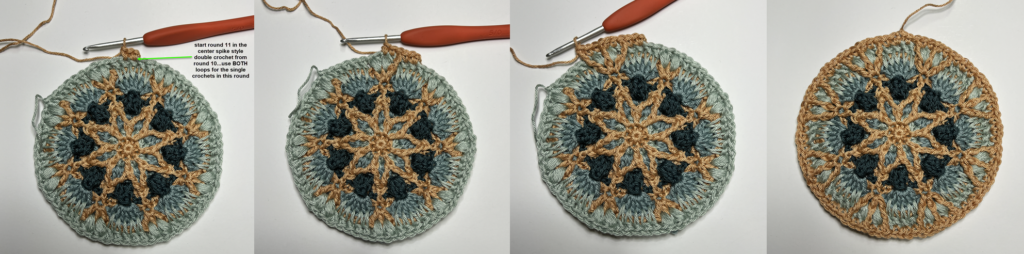
You now have a full-size motif.
Construction:
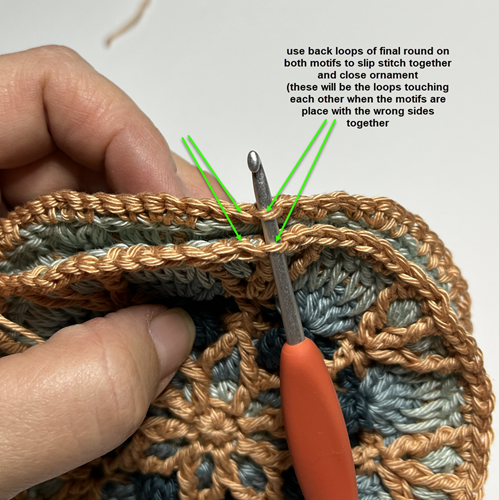
Once you have you two motifs done, place them with their wrong sides touching. Using the back loops of the last row on both (the loops that are touching each other when placed together) sl st in each st until you get about three quarters of the way around. Take some stuffing and fill your ornament enough to be stuffed, but not too much that it bulges out any of the stitches. Continue with a sl st the rest of the way around to completely close.
Once closed, if you want to use this for bunting, go ahead and fasten off and cut your yarn. Weave in your end.
If you want to use this as an individual hanging ornament, keep yarn attached and chain 24, then sl st back down to the bottom where you started your chain. Now fasten off and cut your yarn. Weave in your end and you’re done!
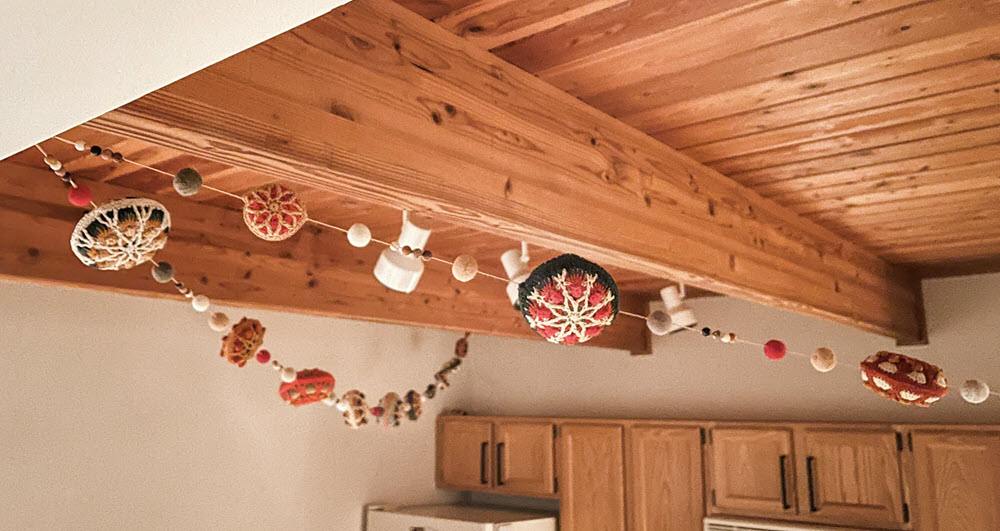
Bunting:
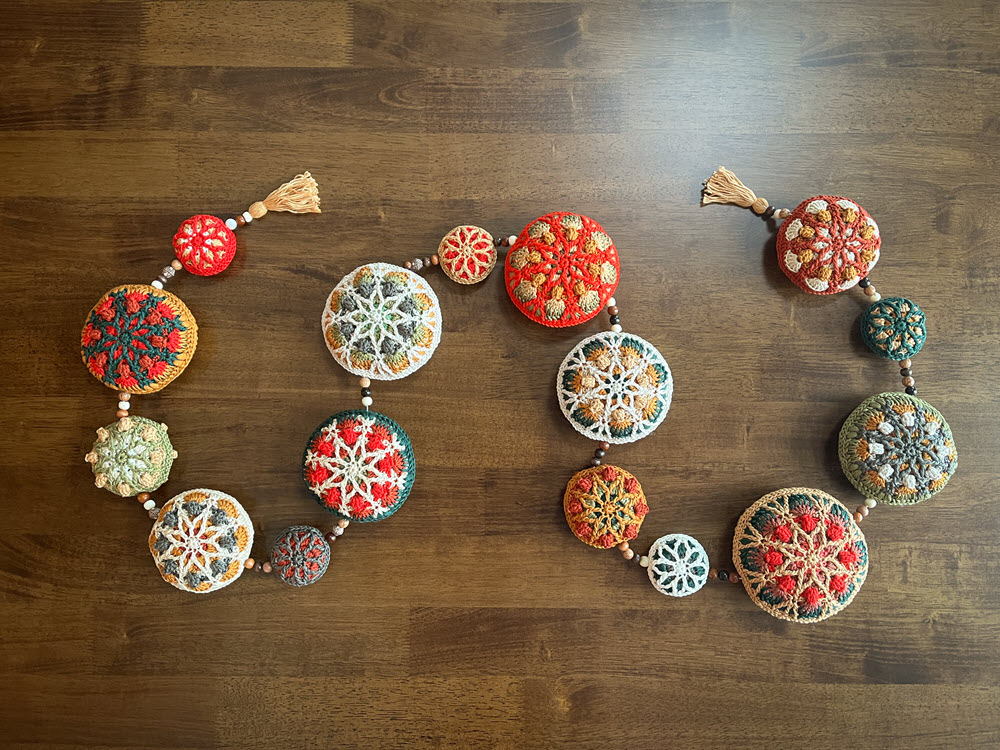
Using a long piece of your yarn (twine and string also work) and a yarn needle, thread on an assortment of ornaments, wooden beads, felt balls, and whatever else you may like. For the ends you can do anything you like. It could be nice to tie loops so it’s easy to hang. On mine, I chose to add tassels, just for fun!
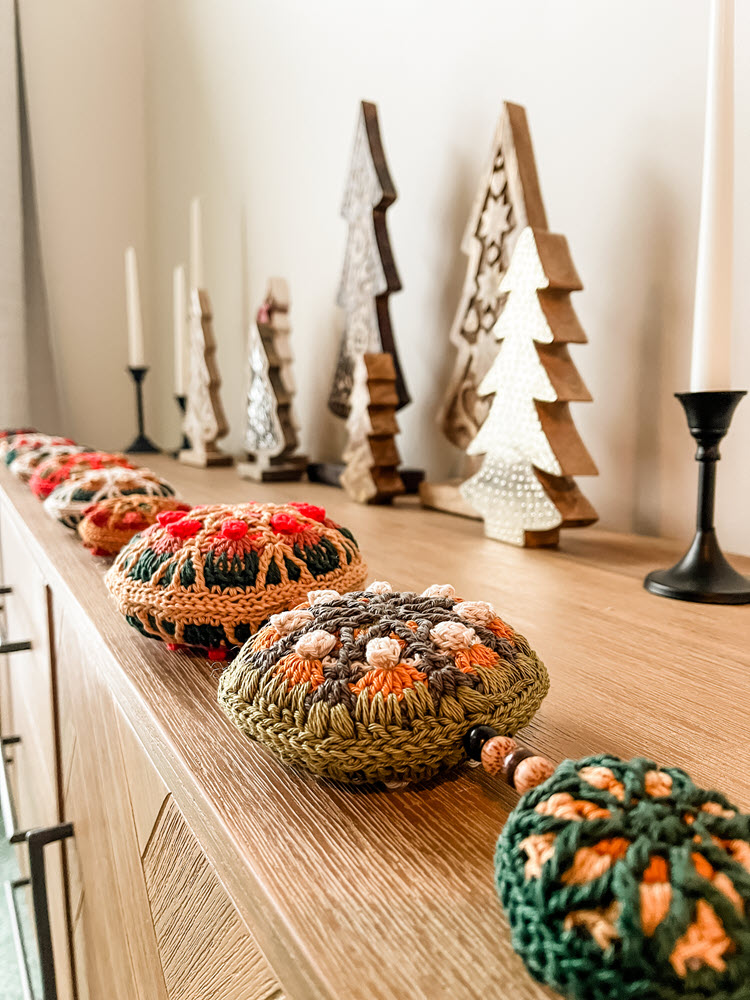
This bunting is stunning on a fireplace mantel, strung from the ceiling, or wrapped around the tree. Switch up the colors and use it for décor all year round!
Thank you SO MUCH for supporting a very small business and designer. I appreciate each and every one of you more than you know!
I love feedback, positive or negative, and I certainly don’t get it right every time. If you have suggestions, criticism, or find anything that needs to be addressed in the pattern, PLEASE feel free to reach out via the Facebook Group below or email: jamie@brooklynhandcrafted.com
Happy Hooking!!
Facebook: https://www.facebook.com/groups/BrooklynHookersCrochetClub
Instagram: https://www.instagram.com/brooklynhandcrafted/ and don’t forget to tag me in your project pictures! @brooklynhandcrafted