I’m cruising into Christmas in July on the very last day of the month, but I made it! I’ll be honest, it felt a little strange digging into the holiday decorations in order to stage an area to shoot photos….it’s 85o F here in West Michigan and we are in the dead of summer. Not usually the time I open the Christmas closet and have a rustle around in there!
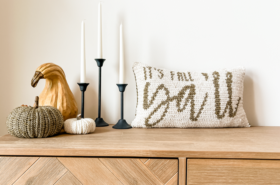
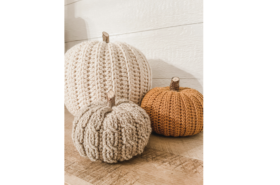
I wrote this pattern last summer with a plan to release it for the 2022 holiday season. But then I started working on pumpkins….and I got so addicted to making pumpkins that everything else just sat and before I knew it my window of opportunity had closed. If you haven’t checked out the Autumn Pumpkin Duo, you really should. They are FUN to make, and fall is just around the corner!
Anyway, back to the point.
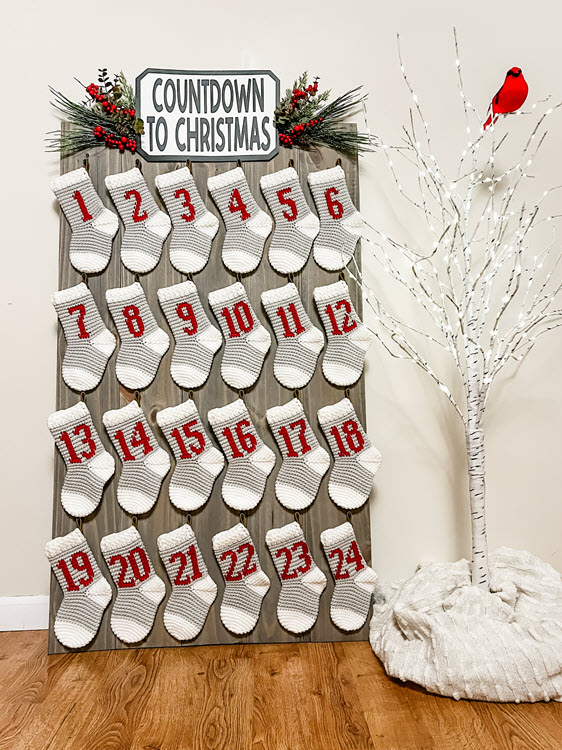
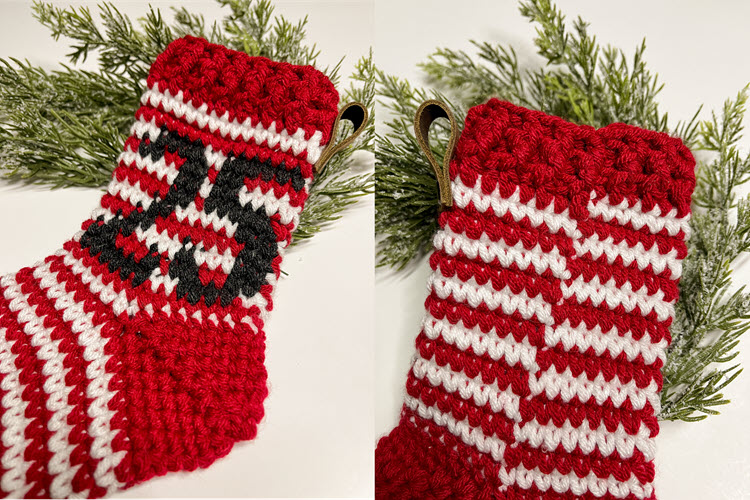
The Stocking Advent is live! This pattern is so much fun, especially for children! It’s a very personal way to enjoy the days leading up to a holiday. Tuck little gifts inside each one for each day…they are even a good size to accommodate families with multiple children. I gifted one to my niece and nephew last year and it provided weeks of entertainment for the month of December.
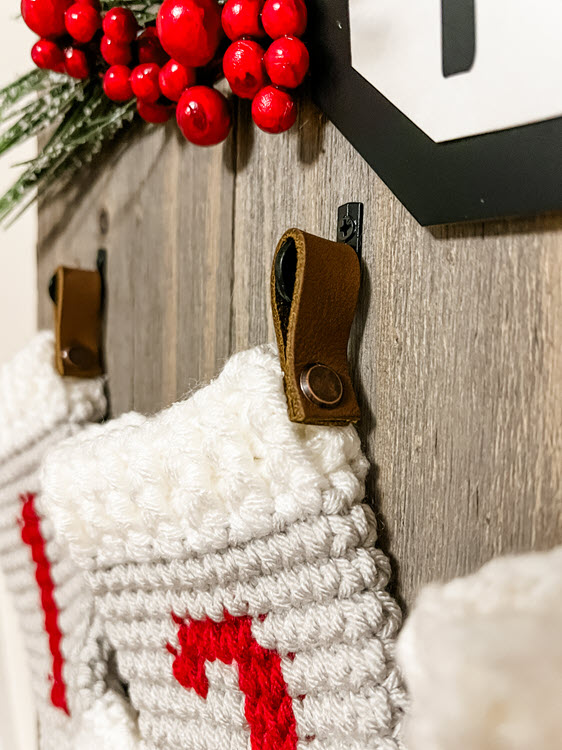
The stockings are a nice quick make, and because of the tapestry style used they are nice and sturdy and will hold up for years to come. I attached a leather loop with a Chicago screw to each one for hangers. If you know me and my patterns, you know I LOVE working with Chicago screws. But don’t worry, you can crochet a loop instead if you prefer.
The stockings can be hung by hooks on a board, or they can be strung together with twine or a crochet chain and hung as bunting (so cute around a fireplace!). There are, of course, endless other ways to display them as well.
They are made by working in the round using mostly single crochet stitches, but also use split single crochet, front post double crochet and back post double crochet. Using split single crochet for the number stitches only allows the stitches to stack perfectly one on top of the other instead of “leaning” slightly to the right as regular single crochet does. I used a low-pill yarn for mine that is nice and soft and springy. Using a hook smaller than the yarn calls for gives a nice tight weave that won’t leave you with holes.
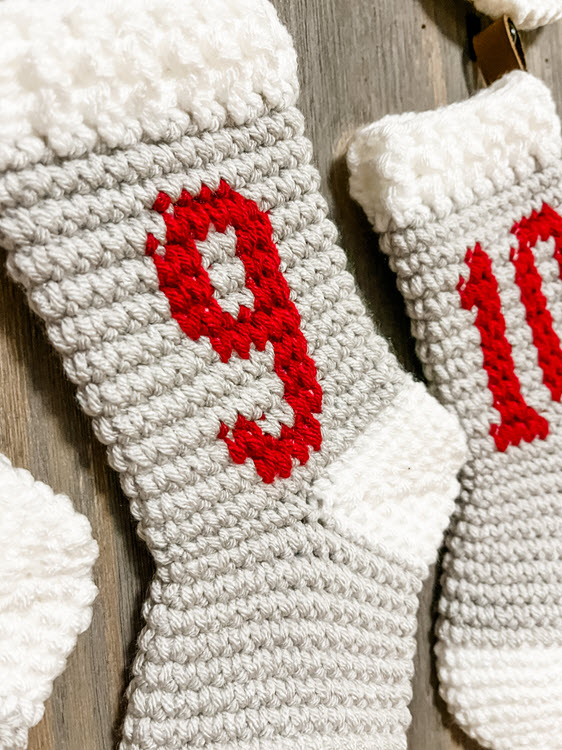
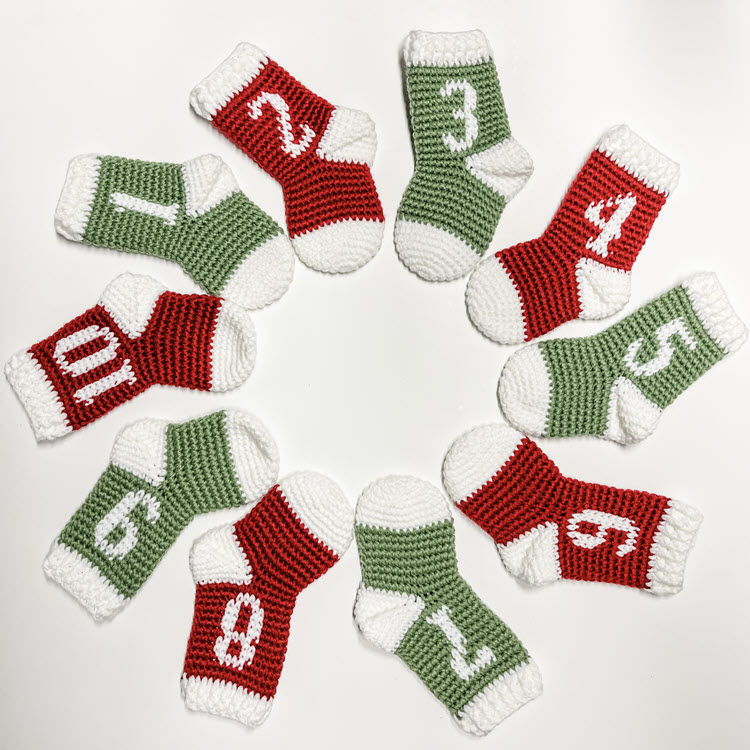
I worked up two different sizes, a regular size and a mini size. The pattern is the same, it’s changing the yarn and hook used that will determine the different sizes. As of this blog post, I was only able to complete 10 of the minis, but my plan once I have all 25 made is to make advent garland with them. Since they are smaller, I think garland will work well!
Level:
Confident Beginner
Terms:
American Standard
Gauge isn’t make or break for this pattern, but for reference I achieved the following:
Regular Size Stockings – 4.5 single crochets = 1”
Mini Size Stockings – 6.5 single crochets = 1”
My finished sizes were the following:
-Regular Size – Approx. 9” x 3.5”
-Mini Size – Approx. 6.25” x 2.5”
Hook Size:
-Regular Size: G/6 – 4.0mm hook
-Mini Size: C – 2.75mm hook
Yarn:
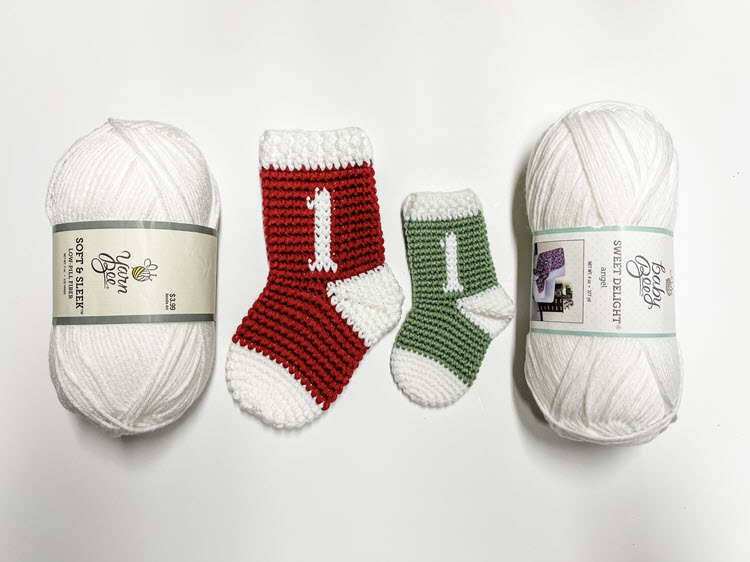
-Regular Size Stockings: Yarn Bee “Soft and Sleek” (4 – medium weight yarn). I used White, Light Grey, and Chili Red.
Color A (White) – 4 balls
Color B (Light Gray) – 4 balls
Color C (Chili Red) – 1 ball
-Mini Size Stockings: Baby Bee “Sweet Delight” (3 – light weight yarn). I used Angel and Baby Sage. They didn’t have a red in this style, so I used “Sport Weight” I Love This Yarn in Red.
Color A (Angel) – 2 balls
Color B1 (Baby Sage) – 1 ball
Color B2 (Red) – 1 ball
-This can also be a great stash buster!
Other Materials You’ll Need:
-scissors
-yarn needle
-leather stripping (optional)
-Chicago screws (optional)
-display materials (we’ll talk more about this at the end of the pattern)
Abbreviations:
-mc – magic circle
-sc – single crochet
-ssc – split single crochet
-hdc – half double crochet
-fpdc – front post double crochet
-bpdc – back post double crochet
-ch – chain
-st – stitch (sts – stitches)
-sl st – slip stitch
-sk – skip
-sc2tog – single crochet 2 stitches together
-sc3tog – single crochet 3 stitches together
Special Stitches Explained:
-split single crochet (ssc): instead of using the top two loops of the stitch, insert hook lower into the body of each stitch, i.e. the center of the two vertical threads that make the “V” of the stitch, yarn over, pull back through the “V”, yarn over and pull through both loops on hook. This is a tighter stitch so it may take a little more work to insert your hook than it would on a regular single crochet.
If you are interested in an ad-free PDF download of this pattern, it can be found on Etsy here or Ravelry here.
Also, make sure to join our Brooklyn Hookers Crochet Group on Facebook. I’m excited for it to grow into an awesome, supportive community! I do throw a code in that group when I release a new pattern…a free download of the PDF pattern through Ravelry. It’s only good for a limited time so make sure to join the group and not miss out on that. You can find it here.
The Pattern:
Body of the Stocking
Begin with Color A and make a mc.
- 6 sc in mc (wait until row 4 to tighten mc-beginning sts are easier to work in this way) (6 sts)
- 2 sc in ea st around (12 sts)
- [2 sc in next st, 1 sc in next st], repeat [ to ] around (18 sts)
- [2sc in next st, 1 sc in next 2 sts], repeat [ to ] around (24 sts) – now gently tighten the mc
- [2sc in next st, 1 sc in next 3 sts], repeat [ to ] around (30 sts here and throughout)
- sc in each st around
- repeat row 6
- repeat row 6
Change to Color B and carry Color A tapestry style. If you wish to do a striped stocking, you will alternate the two colors every other row. This will result in a small jog that is visible up the back.
- repeat row 6
- repeat row 6
- repeat row 6
- repeat row 6
- repeat row 6
- repeat row 6
- repeat row 6
- repeat row 6
Continue with Color B and leave an opening for the after-thought heel:
- ch 15, sk the next 15 sts, sc in the 16th st, sc in the remaining 14 sts
- sc in each of the 15 ch sts you made in row 17, sc in the remaining 15 sts
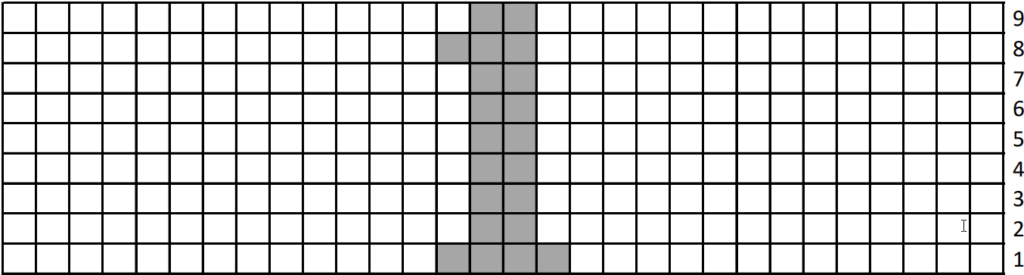
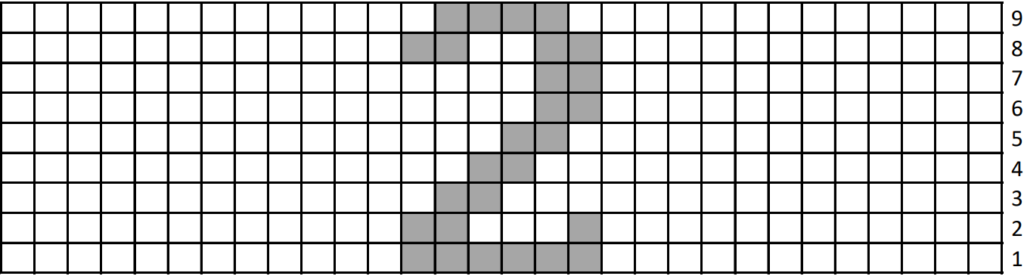
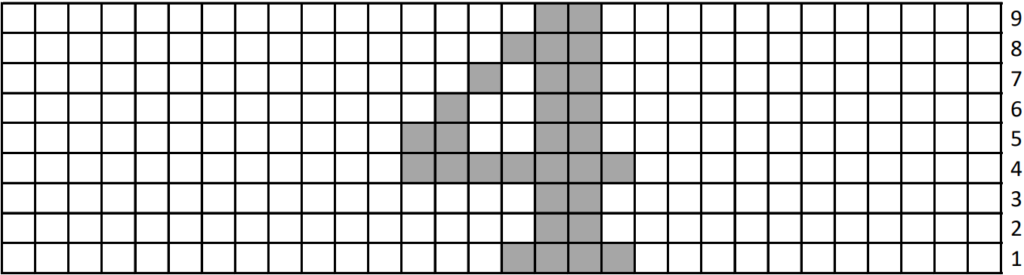
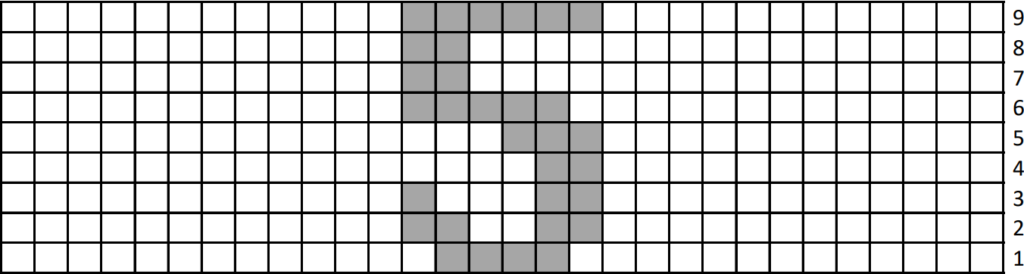
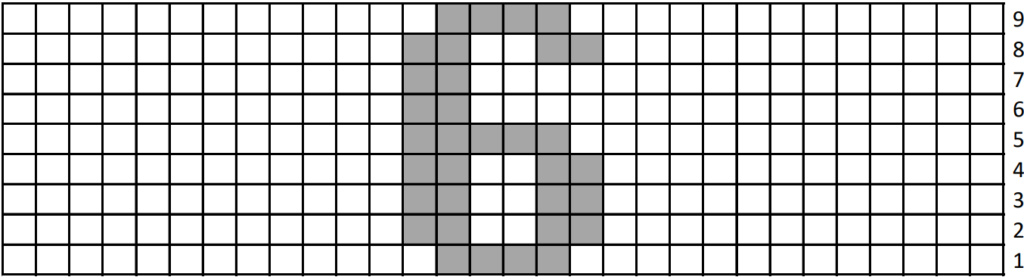
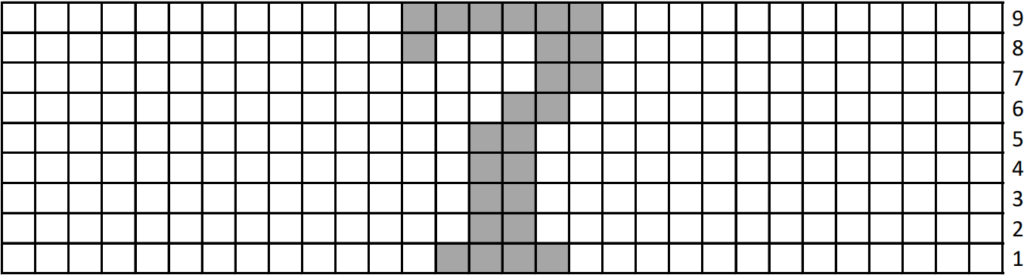
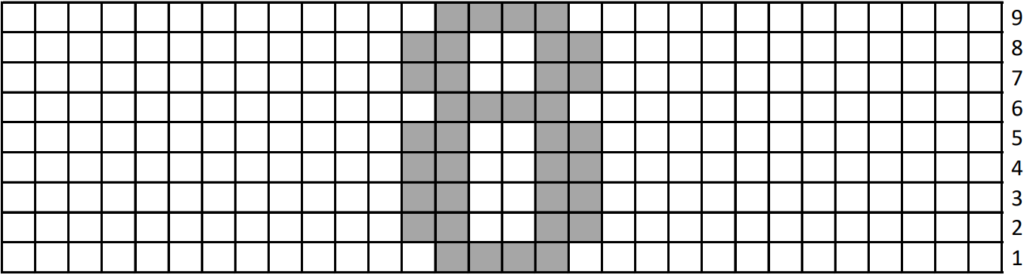
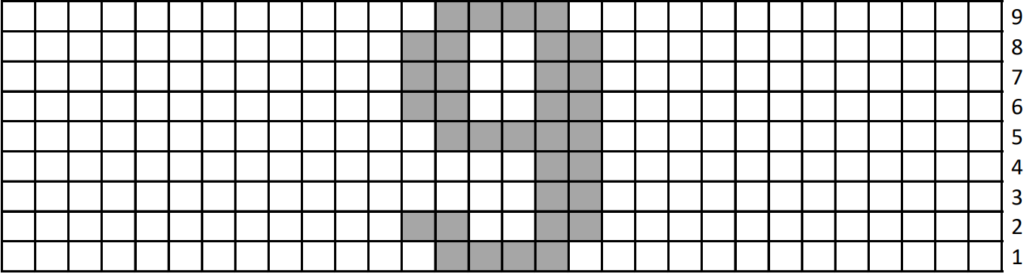
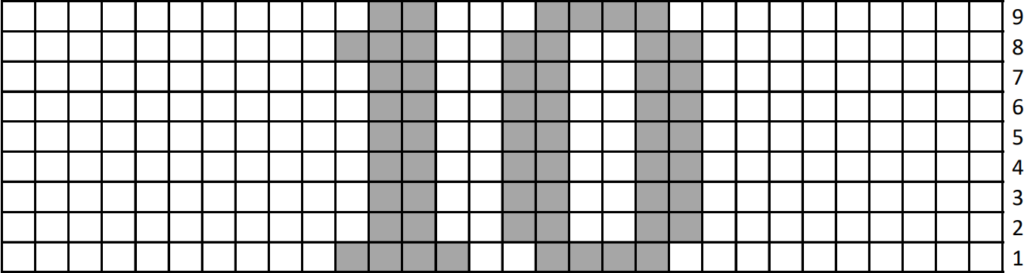
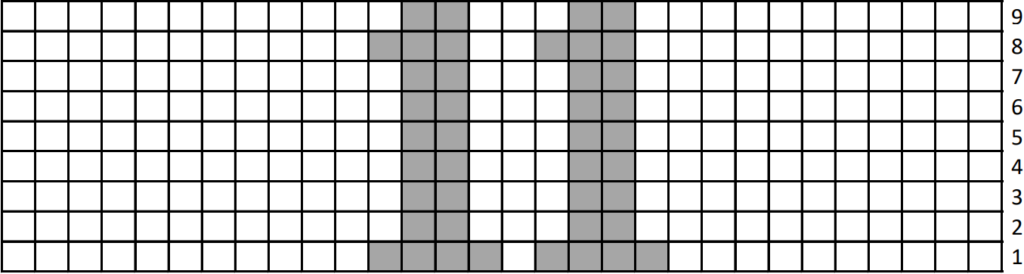
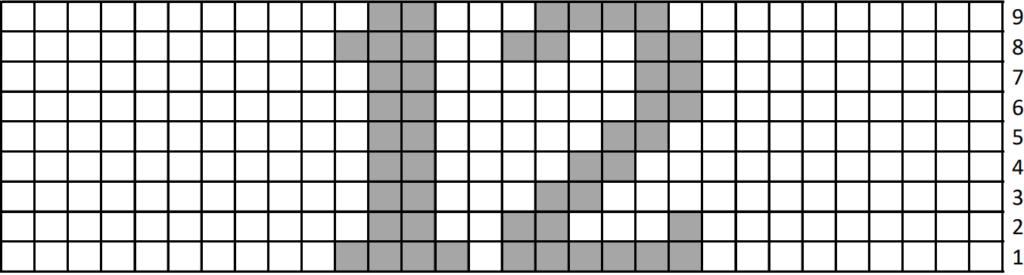
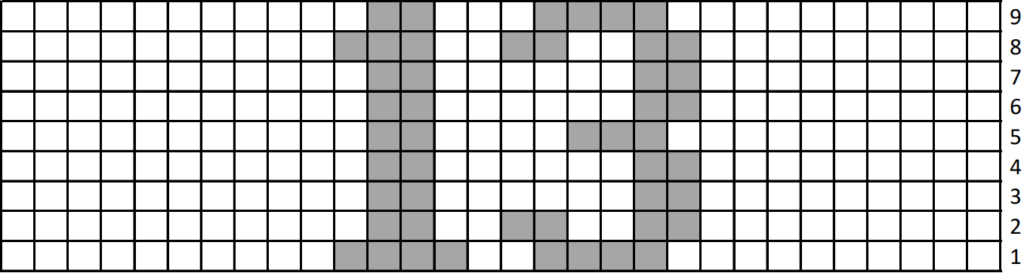
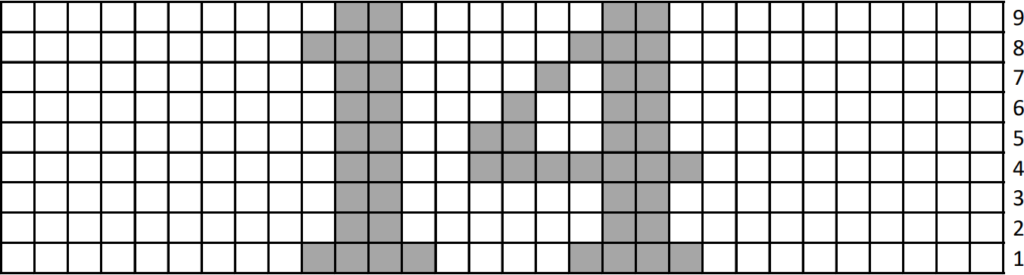
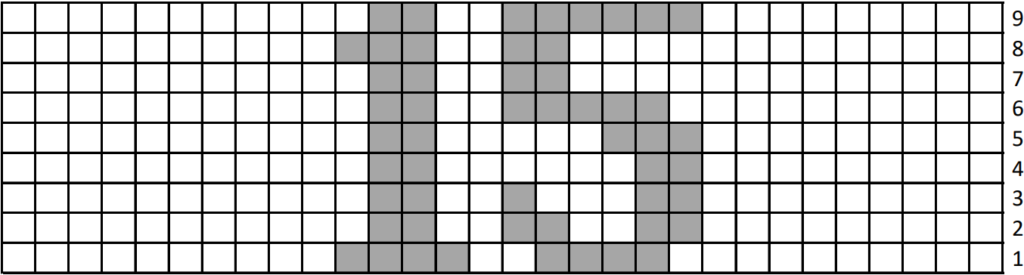
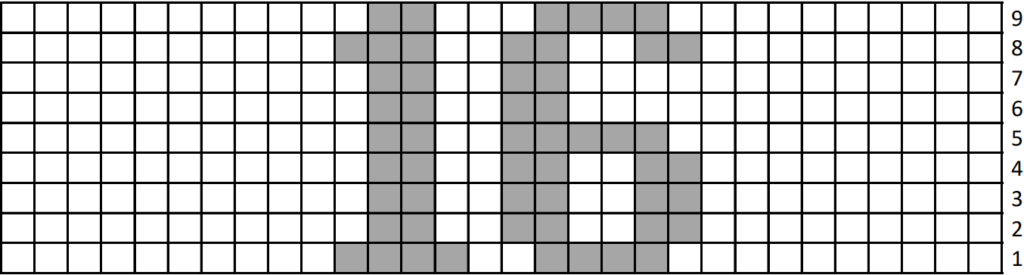
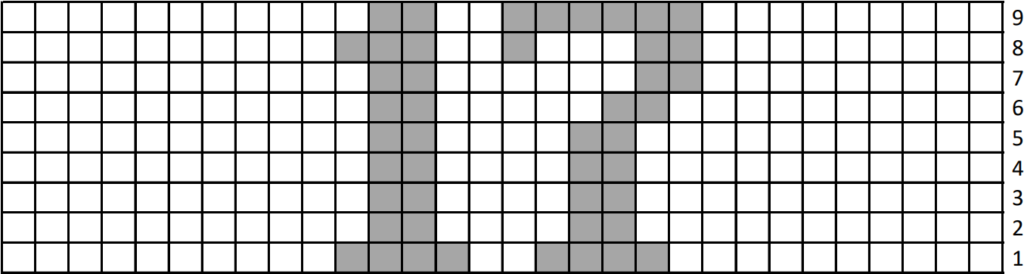
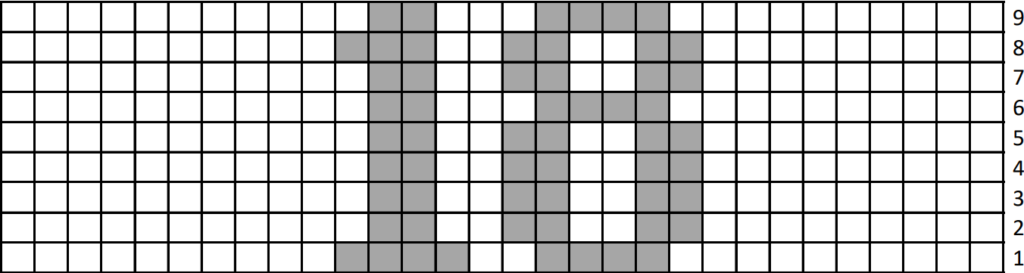
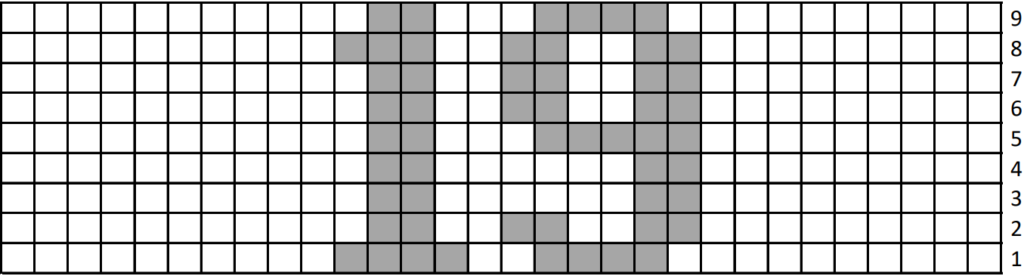
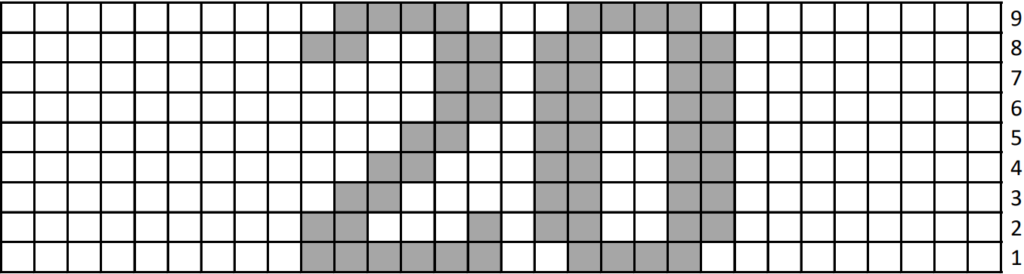
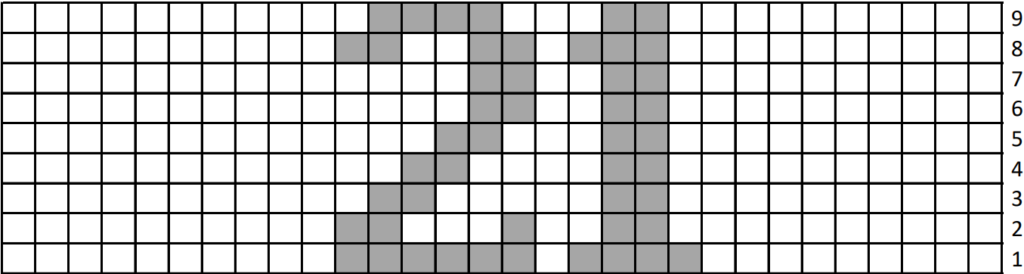
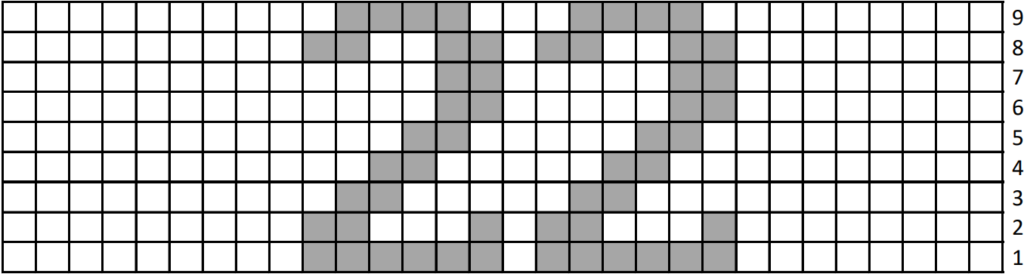
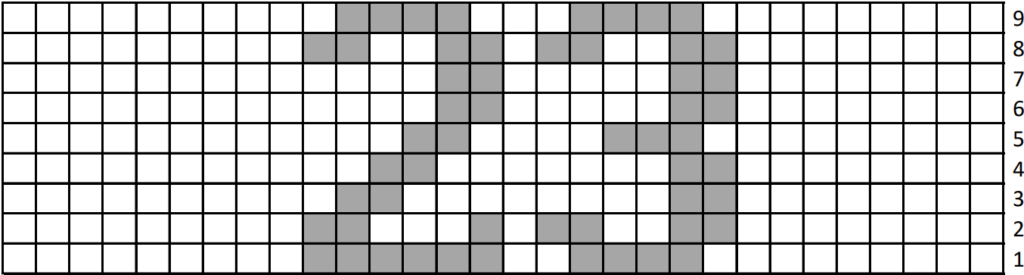
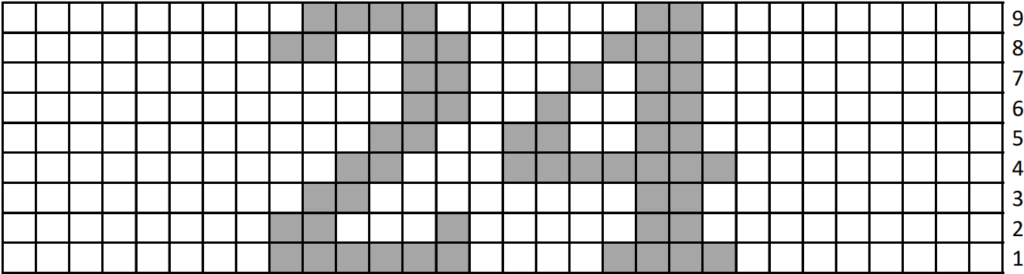
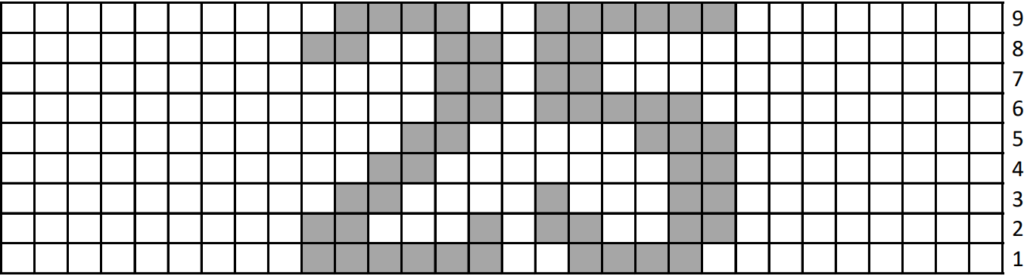
Now start working the chart for each date. There are 9 rows to each chart that make up rows 19-27 of the stocking.
You will stay with Color B until the last yarn over of the st before your first st in a new color. When completing the last st before a st of a different color, make the last yarn over before you complete the st in the new color. Then complete the stitch.
The charts are read bottom to top, right to left. The first stitch is shown in the bottom right-hand corner. If the box is white, it is a regular sc stitch in Color B. If the box is grey, it is a ssc stitch in Color C.
For example, the first row for stocking 1 is read as: sc in next 13 sts with Color B making sure to complete your last yarn over on the 13th st with Color C, ssc in next 4 sts with Color C making sure to complete your last yarn over on the 4th st with Color B, sc in next 13 sts with Color B.
You will carry the color you are not currently working with inside your stitches tapestry style (on a 3 color stocking you will carry 2 colors tapestry style for the entirety of the chart).

Once the chart is complete:
- using Color B, sc in each st around
- repeat row 28 changing to Color A on your final yarn over before you complete st 30
Cuff
- hdc in each st around
- [fpdc in next st, bpdc in next st], repeat [ to ] around
- repeat row 31, sl st to next st, fasten off and weave in end
Heel
The heel is worked in the round, around the opening we left on row 17. There are 15 lower stitches that were missed, and there are upper back bumps of the ch 15 that we single crocheted into on row 18 (so, a total of 30 sts). We are going to crochet around and around and close that opening nice and neat.
- Attach Color A to the 1st missed st from row 17, sc in the same st, sc in next 13 sts, sc2tog over the next 2 sts (the last st in the lower row you just worked and the first st from the upper backbump row), sc in the next 13 backbumps, sc2tog over the next 2 sts (the last backbump, and the first sc you worked when you started this row.
- sc in next 12 sts, sc3tog over next 3 sts in corner (the middle st of this should be your sc2tog from the last row), sc in next 11 sts, sc3tog over next 3 sts in corner (again, the middle st of this should be your sc2tog from the last row).
- sc in next 10 sts, sc3tog over corner, sc in next 9 sts, sc3tog over corner.
- sc in next 8 sts, sc3tog over corner, sc in next 7 sts, sc3tog over corner.
- sc in next 6 sts, sc3tog over corner, sc in next 5 sts, sc3tog over corner.
- sc2tog 6 times
Cut yarn and pull through loop. Using a yarn needle, insert the needle into the front loop of each st around the last row. Pull yarn gently to close the opening and weave in the tail.
Leather Loop
I love incorporating leather into projects, and I absolutely love Chicago screws. Though you absolutely do not have to use either one of these for your stockings, I really think they are a nice upgrade. Both the ½” wide leather stripping (72’ long) and the Chicago screws are available on Amazon. There are links for them below if you are interested.
You are welcome to make a loop to hang your stocking however you would like…leather, crochet, twine, ribbon…the possibilities really are endless.
Here’s what I did:
I cut the leather stripping into 2” pieces and then folded them in half length wise. Using a leather punch, I made holes through both layers of leather close to the cut ends (not up by the fold).
I positioned the loop (both layers of leather) on the outside of my stocking just under the first row of cuff. I wiggled the female end of the screw through the hole in the leather and then through the body of the stocking (I aimed to go through the middle of a single crochet so it was the smallest space possible…a little frustrating because it’s tight, but very secure because it’s tight). Then I attached the male end of the Chicago screw to the female end on the inside of the stocking.
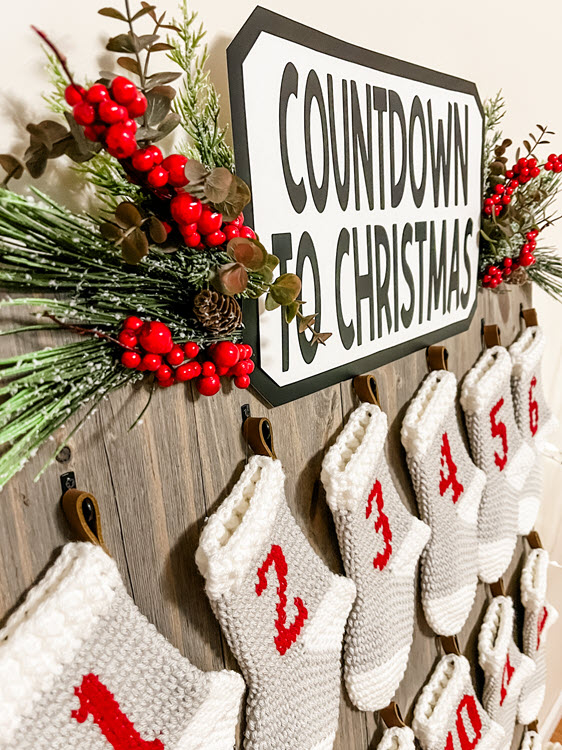
Hanging or Stringing
I really liked the idea of a hanging my stockings from a board that would then lean against the wall, so I went to the hardware store. I found a box of 8 shiplap boards that were 47.5” long and 5.5” wide. There were 8 boards in the box, but I only ended up using 5 of them. I took some scrap wood and short nails and attached the five boards together on the back by placing the scrap wood perpendicular to the shiplap boards in four places. Be careful not to use too long of nails otherwise they’ll go through to the front of your project.
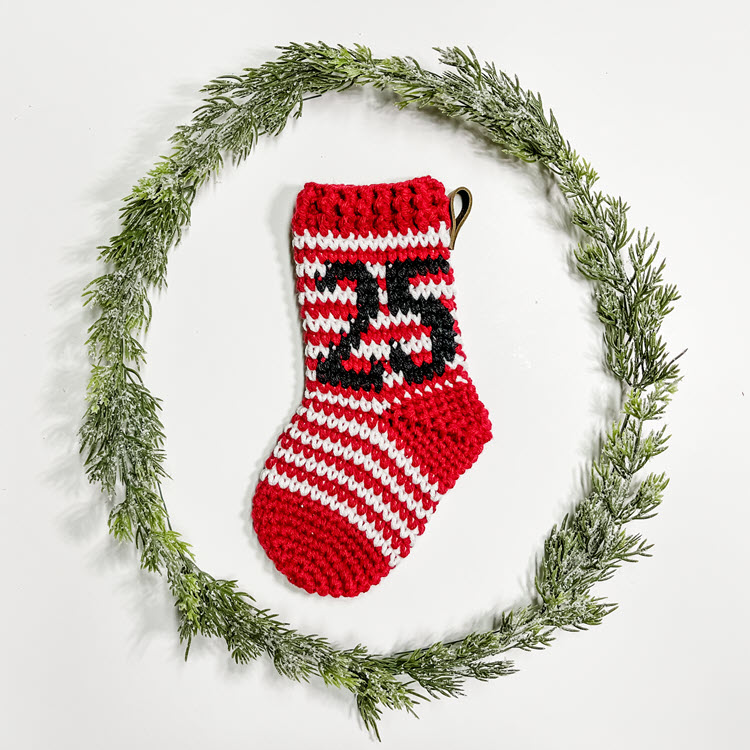
Then, I took some very small hooks that I found on Amazon (less than an inch long) and spaced them out in four rows of six. I found that the hooks needed to be 4.75” apart left to right, and the rows needed to be 11” apart up and down…this seemed to best display the stockings within the space and left a little room at the top for decorations. I did choose to forgo stocking number 25, first because it didn’t fit on the board quite right and second because the 25th advent gift is usually a little overshadowed in our house compared to everything else that’s going on Christmas Day. I did include 25 in the graphs though, and it can obviously be included in your advent if you choose. It also makes a very cute ornament or works great as a gift card holder.
Next, I made a sign out of vinyl and poster board with my Cricut for the top and decorated it with a glue gun and some holiday themed floral and berry sprays. You could certainly stencil it or buy premade letter stickers if you don’t have a Cricut. Or, just decorate it with some holiday themed decorations and sprays, maybe with a wood craft letter as a monogram…it’s dealers choice here!
Here are the links of the products I used to make this board. I do not get a kickback of any kind if you choose to purchase using these links, but I thought it would be helpful if everything was in one place!
Small black hooks from Amazon can be found here.
Leather stripping from Amazon can be found here.
Chicago screws from Amazon can be found here.
Box of barnwood boards (8 boards per box) from Menards can be found here (I do believe both Lowe’s and Home Depot also carry this product, or something very similar).
There is absolutely no reason you must do a board if you’d rather not. There are an endless number of possibilities for hanging these sweet little stockings.
They can be strung together with a crochet chain using leftover yarn…no need to purchase anything additional!
One idea I had that I would like to try and complete before my holiday season is to take a walk in the woods and find sticks in a variety of lengths. Taking twine, I would lay the sticks horizontal and tie them together in a pyramid (or, Christmas tree) shape and hang the stockings from the sticks.
I haven’t gotten this far yet but hope to find the time to try!
Whatever you choose, I hope you have a fabulous time exercising your creativity to make it truly yours!
As always, thank you SO MUCH for supporting a very small business and designer. I appreciate you more than you know!
I love feedback, positive or negative, and I certainly don’t get it right every time. If you have suggestions, criticism, or find anything that needs to be addressed in the pattern, PLEASE feel free to reach out via the Facebook Group below or email: jamie@brooklynhandcrafted.com
Happy Hooking!!
Blog: https://brooklynhandcrafted.com/
Facebook: https://www.facebook.com/groups/BrooklynHookersCrochetClub
Instagram: https://www.instagram.com/brooklynhandcrafted/ and don’t forget to tag me in your project pictures! @brooklynhandcrafted