As much as I love the heat and warmth of summer, autumn is my very favorite season. I live in Michigan, so the summers are fantastic, but with them comes some pretty heavy duty humidity. Autumn washes that away with crisp, fresh air while still keeping the abundant sunshine (most of the time). And we get some spectacular colors around here! I hope wherever you are in the world, you’re able to enjoy the show that Mother Nature puts on in Autumn.
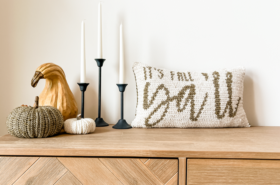
I wasn’t planning on releasing a pumpkin pattern this year. It wasn’t on my radar at all, in fact I had been working on a pillow pattern to release (which will still come out, next week), but I couldn’t stop playing around with stitch patterns and making pumpkins for personal use. It was almost an addiction…I couldn’t stop. I would sit down in the evening, knowing I had to record the video tutorial for the It’s Fall Ya’ll pillow, and at the end of the night I would have two more pumpkins instead.
So here we are.
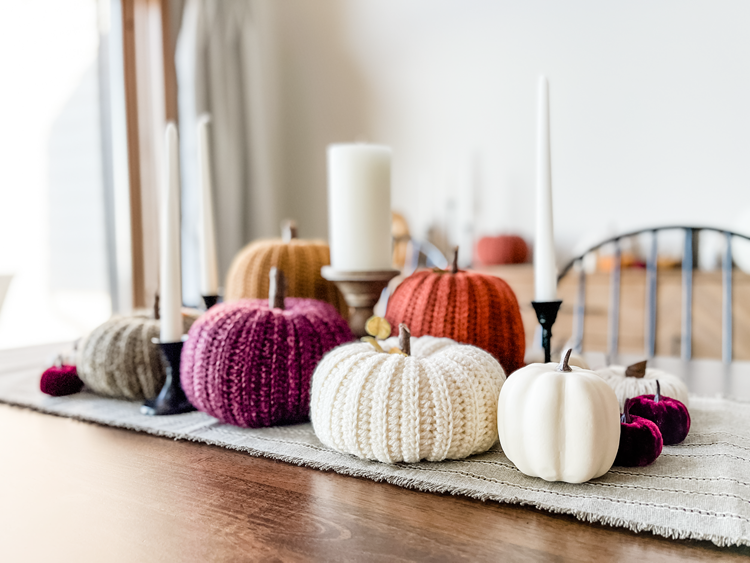
I absolutely love both of these patterns. I’m biased, yes, but I think you will too. I have gotten such great feedback on the ones I’ve given away, they make wonderful gifts!
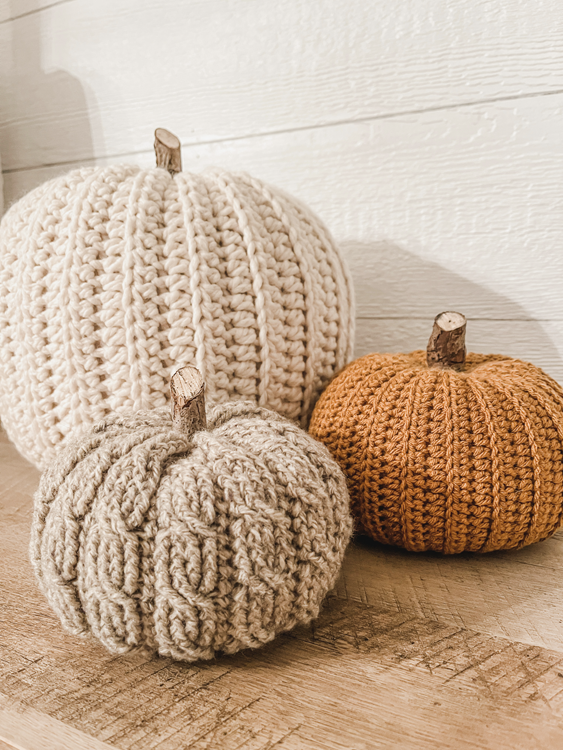
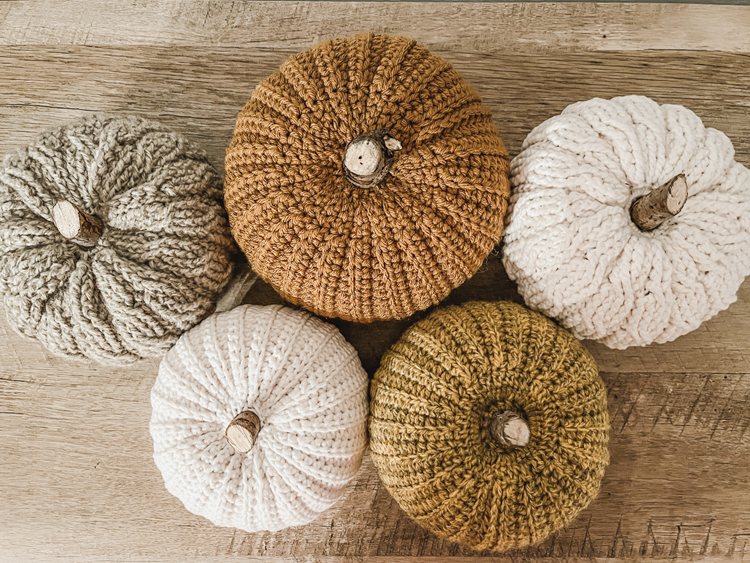
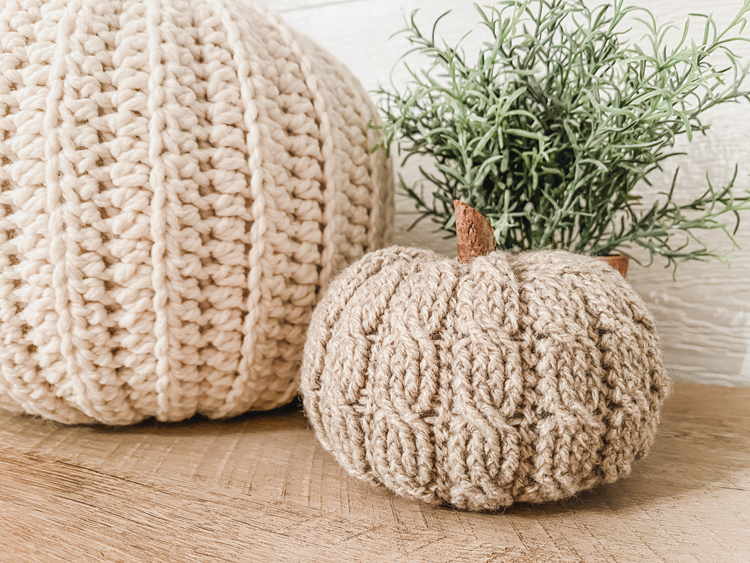
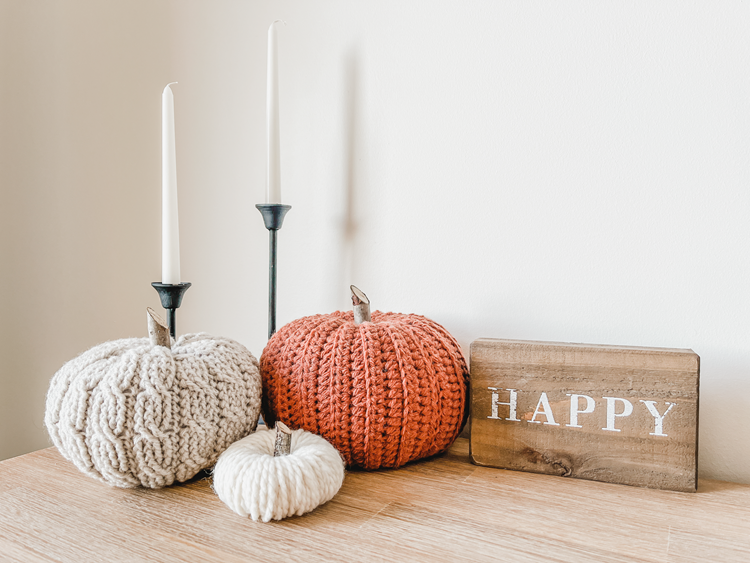
This Autumn Pumpkin Duo is a really fun way to dress your house for fall! The texture of both styles really lends a cozy, comfortable décor style to any room. The beautiful thing about these is you can use ANY yarn as long as you size your hook accordingly. Any fiber, any weight, any color yarn. It’s great! The bigger the yarn, the chunkier the pumpkin. Just be sure to grab a hook that’s 1.5mm SMALLER than your yarn calls for. Easy peasey!
Make them in loads of different colors to complement any environment and add a tree branch stem for a sweet and rustic finishing touch. I found they were pretty easy to complete in a short amount of time.
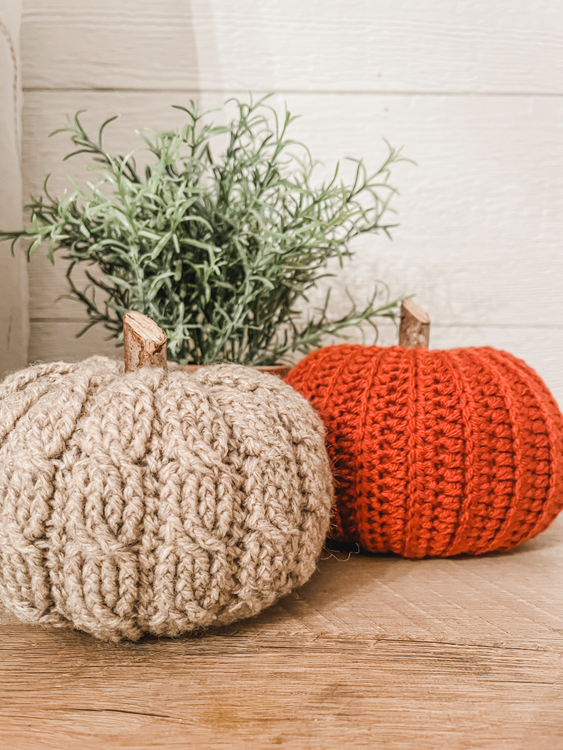
The Ribbed Pumpkin is made flat, seamed using a method that is virtually invisible, then cinched together at both ends and shaped.
The Cabled Pumpkin is made in the round, cinched together at both ends and shaped.
Tip: Using bulky yarn, like Lion Brand Wool Ease Thick and Quick, makes for an awesome big pumpkin! But, you may have a hard time (especially on the cabled pumpkin) getting the bottom to cinch together completely. It’s the bottom though, so no one will really see it!
There are two video tutorials for these pumpkins. The first will show how to seam the ribbed pumpkin, and also how to shape both pumpkins. It can be found here.
The second video is instruction on how to make cables for the cabled pumpkin. It can be found here.
Level:
-Ribbed Pumpkin – Confident Beginner
-Cabled Pumpkin – Intermediate
Terms:
-American Standard
Gauge:
-Varies depending on yarn used.
Finished Size:
-Varies depending on yarn used. Keep in mind the thickness of the yarn will determine the size of the pumpkin.
Hook Size:
-A hook 1.5mm smaller than the yarn you’re using calls for (ex: if the yarn calls for a 6mm hook, use a 4.5mm hook for this project).
Yarn:
-The best part of this project is you can use ANY yarn! Some that I really enjoyed working with for the ribbed pumpkin were Hobby Lobby “I Love This Yarn” and Lion Brand “Hue + Me”. One that I particularly loved for the cabled pumpkin was Bernat “Bundle Up”.
Other Materials You’ll Need:
-Scissors
-Yarn Needle
-Stitch Marker
-Long Tapestry Needle (mine is 10”)
-Short Tree Branch (or something similar)
-Hand Saw (for cutting the tree branch)
-Glue Gun
Abbreviations:
-sc = single crochet
-sl st = slip stitch
-st = stitch (sts = stitches)
-blo = back loop only
-sk = skip
-ch = chain
-hdc = half double crochet
-fpdc = front post double crochet
-fpdc2tog = front post double crochet 2 sts together
-fptc = front post treble crochet
Special Notes:
-For the cabled pumpkin, if you have not done cables before it can feel and look wrong to “twist” your front post double crochets behind one another. Just take it one step at a time, one stitch at a time, and I promise it will all look fantastic in the end!
The PDF pattern for the Autumn Pumpkin Duo can be purchased on Etsy here or Ravelry here.
Also, make sure to join our Brooklyn Hookers Crochet Group on Facebook. There’s always a code in that group when I release a new pattern…a free download of the PDF pattern through Ravelry. It’s only good for a limited time so make sure to join the group and not miss out on that. You can find the group page here.
The Ribbed Pumpkin Pattern
Foundation Row: Leaving a long 12” tail, ch 31
- (stitch in the back bumps for this row) sc in 2nd ch from hook, hdc in next 25 sts, sc in next 2 sts, sl st in next 2 sts, ch 1, turn
- sl st blo in first 2 sts, sc blo in next 2 sts, hdc blo in next 25 sts, sc in last st, ch 1, turn
- sc in first st, hdc blo in next 25 sts, sc blo in next 2 sts, sl st blow in next 2 sts, ch 1, turn
- repeat row 2
- repeat row 3
- repeat row 2
- repeat row 3
Carry on repeating rows 2 and 3 just like this for a total of 43 rows. You will end row 43 at the top of the pumpkin (the same end your long starting tail is at). Cut a 3 yard tail and pull it through the loop that is left on your hook.
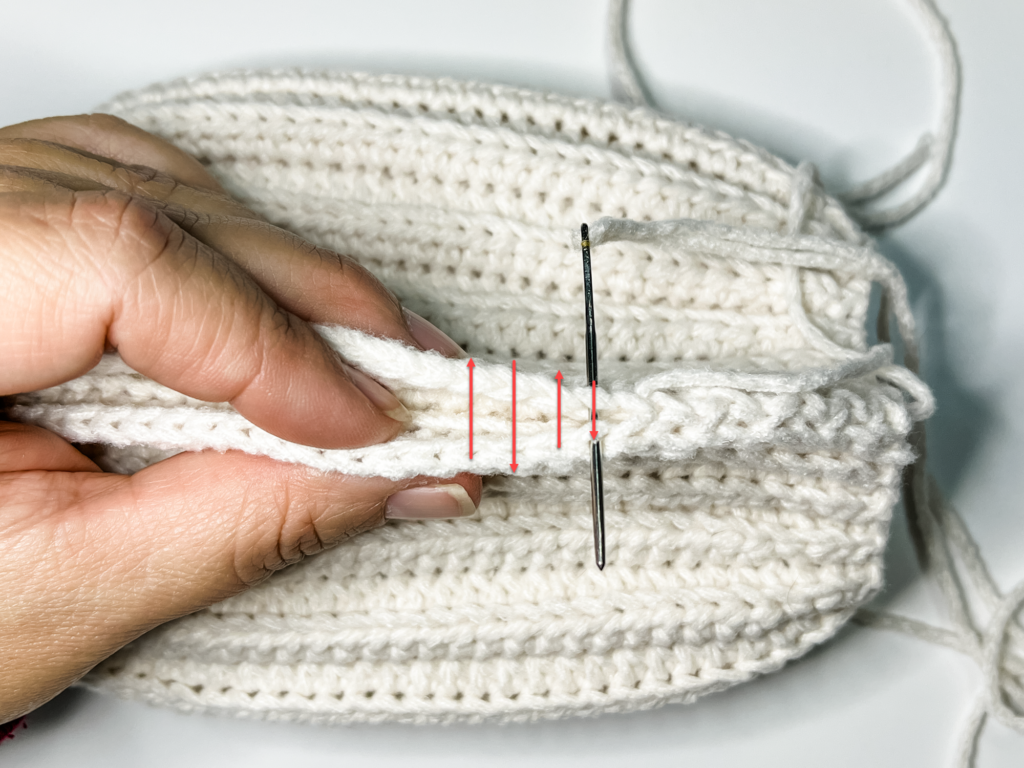
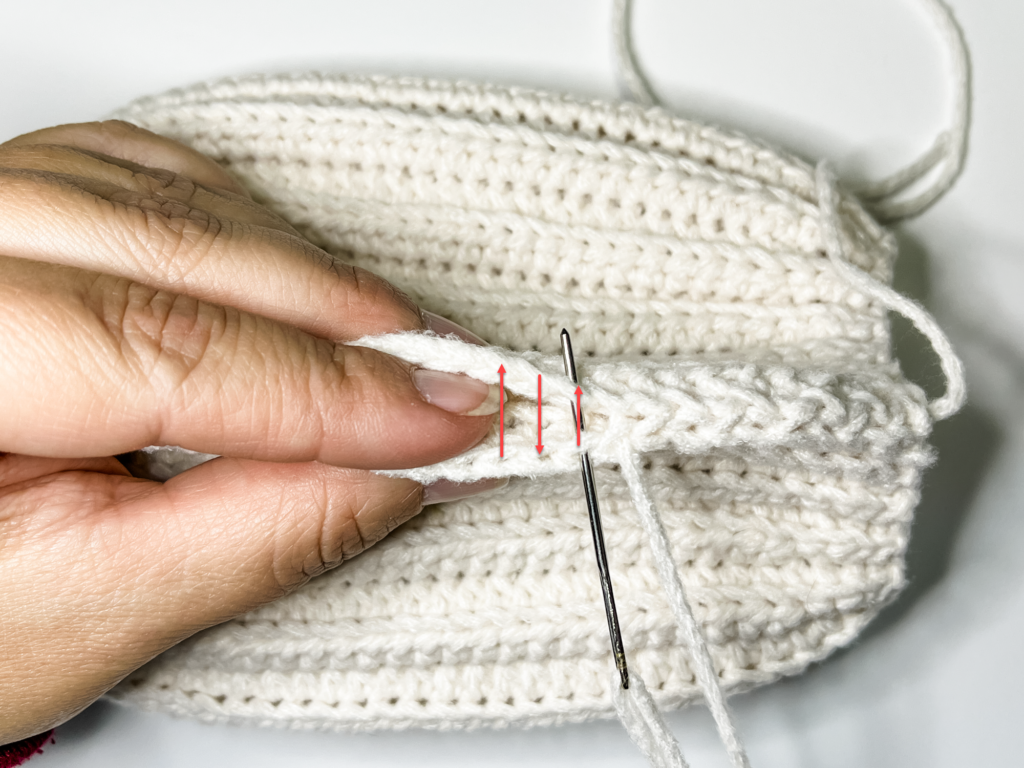
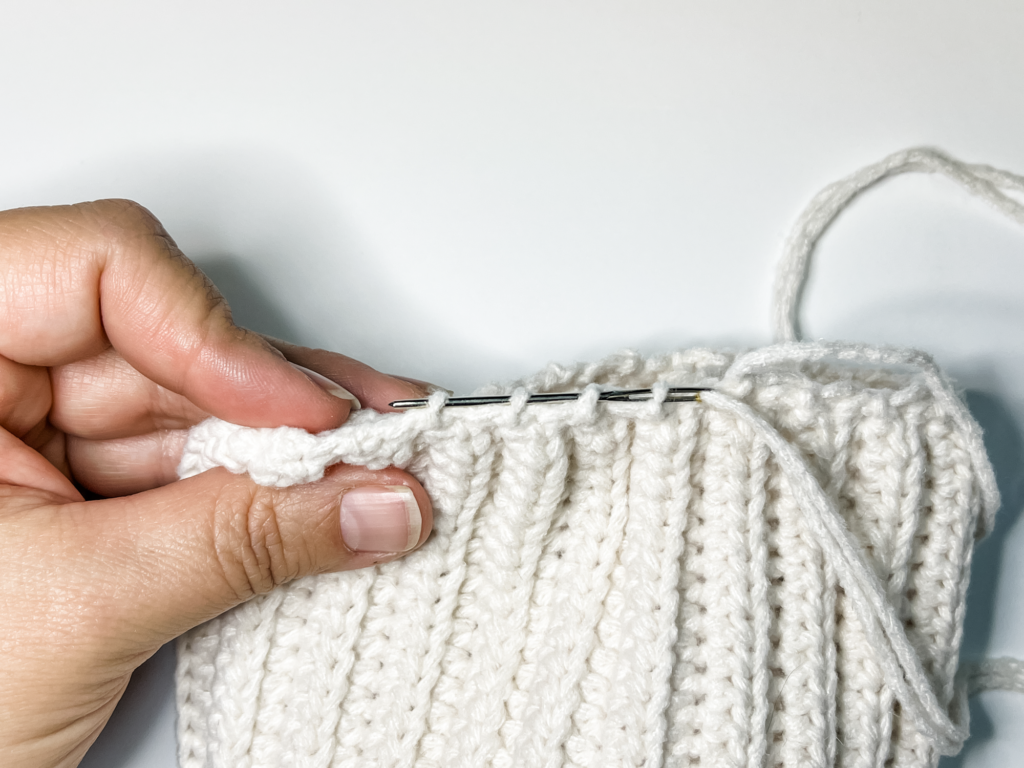
Seaming Row: Hold the two edges together, one on top of the other with the top of the pumpkin to your right, to seam them together. Since we used the back bumps for row one, there should be a line of what look like normal crochet stitches on both edges.
Thread your yarn needle on to your 3 yard tail. Using the back loops (which will be the upper loops when looking at it) of the stitches in both rows, stitch the two edges together by inserting the needle first from the top edge back loop down through the bottom edge back loop. Then, moving over to the next stitches, up through the bottom edge back loop and then the top edge back loop. You’ll continue like that, alternating up, then down, through all the back loops in the rows down to the bottom of the pumpkin.
Once you are down to the bottom, grab the very ends of both edges with the needle, run the yarn through and tie a knot. Do not cut the yarn, we aren’t done with it!
Remove your yarn needle from the 3 yard tail and thread it on to your long 12” starting tail at the top of the pumpkin. Whip stitch into every other stitch all the way around the top edge. Pull it somewhat tight, but not completely. Insert your tree branch stem into the remaining opening and pull your tail tight so the opening closes around the stem. Note: If you are using a yarn that breaks easily, be careful how tightly you pull when you’re doing this!
Secure your tail with a knot, weave in a bit of the end, cut the remainder and set your yarn needle aside.
Take your glue gun and, working inside of the pumpkin so you won’t see it, run a thick line of hot glue around the stem where it meets the yarn to keep it in place. Let it completely dry for a few minutes until you move on, otherwise it will move and create a hot glue mess (yes, I know this from experience).
Now we need to get the bottom of the pumpkin ready for stuffing and closure.
Thread your yarn needle back on your long 3 yard tail. Grab a single loop at the end of every “rib” along the bottom of the pumpkin all the way around back to where you started.
Stuff your pumpkin nice and plump, but not too much that it hinders the ability to cinch it closed.
Pull your yarn tail to cinch the bottom closed (be careful here, if your yarn tends to break easily you’re going to want to take care not to put too much tension on it). Run the yarn around the closure a couple times to secure it and then tie two sturdy knots. Set your yarn needle aside, but do not cut your yarn yet…we still aren’t done with it!
Now we’ll shape the pumpkin.
We are going to run yarn up and down through the middle of our pumpkin around the stem, pulling it just a little tight each time. This will pull the center of the top and bottom of the pumpkin inward, giving it that pumpkin-y shape. It’s good to make 10 to 12 passes around the stem to ensure that it looks uniform, and not lumpy (there is a nice visual tutorial on this in the video if you think it may be helpful).
Thread a long tapestry needle on your long 3 yard tail at the bottom of your pumpkin. Insert the tapestry needle near the cinched closure on the bottom of your pumpkin. Run it through the center and out the top in approximately the same location next to the stem. Pull just a little on the yarn. Re-insert the tapestry needle in the top of the pumpkin 1 stitch away and run it through the center. Bring it up alongside the bottom cinched closure a little ways around from where your first pass was. Pull just a little on the yarn. Insert needle back into the bottom of the pumpkin just a few stitches away from where you came out (but not too far that you are leaving a visible line of yarn) and repeat the process coming out near the stem 3 or 4 stitches past where you last worked. Pull just a little on the yarn.
You should start to see the shaping taking place.
Continue doing this same thing 10-12 times around the stem at the top and the cinched closure at the bottom.
Make sure you end up at the bottom of the pumpkin on your last pass. Tie a couple knots at the bottom, weave in some of your end and cut off the rest.
Voila! A perfectly sweet ribbed pumpkin!
The Cabled Pumpkin Pattern
Foundation Row: Leaving a long 12” tail, ch 81
- hdc in 2nd ch from hook and in ea st across to the end (80 sts here and throughout)
Without twisting it, we are going to attach the two ends of the foundation row together so we can begin working in the round. Bring the opposite end of your work (where you started your first hdc at) around to the left side of the last hdc st you just made. Your first hdc that you made should now be sitting just to the left of the last hdc you just made when you ended the row. You will make the first st of the next row in that first hdc you made in row 1…this will attach the two ends together. We will then start adding rows and working “up” to make a cylinder. If you’d like, you can mark the first st of row 2 with a stitch marker so you always know where your first st of the row will be. It should be fairly easy to see once you get the hang of it.
- sc in first hdc from row 1, fpdc in next 4 sts, [ sc in next st, fpdc in next 4 sts ], repeat [ to ] all the way around back to where you started
- repeat row 2
- repeat row 2
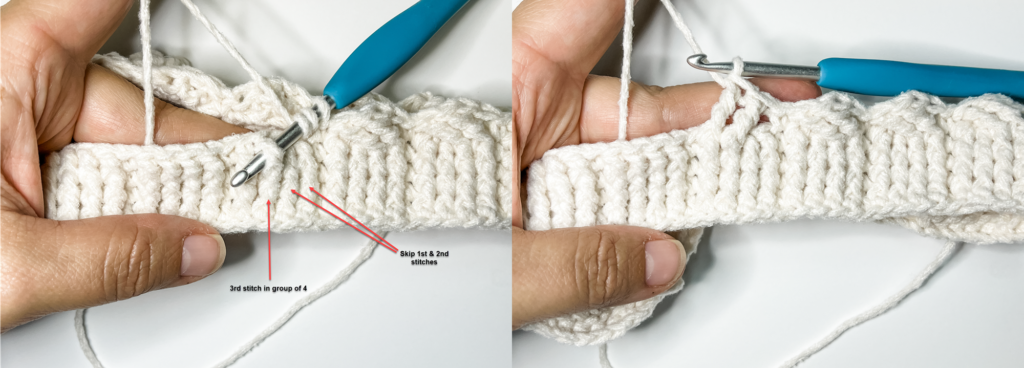
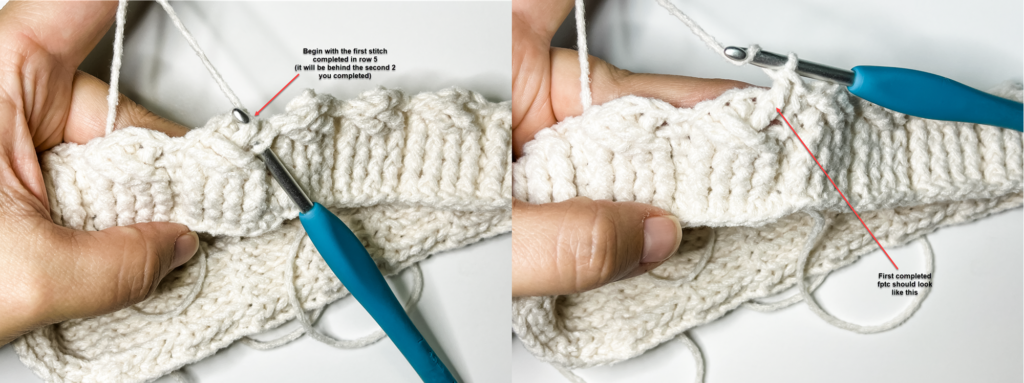
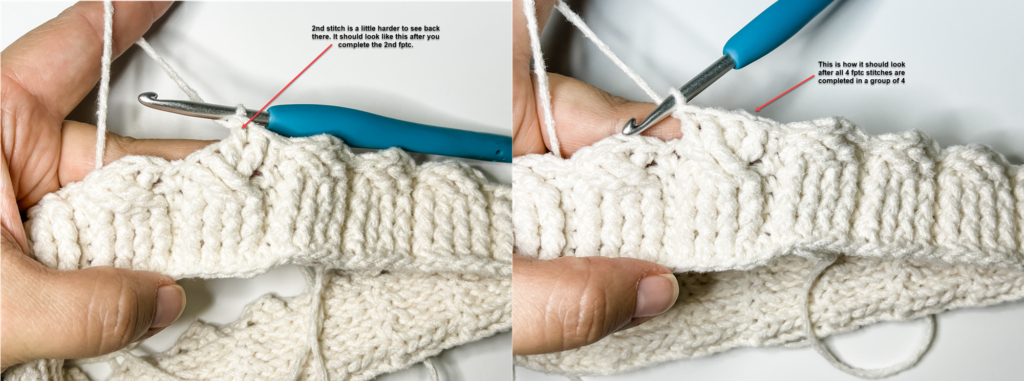
- We will make the “twist” for the cables in this round…it feels weird, and it will look a little funny for this row, but that’s ok! sc in first st, sk 2 sts and fptc in next 2 sts, then working IN FRONT of the 2 fptcs you just made, return to the skipped 2 sts and fptc in 2 the 2 skipped sts (these 2 will cross over, or be “on top of” the first 2 you made), [ sc in next st, sk 2 sts and fptc in next 2 sts, then working IN FRONT of the 2 fptcs you just made, return to the skipped 2 sts and fptc in 2 the 2 skipped sts ], repeat [ to ] all the way around back to where you started
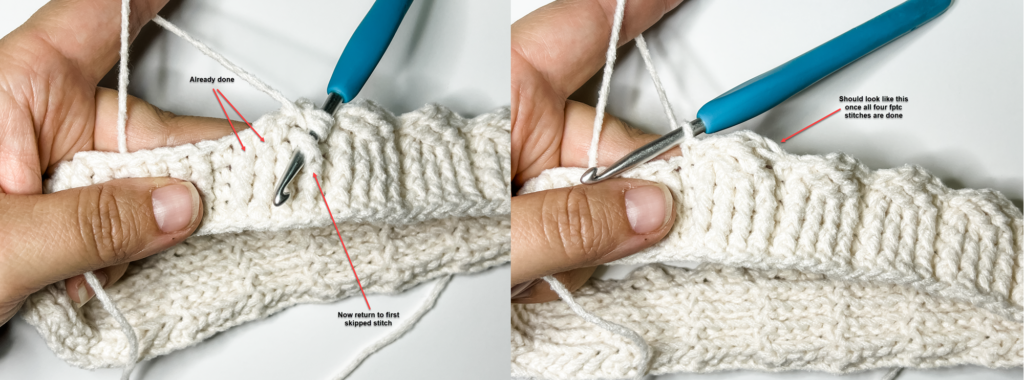
- repeat row 2 (when you are making your 4 fpdc sts, you will make the first 2 into the first 2 fptc sts you made…they are “behind” the second 2 fptc you made)
- repeat row 2
- repeat row 2
- repeat row 5
- repeat row 2
- repeat row 2
- repeat row 2
- repeat row 5
- repeat row 2
- repeat row 2
- repeat row 2
- repeat row 5
- repeat row 2
- repeat row 2
- repeat row 2
- repeat row 5
- repeat row 2
- repeat row 2
- repeat row 2
- sc in first st, fpdc2tog over next 2 sts twice, sc in next st, fpdc2tog over next 2 sts twice ], repeat [ to ] all the way around back to where you started
Cut a 3 yard tail and pull it through the loop that is left on your hook. This is the top of your pumpkin.
The body of your pumpkin is complete. We will cinch together the top first, making sure to leave enough of an opening for our tree branch stem. Then we’ll stuff the pumpkin and cinch together the bottom.
Use a yarn needle and your 3 yard tail to whip stitch into every other stitch all the way around the final round (row 25). Pull it somewhat tight, but not completely. Insert your tree branch stem into the remaining opening and pull your tail tight so the opening closes around the stem (if you are using a yarn that breaks easily, be careful how tightly you pull when you’re doing this).
Secure your tail with a knot, remove your yarn needle from the tail and set it aside. Do not cut the tail, we aren’t done with it yet!
Take your glue gun and, working inside of the pumpkin so you won’t see it, run a thick line of hot glue around the stem where it meets the yarn to keep it in place. Let it completely dry for a few minutes until you move on, otherwise it will move and create a hot glue mess (yes, I know this from experience).
When the hot glue is dry, stuff your pumpkin from the bottom. The cabled pumpkin doesn’t need quite as much stuffing as the ribbed pumpkin, just enough to give it shape.
Thread your yarn needle on to your 12” tail on the bottom of the pumpkin (the end you just stuffed) and whip stitch into every other stitch all the way around the bottom row of stitches (this was the foundation row). Cinch it tight (again, be careful if your yarn breaks easily) and tie a couple knots to secure. Weave in some of the tail and cut the excess off.

Now we’ll shape the pumpkin. The process is identical to the ribbed pumpkin.
We are going to run yarn up and down through the middle of our pumpkin around the stem, pulling it a little tight each time. This will pull the center of the top and bottom of the pumpkin inward, giving it that pumpkin-y shape. It’s good to make 10 to 12 passes to ensure that it looks uniform, and not lumpy around the stem (there is a nice visual tutorial on this in the video if you think it may be helpful).
Thread a long tapestry needle on to your long tail at the top of your pumpkin. Insert the tapestry needle near the stem of your pumpkin. Run it through the center and out the bottom in approximately the same location from the cinched closure. Pull just a little on the yarn. Re-insert the tapestry needle in the bottom of the pumpkin (just far enough away to grab some yarn, but not too far that you are leaving a visible line of yarn) and run in through the center. Bring it up alongside the stem 3 or 4 stitches around from where your first pass was. Pull just a little on the yarn.
You should start to see the shaping taking place.
Continue doing this same thing 10-12 times around the stem.
Make sure you end up at the bottom of the pumpkin on your last pass. Tie a couple knots at the bottom, weave in some of your end and cut off the rest.
Voila! A beautifully textured cabled pumpkin!
Thank you SO MUCH for supporting a very small business and designer. I appreciate each and every one of you more than you know! I hope you get as addicted to making these pumpkins as I did!
I love feedback, positive or negative, and I certainly don’t get it right every time. If you have suggestions, criticism, or find anything that needs to be addressed in the pattern, PLEASE feel free to reach out via the Facebook Group below or email: jamie@brooklynhandcrafted.com
Happy Hooking!!
Facebook: https://www.facebook.com/groups/BrooklynHookersCrochetClub
Instagram: https://www.instagram.com/brooklynhandcrafted/ and don’t forget to tag me in your project pictures! @brooklynhandcrafted