
Week 7 is here! And we are less than 2 weeks away from the holiday! Wow…that almost puts me into panic mode. It doesn’t seem to matter how much I prepare, Christmas always manages to sneak up on me. I have most of my shopping done, but not a single thing is wrapped. And baking? Yeah right….probably not going to happen this year!
There is, however, always time for more crochet! So here is week 7’s pattern, the Christmas Gnome.
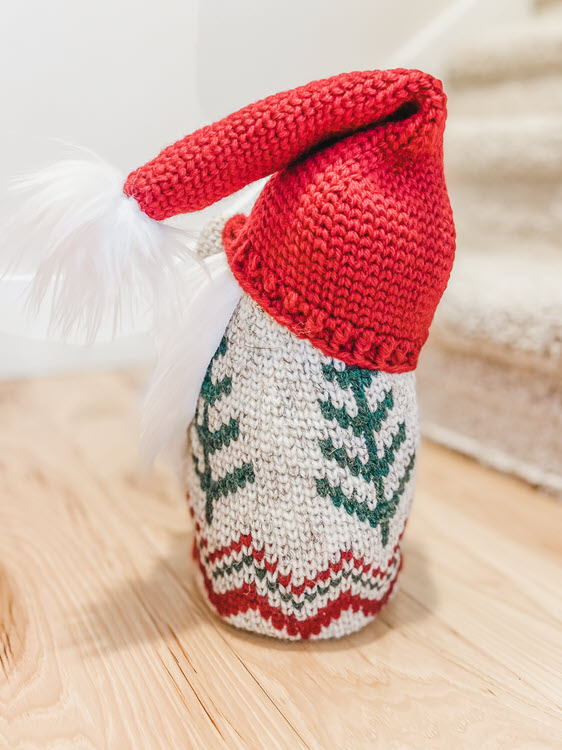
The Christmas Gnome is excellent as a decoration, but also functions as a perfect doorstop if you fill a plastic bag with sand and put it in the bottom of his body prior to stuffing him. He has a cute floppy hat that you can position any way you want to give him a little extra personality. Gauge isn’t terribly important, but you want to make sure your tension is consistent throughout the piece so you have nice symmetrical edges along the body.
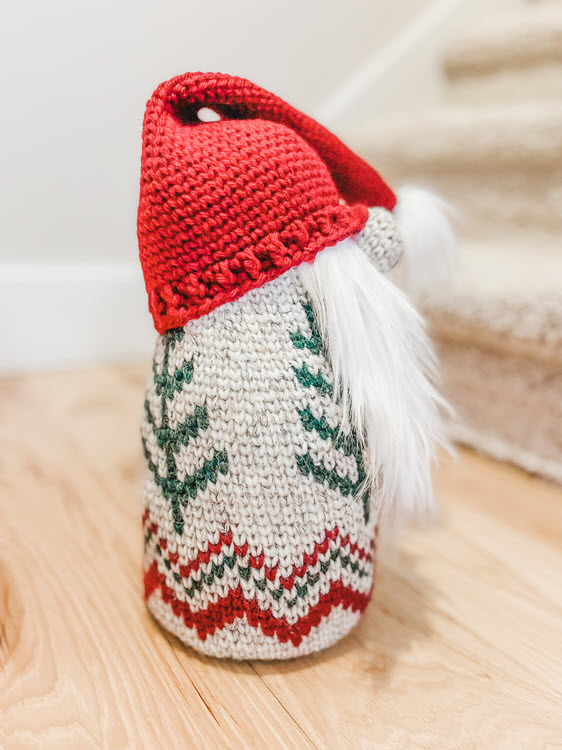
The pattern starts with a magic circle and works in the round, increasing for the first 10 rounds to make a flat base. Then, continuing to work in the round, you’ll start working the chart. The chart is read from right to left and from top to bottom. The first 25 rows of the chart are all 64 stitches long. Then you will begin decreasing 4 times per round to taper his body up to the head area. Next, we’ll make his nose and his hat as separate pieces. You’ll add some fur and sew on the hat and nose, then finish him off with a small fur pom pom on the tip of his hat.
Level:
-Confident Beginner/Intermediate
Terms:
-American Standard
Gauge:
-15 ssc sts in a row is approx. 4”
Finished Size:
-12” tall by 6” wide (with hat folded over)
Hook Size:
-5.5mm (I) hook
Yarn:
-Lion Brand Wool Ease, 3oz = 197 yards/180 meters
1 ball each in: Wheat, Cranberry and Forest Green Heather (a very small amount of Forest Green Heather…you could use scrap worsted weight if you had it in a dark green color)
Other Materials You’ll Need:
-Scissors
-Yarn Needle
-Stitch Marker (optional, for the beginning of each row)
-Faux Fur (approx. 4” x 10”)
-Sewing Needle
-Thread
-Polyfil Stuffing
-plastic bag and sand (optional if you want to use him as a doorstop)
Abbreviations:
-mc = magic circle
-sc = single crochet
-ssc = split single crochet
-ssc2tog = split single crochet 2 stitches together (decrease stitch)
-sl st = slip stitch
-st = stitch (sts = stitches)
-dc = double crochet
-fpdc = front post double crochet
Special Stitches:
–-split single crochet (ssc): instead of using the top two loops of the stitch, insert hook lower into the body of each stitch, i.e. the center of the two vertical threads that make the “V” of the stitch, yarn over, pull back through the “V”, yarn over and pull through both loops on hook.
-split single crochet 2 stitches together (ssc2tog): this is a decrease stitch…it takes 2 stitches and turns them into 1 stitch. Insert hook into center of the “V” of the stitch, yarn over, pull back through the “V”, insert hook into center of the “V” of the NEXT stitch also, yarn over, pull back through, yarn over and pull through 3 loops on hook.
The PDF pattern for this stocking can be purchased on Etsy here or Ravelry here.
Also, make sure to join our Brooklyn Hookers Crochet Group on Facebook. There’s always a code in that group when I release a new pattern…a free download of the PDF pattern through Ravelry. It’s only good for a limited time so make sure to join the group and not miss out on that. You can find the group page here.
The Base
*Note: you may want to place a stitch marker at the beginning of each row to easier keep count.
Make 6 sc in a mc and gently tighten.
- 2 ssc in each st around (12)
- [ 2 ssc in next st, 1 ssc in next st ], repeat 6 times (18)
- [ 2 ssc in next st, 1 ssc in next 2 sts ], repeat 6 times (24)
- [ 2 ssc in next st, 1 ssc in next 3 sts ], repeat 6 times (30)
- [ 2 ssc in next st, 1 ssc in next 4 sts ], repeat 6 times (36)
- [ 2 ssc in next st, 1 ssc in next 5 sts ], repeat 6 times (42)
- [ 2 ssc in next st, 1 ssc in next 6 sts ], repeat 6 times (48)
- [ 2 ssc in next st, 1 ssc in next 7 sts ], repeat 6 times (54)
- [ 2 ssc in next st, 1 ssc in next 8 sts ], repeat 6 times (60)
*The repeat in the next round is different than the last 9 rounds.
- [ 2 ssc in next st, 1 ssc in next 14 sts ], repeat 4 times (64)
- ssc in each st around (64)
The Body
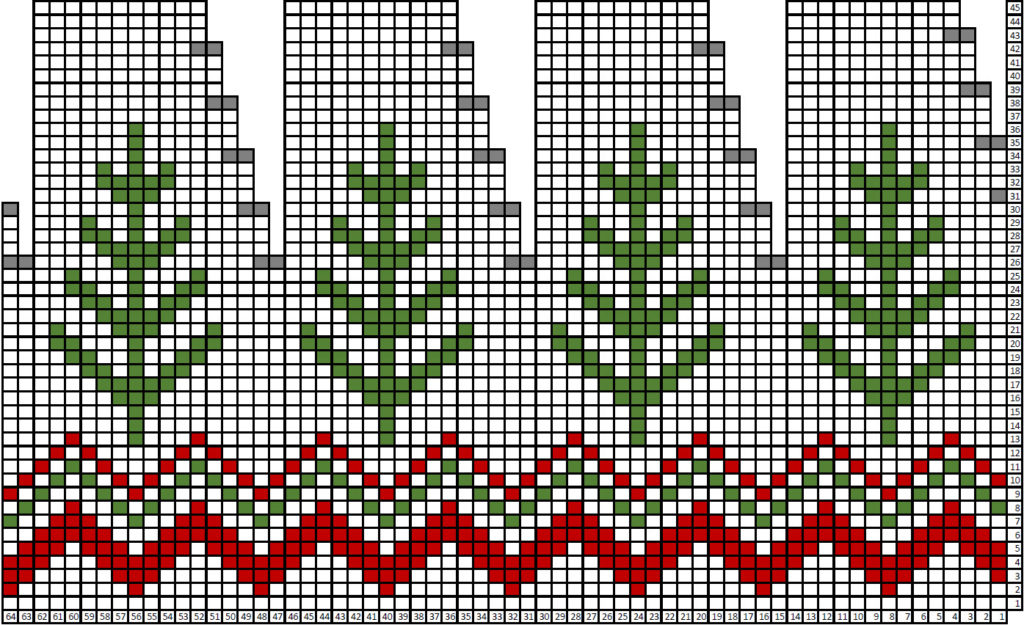
Now we will begin to work the chart.
The chart is read from right to left and from bottom to top. You will work row 1 first from right to left. Then, at the end of row 1, you will come back and start row 2 and work it from right to left.
When you get to row 26 you will notice the chart begins to change. This is where our decreases begin. The 2 connected dark grey boxes are to be worked as a ssc2tog. This will gently taper our gnome’s body up to his head. On the chart you will see white open spaces in front of decrease stitches. This is to account for the missing stitches that we are decrease. You can ignore the white space, carry on to the next box in that row and perform the stitch it calls for.
For example, row 34 can be read as: ssc using Wheat in the next 7 sts, change to Forest Green Heather and ssc in the next st, change to Wheat and ssc in the next 6 sts, ssc2tog over the next 2 sts, ssc in the next 5 sts, change to Forest Green and ssc in the next st, change to Wheat and ssc in the next 6 sts, ssc2tog over the next 2 sts, ssc in the next 5 sts, change to Forest Green and ssc in the next st, change to Wheat and ssc in the next 6 sts, ssc in the next 5 sts, change to Forest Green and ssc in the next st, change to Wheat and ssc in the next 6 sts
You simply move right past any white space and go to the next square in the chart.
When you have completed the chart, sl st to the next st.
Fasten off and weave in ends.
The Nose
Using Wheat, make 6 sc in mc and gently tighten.
- 2 ssc in ea st around (12)
- [ 2 ssc in next st, ssc in next st ], repeat 6 times (18)
- ssc in each st around (18)
- ssc in each st around (18)
- ssc in each st around (18)
- ssc2tog 9 times (9)
sl st in next st.
Cut a 12” tail of yarn and pull up through your loop.
Tuck a small ball of Polyfil stuffing into your nose.
Using a darning needle, run yarn tail through the front loop of all sts. Pull tight to close the hole.
Fasten off and weave in ends.
The Hat
Using Cranberry, make 6 sc in mc and gently tighten.
- 2 ssc in each st around (12)
- ssc in each st around (12)
- ssc in each st around (12)
- ssc in each st around (12)
- [ 2 ssc in next st, ssc in next 3 sts ], repeat 2 times (15)
- ssc in each st around (15)
- ssc in each st around (15)
- ssc in each st around (15)
- ssc in each st around (15)
- ssc in each st around (15)
- ssc in each st around (15)
- ssc in each st around (15)
- ssc in each st around (15)
- [ 2 ssc in next st, ssc in next 4 sts ], repeat 2 times (18)
- ssc in each st around (18)
- ssc in each st around (18)
- ssc in each st around (18)
- ssc in each st around (18)
- ssc in each st around (18)
- ssc in each st around (18)
- ssc in each st around (18)
- ssc in each st around (18)
- [ 2 ssc in next st, ssc in next 5 sts ], repeat 2 times (21)
- ssc in each st around (21)
- ssc in each st around (21)
- ssc in each st around (21)
- ssc in each st around (21)
- ssc in each st around (21)
- ssc in each st around (21)
- ssc in each st around (21)
- ssc in each st around (21)
- [ 2 ssc in next st, ssc in next 6 sts ], repeat 2 times (24)
- ssc in each st around (24)
- ssc in each st around (24)
- ssc in each st around (24)
- ssc in each st around (24)
- ssc in each st around (24)
- ssc in each st around (24)
- [ 2 ssc in next st, ssc in next 5 sts ], repeat 3 times (28)
- [ 2 ssc in next st, ssc in next 6 sts ], repeat 3 times (32)
- [ 2 ssc in next st, ssc in next 7 sts ], repeat 3 times (36)
- [ 2 ssc in next st, ssc in next 8 sts ], repeat 3 times (40)
- [ 2 ssc in next st, ssc in next 9 sts ], repeat 3 times (44)
- [ 2 ssc in next st, ssc in next 10 sts ], repeat 3 times (48)
- [ 2 ssc in next st, ssc in next 11 sts ], repeat 3 times (52) **Yes, it will look like a square at this point**
- ssc in each st around (52 here and throughout the remainder of the hat)
- ssc in each st around
- ssc in each st around
- ssc in each st around
- ssc in each st around
- ssc in each st around
- ssc in each st around
- ssc in each st around
- ssc in each st around
- ssc in each st around
- [ dc in next st, sc in next st ], repeat around
- [ 1 fpdc in next st, sc in next st ], repeat around
sl st to next st, fasten off and weave in ends.
The Faux Fur
You now want to cut your faux fur. You will need some for the beard and some for the pom pom. The graphic below shows the approximate dimensions to cut. It’s important to cut the faux fur with the nap running downward that way the beard and the pigtails look like real hair.
Helpful hint for cutting faux fur: turn it over and use an exacto knife or a razor blade to score the fabric only. This will leave all the fur intact for a nice shaggy look rather than a straight cut edge.

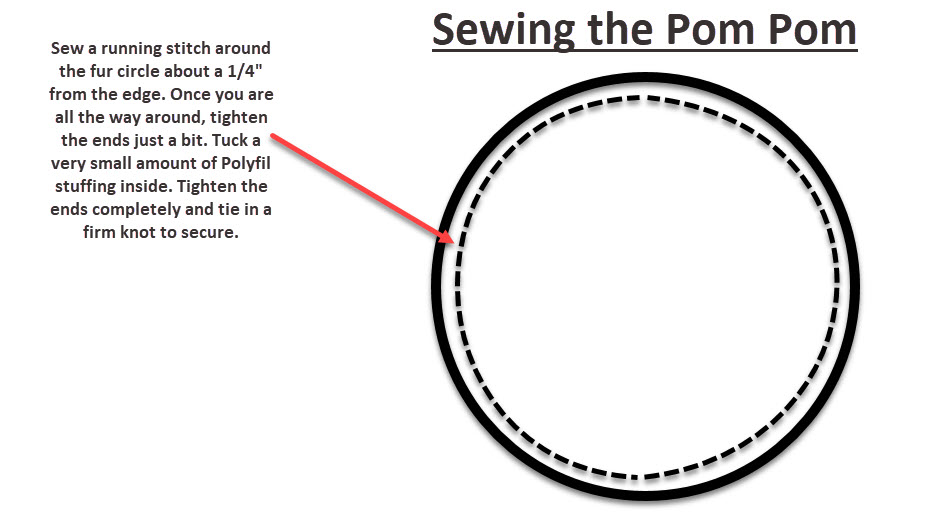
Now, you will want to make your faux fur circle into a pom pom.
See the graphic below for instructions.
The Construction
Now, the fun part! Bringing him (or her) together!
First, you are going to stuff the body. If you would like to use your gnome as a doorstop, fill a plastic bag with a very generous amount of sand to weight it so it will hold a door open. You can skip this step if your gnome is just a decoration.
Stuff the body with Polyfil stuffing. Take care to smooth it out around the edges by taking your fingertips and running them down the inside between the stuffing and the side. This will help him not be lumpy.
Now you will stuff the hat. Take a baseball size amount of Polyfil and form a ball with it like you would make a snowball. Try and really work it together into a nice round shape. Now place your ball inside the fat part of the hat.
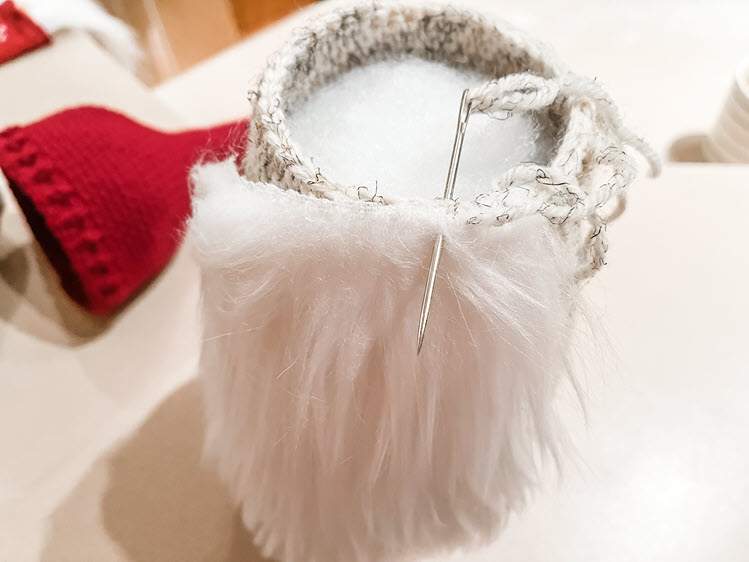
Next, you will sew the beard onto the body. Using a darning needle and Wheat colored yarn, whip stitch the beard to the top row of the body.
Now we are ready for the hat. When placing the hat onto the top of the body, you will put the front higher than the back, kind of like a hat sits upon a real head. Bring the front edge down just enough that the entire ribbed edge is over the top edge of the body. Bring the back down about 2” from the top edge of the body.
Using a sewing needle and red thread (that relatively matches the hat), sew the hat to the body along the top edge of the ribbing. Make sure you are grabbing the body when you are making your stitches.
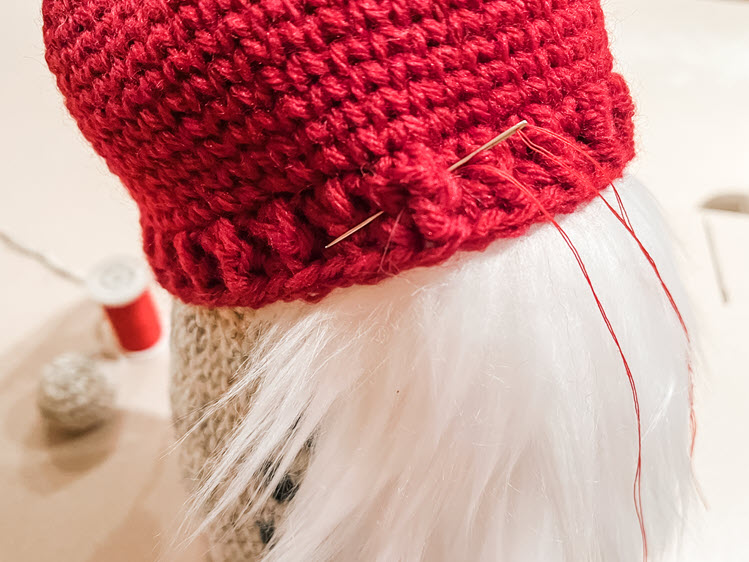
Note: the reason we are sewing along the top edge of the ribbing (rather than the bottom) is so we have a little edge left to tuck our nose up under.
Now, take your nose and tuck it up under the ribbed edge and sew it into place. Make sure to place the side of the nose you tightened up at the end when you made it again the beard of the gnome so the nice looking side is facing out.

Lastly, sew your fur pom pom onto the tip of the hat.
Your cute little gnome is now complete! I hope you enjoy him as a decoration, or a doorstop!

Thank you SO MUCH for supporting a very small business and designer. I appreciate each and every one of you more than you know!
I love feedback, positive or negative, and I certainly don’t get it right every time. If you have suggestions, criticism, or find anything that needs to be addressed in the pattern, PLEASE feel free to reach out via the Facebook Group below or email: jamie@brooklynhandcrafted.com
Happy Hooking!!
Facebook: https://www.facebook.com/groups/BrooklynHookersCrochetClub
Instagram: https://www.instagram.com/brooklynhandcrafted/ and don’t forget to tag me in your project pictures! @brooklynhandcrafted