Week 4 brings us to our last stocking in the Heirloom collection, the Holly Jolly Heirloom Stocking. I can’t believe we’re here already! And Thanksgiving here in the states is just days away. If you celebrate Thanksgiving, warmest wishes for a lovely holiday.
These stockings have been a bucket list item of mine for so long. You see so many beautiful fair isle items….in knit. Never crochet. That just rubbed me the wrong way so I was determined to make not one, but several options. I never get sick of fair isle, and it never really goes out of style.
To be 4 weeks in to my 8 weeks of Christmas and releasing the fourth stocking pattern is kind of surreal. This was just a pipe dream in July but I decided to take a crack at it. I loved the way the first one turned out and the rest is history. The Holly Jolly Stocking is actually the first of the 4 stockings that I wrote and stitched out. I’m not sure why I decided to release it fourth instead of first…maybe I wanted to finish strong with the first one I fell in love with 🙂
I’ve loved reading the comments and seeing the feedback from the past few weeks. Unlike a big corporation, when you “like” or comment on something, I personally see it and I actually read it! I show whomever I’m with the picture or the comment and I swell with happiness. It’s so good for my soul knowing that others are getting enjoyment out of these patterns. It makes me want to write so much more. Thank you for being a part of this, and please know that you are 100% appreciated.
Now I’ll stop being sappy and get on with it.
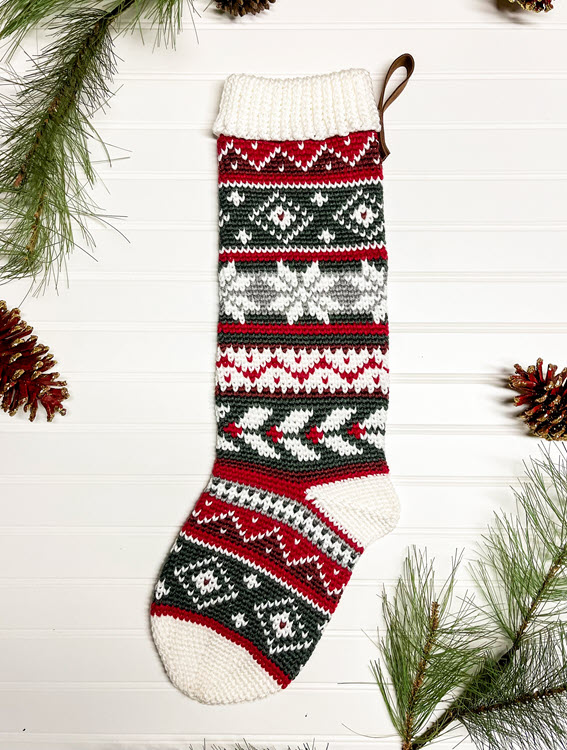
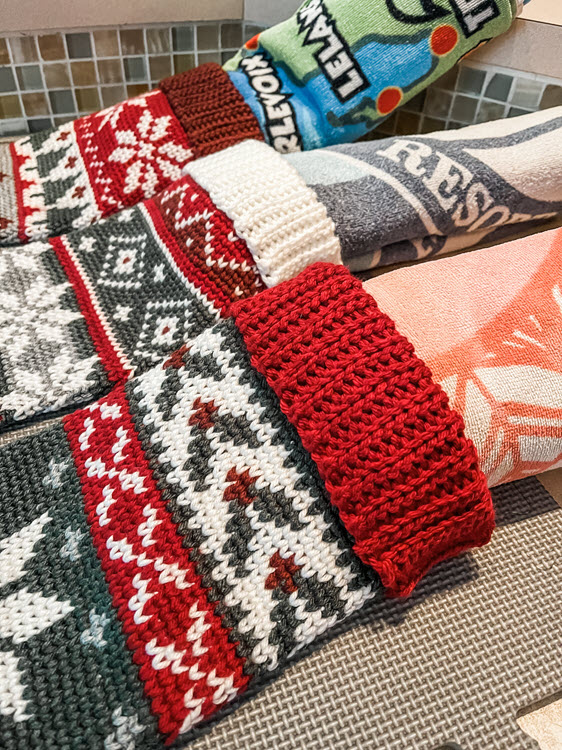
While we’ve done heavy color in each of the other stockings, this week’s design brings white to the forefront with the reds, green and grey highlighting it. The method of construction is going to be identical to weeks 1, 2 and 3.
If you didn’t get a chance to see week 1, check it out here! And check out week 2 here! And week 3 here!
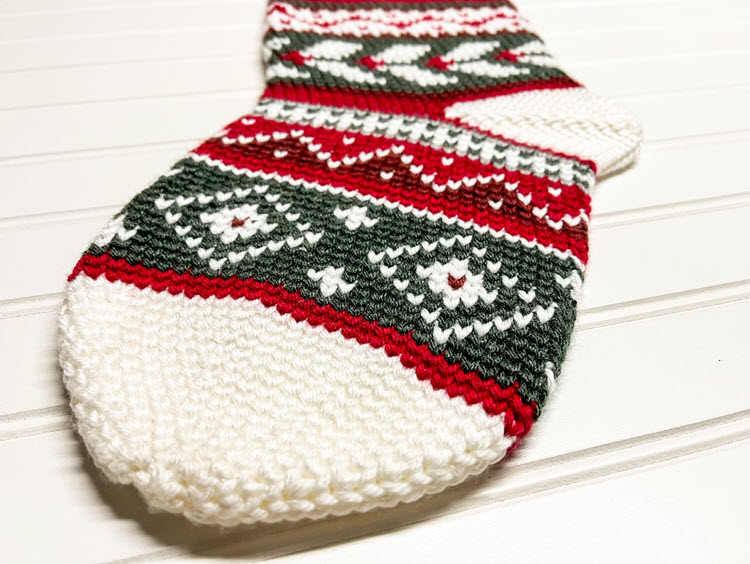
Like I’ve mentioned before, there is much to like about these stockings. They are timeless, they are a generous size, they have lots of interesting pattern elements, but best of all they have a nice FLAT heel worked into them. I cannot stand ruffly, wobbly heels, and believe me I’ve made plenty of them. I used a 3 together stitch for the corners of the heel for these and it came out beautifully.
I used Lion Brand Basic Stitch Anti-Pilling yarn. It was a perfect weight for this pattern and has the added benefit of being durable for years to come. I’m a sucker for heathers, so I really was thrilled that the red, green, and grey are heathers in this line. You will need one ball each of Red Heather, Pine Heather, Silver Heather, Pomegranate, and White.
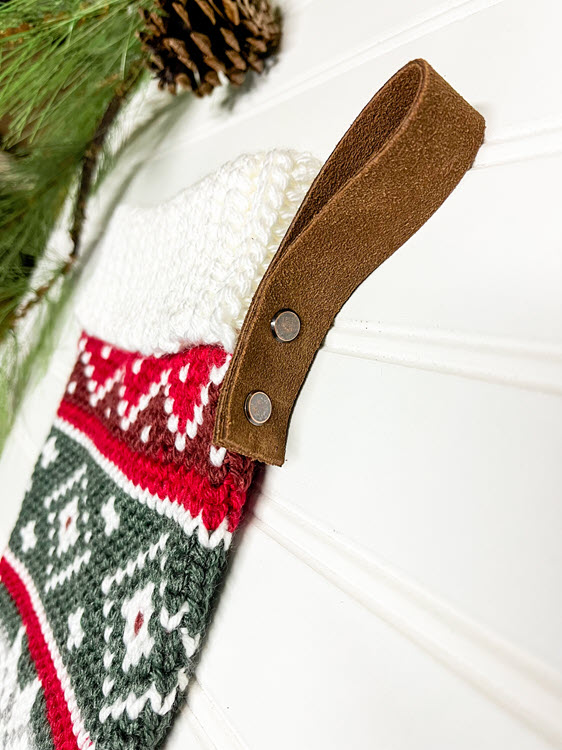
For the loop to hang the stocking with, I went farmhouse and used some leather with Chicago screws. I really love Chicago screws for attaching things…they are relatively inexpensive, and they look awesome. If you’re interested in using them as well, you can find them on Amazon here.
This stocking is a great choice for a confident beginner or an intermediate crocheter. Colorwork can be lots of fun, perhaps a little frustrating at times, but well worth the effort.
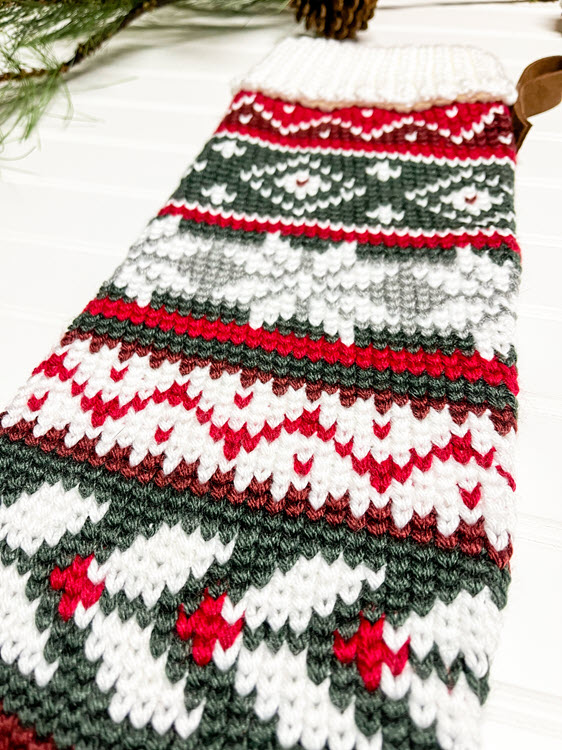
It is crocheted using the split single crochet stitch (also known as the waistcoat stitch, center single crochet, or knit stitch) which gives it substantial structure to hold up for many years to come. It makes for a wonderful family keepsake.
Except for the cuff, the entire stocking is crocheted in the round so there is no joining after every row. We will first make the toe with increasing rounds, then complete both foot and leg charts (leaving an opening for the heel), add a cuff, and then add the afterthought heel at the end. Finally, we will attach a leather (or another material of your choice) loop so we can hang our stocking.
Gauge isn’t terribly important, but mine ended up being 19 split single crochet sts = 4” width. Tension is a little more important; when making a long cylindrical piece it is important to have consistent tension so your edges are nice and parallel on your finished piece.
The finished size of the stocking with the appropriate gauge is approx. 6 ½” wide x 24” long.
Hook Size:
-5.0mm (H) hook for stocking
-6.5mm (K) hook for cuff
Yarn:
-Lion Brand Basic Stitch Anti-Pilling, 3.5oz = 185 yards
2 balls in:
Color A: White (I used 115 grams, so if you have leftover from a previous stocking you may only need 1 ball)
1 ball in each of the following colors:
Color B: Red Heather
Color C: Pine Heather
Color D: Pomegranate
Color E: Silver Heather
Other Materials You’ll Need:
-Scissors
-Yarn Needle
-Stitch Marker (optional, for the beginning of each row)
-Strip of Leather (optional)
-Leather Hole Punch (optional)
-Chicago Screws (optional)
Abbreviations:
-mc = magic circle
-sc = single crochet
-ssc = split single crochet
-sl st = slip stitch
-st = stitch (sts = stitches)
-blo = back loop only
-sk = skip
-ch = chain
-ssc2tog = split single crochet 2 stitches together (decrease)
-ssc3tog = split single crochet 3 stitches together (decrease)
Special Stitches:
-split single crochet (ssc): instead of using the top two loops of the stitch, insert hook lower into the body of each stitch, i.e. the center of the two vertical threads that make the “V” of the stitch, yarn over, pull back through the “V”, yarn over and pull through both loops on hook.
-split single crochet 2 stitches together (ssc2tog): this is a decrease stitch…it takes 2 stitches and turns them into 1 stitch. Insert hook into center of the “V” of the stitch, yarn over, pull back through the “V”, insert hook into center of the “V” of the NEXT stitch also, yarn over, pull back through, yarn over and pull through 3 loops on hook.
-split single crochet 3 stitches together (ssc3tog): work as ssc2tog except over 3 stitches in a row instead of only 2.
The video is very detailed in both method of construction and showing special stitches. You can find it here.
The PDF pattern for this stocking can be purchased on Etsy here or Ravelry here.
Also, make sure to join our Brooklyn Hookers Crochet Group on Facebook. I’m excited for it to grow into an awesome, supportive community! I do throw a code in that group when I release a new pattern…a free download of the PDF pattern through Ravelry. It’s only good for a limited time so make sure to join the group and not miss out on that. You can find it here.
Body of Stocking
Beginning with Color A and a 5.0mm (H) hook, make a magic circle.
- sc 7 into mc (7)
- 2ssc into each st around (14)
- ssc into each st around (14)
- [ 2ssc into next st, ssc into next st ], repeat [ to ] around (21)
- ssc into each st around (21)
- [ 2ssc into next st, ssc into next 2 sts ], repeat [ to ] around (28)
- ssc into each st around (28)
- [ 2ssc into next st, ssc into next 3 sts ], repeat [ to ] around (35)
- ssc into each st around (35)
- [ 2ssc into next st, ssc into next 4 sts ], repeat [ to ] around (42)
- ssc into each st around (42)
- [ 2ssc into next st, ssc into next 5 sts ], repeat [ to ] around (49)
- ssc into each st around (49)
- [ 2ssc into next st, ssc into next 6 sts ], repeat [ to ] around (56)
- ssc into each st around (56 here and throughout the body of the stocking)
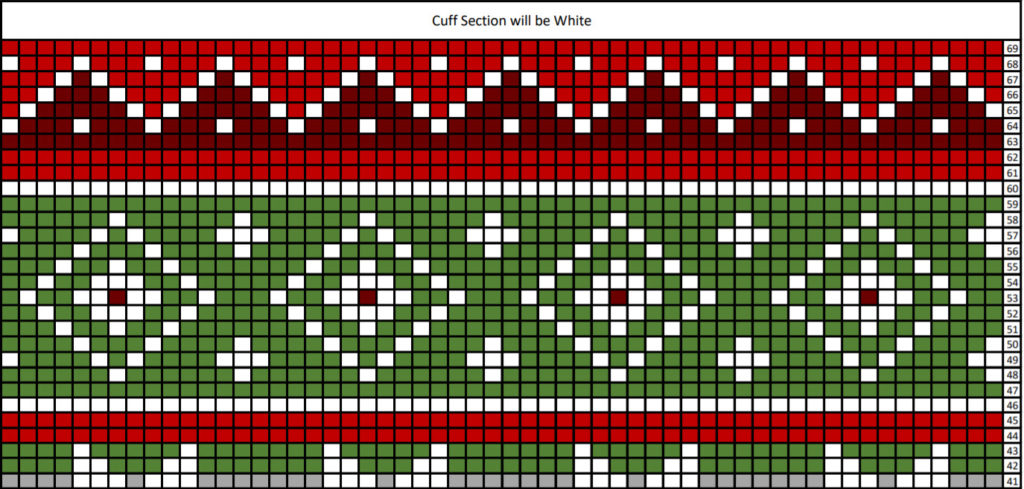
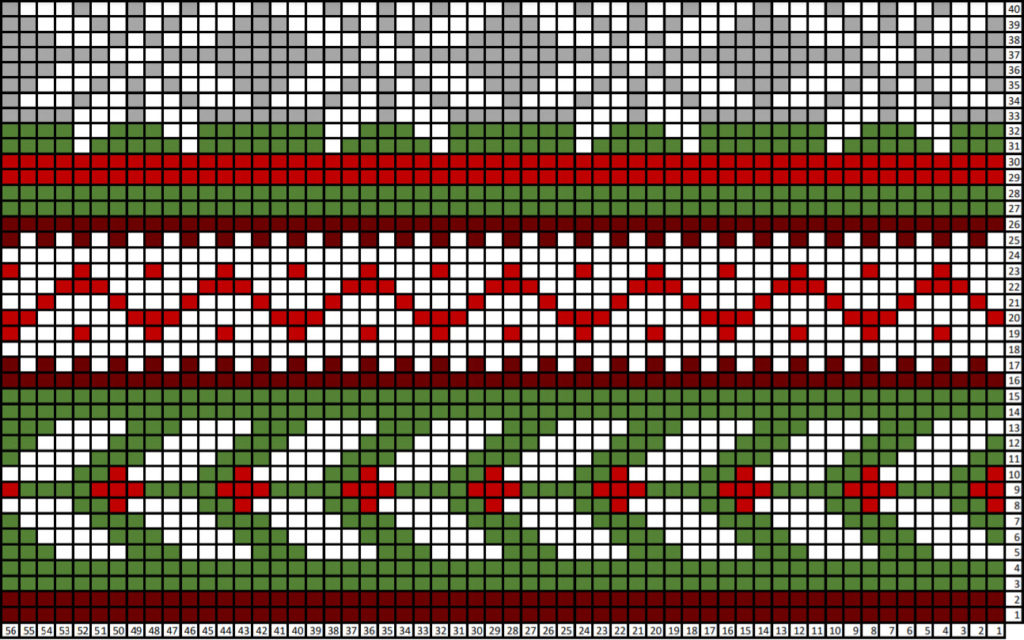
Now begin working the charts (it is worked from right to left, bottom to top)
Note: for color changes, you want to complete the final yarn over of the previous stitch with the new color for the next stitch. For example, on your final ssc of row 15 you want to pull red through the two loops on the hook when finishing the stitch. If you need further clarification, please visit the video tutorial as it shows the color change in detail.
Foot chart:
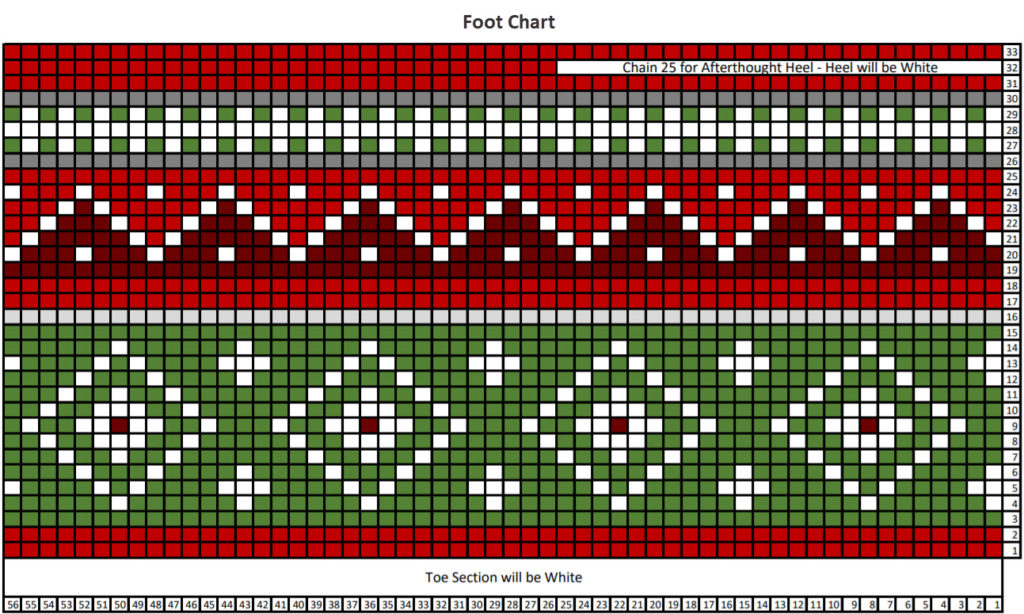
Note: For the afterthought heel, you will chain 25 and then count and miss 25 stitches from the previous row. Now continue working your ssc stitches to the end of row 32. At the start of row 33, you will make 25 sc’s into the 25 chains and then finish out the row with ssc’s.
Now move on to the leg charts. I have separated them into 2 charts because the images were much easier to read that way. IMPORTANT: start with the LOWER of the 2 chart images on this page first (row 1). Ignore the white space in between rows 40 and 41.
When completing your final st change to Color A, sl st in next st to secure color A.
Now we are on to the cuff.
Cuff
We are going to work with a larger hook to do the cuff, and then we are going to block it also as it will still need to be stretched a bit. We will use back loop only slip stitches…this method makes a nice stretchy cuff that will retain its shape.
Using Color A and a 6.5mm (K) hook:
ch 21, turn
- skip one ch, sl st into blo of second ch and each ch across back down to body of stocking (20 here and throughout each row of the cuff)
- sl st to next st in top of stocking (the st directly after the st you fastened Color B to)
- sl st to next st in top of stocking once again, turn
- sl st into blo of each st across (up your cuff), ch 1, turn (20)
- sl st into blo of each st across down back to body of stocking
Repeat steps 2-5 all the way around the top of the stocking. You will only have one sl st to top of stocking instead of two on last pass. Just eliminate step 3 for your last pass.
Place the beginning row and the ending row of the cuff on top of one another and sl st together 20 sts up to the top of the cuff to join. See the video if you would like to see an example of this being done.
Fasten off and weave in end.
Heel
Note: the video can be helpful with this part…it’s not a difficult method, but it can be difficult to accurately describe on paper. The ssc2tog and ssc3tog stitches do a really nice job of pulling the corners together nice and tight and not creating a bulky misshapen heel.
Using Color A and going back to a 5.0mm (H) hook, attach yarn to last st in row of missed ssc stitches (on the foot edge, not the leg edge)
- (Foundation round) ssc2tog over same st and next st (which should be the first st of the opposite leg edge, a back bump of the chain you made on row 33 of the foot chart) Note: you will not be able to do a ssc in the back bumps of the leg edge so it will just be a sc on this first round. sc in the next 23 sts (back bumps along the leg edge) stopping one st short of the corner, ssc2tog over last back bump st and first st along the foot edge, ssc in the next 22 sts along the foot edge (one st will be left unworked between the 22nd ssc you just finished and the beginning ssc2tog you started with)
From here we will work all ssc’s since our back bumps all now have sc’s in them.
- ssc3tog over the next 3 sts (the st left unworked, the beginning ssc2tog from your first corner, and the next st), ssc in next 21 sts, ssc3tog over next 3 sts, ssc in next 20 sts
- ssc3tog over the next 3 sts, ssc in next 19, ssc3tog over the next 3 sts, ssc in next 18
- ssc3tog over the next 3 sts, ssc in next 17, ssc3tog over the next 3 sts, ssc in next 16
- ssc3tog over the next 3 sts, ssc in next 15, ssc3tog over the next 3 sts, ssc in next 14
- ssc3tog over the next 3 sts, ssc in next 13, ssc3tog over the next 3 sts, ssc in next 12
- ssc3tog over the next 3 sts, ssc in next 11, ssc3tog over the next 3 sts, ssc in next 10
- ssc3tog over the next 3 sts, ssc in next 9, ssc3tog over the next 3 sts, ssc in next 8
- ssc3tog over the next 3 sts, ssc in next 7, ssc3tog over the next 3 sts, ssc in next 6
- ssc3tog over the next 3 sts, ssc in next 5, ssc3tog over the next 3 sts, ssc in next 4
- ssc3tog
Cut a 12” tail and pull yarn through last loop.
Flatten the small opening you have left so the rows are on top of one another. Use a yarn needle and the whip stitch (I accidentally said mattress stitch in the video – palm to forehead) to sew the front loops of the rows together. Fasten off and weave in ends.
Blocking the Cuff
If this is your first stocking, don’t panic…blocking this cuff is very easy. If you’ve made the other Heirloom stockings you are probably a pro at it already.
Here’s what I did:
Folded the cuff over how I wanted it when it was finished. Now get the cuff wet. Take a towel and gently squeeze out the extra water. Lay it flat on a blocking mat and stretch it out a little further than the size you want it. Pin it to the blocking mat and let it dry.
If you don’t have a blocking mat, use something from around the house. Anything a pin will stick into…Styrofoam, scrap cardboard, etc.
Or if you don’t have any of these things, roll up and towel and insert it into the cuff to keep it stretched while it dries. Here’s a picture of how I did this (don’t mind the mis-matched beach towels!):
It’s also not a bad idea to spray a little water (not much) on the heel at the same time to flatten and shape it.
Leather Loop
I love the look of the leather loop attached with Chicago screws on this stocking. I actually think it’s the Chicago screws I like so much…I use them for everything. They are such a nice upgrade for attaching rather than just sewing something on. You absolutely do not have to use them if you’d rather not. You can make a loop to hang your stocking however you would like…leather, crochet, ribbon, twine…the possibilities really are endless.
Here’s what I did if you’re interested:
Cut a strip of leather approximately 8” long by 1” wide. Fold it in half length wise. Using a leather punch I made holes through both layers of leather in two places about 1” apart.
I positioned the loop (both layers of leather) on the outside of my stocking up near the cuff making sure at least one of the Chicago screws was going through the body of the stocking (because the cuff is so stretchy, I wanted to make sure I was attached to the more sturdy body as well).
I wiggled the female end of the Chicago screw through the hole in the leather, and then through the stocking in the appropriate spot. Now attach the male end of the Chicago screw on the inside of stocking to the female end.
Repeat with the other Chicago screw.
Voila! You have a beautiful, timeless keepsake.
This is the last stocking which makes our Heirloom collection complete!
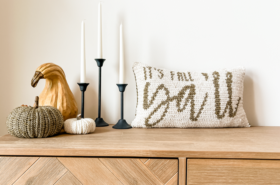
Next week we will move on to a new, non-stocking pattern. This one makes up extremely quick and is super cute! If you do craft fairs, it’s always a favorite! I’ve wanted to write it down for years, finally got myself in gear this year. Then we’ll have 3 more fun patterns over the final 3 weeks which will bring us to Christmas!
Here’s a little sneak peek of next Monday’s pattern 😉
Thank you SO MUCH for supporting a very small business and designer. I appreciate each and every one of you more than you know!
I love feedback, positive or negative, and I certainly don’t get it right every time. If you have suggestions, criticism, or find anything that needs to be addressed in the pattern, PLEASE feel free to reach out via the Facebook Group below or email: jamie@brooklynhandcrafted.com
Happy Hooking!!
Facebook: https://www.facebook.com/groups/BrooklynHookersCrochetClub
Instagram: https://www.instagram.com/brooklynhandcrafted/ and don’t forget to tag me in your project pictures! @brooklynhandcrafted


Anna
Thank you so much for posting these! A friend of mine has stockings knitted by her mom for her family. Her mom is too old and her vision won’t allow her to knit or crochet anymore. My friend was telling me she was upset that her new in-laws wouldn’t get matching stockings. Well, yes, they will! Thanks to your beautiful patterns.
admin
I love hearing this! Enjoy!