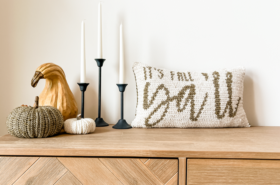
Over the last couple of years I started collecting gnomes to decorate the house for the holidays. I really don’t know if there’s anything cuter, especially one dressed in a silly little Christmas outfit. I wanted to incorporate one or two into this year’s Christmas round up.
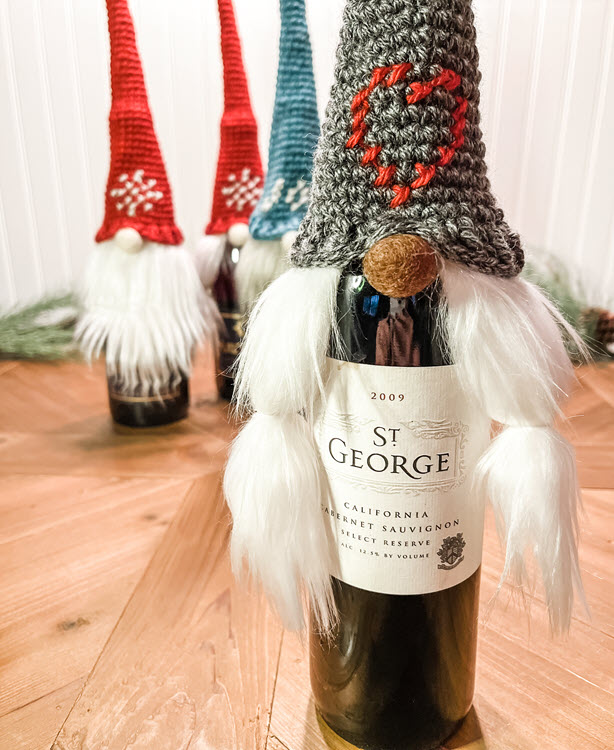
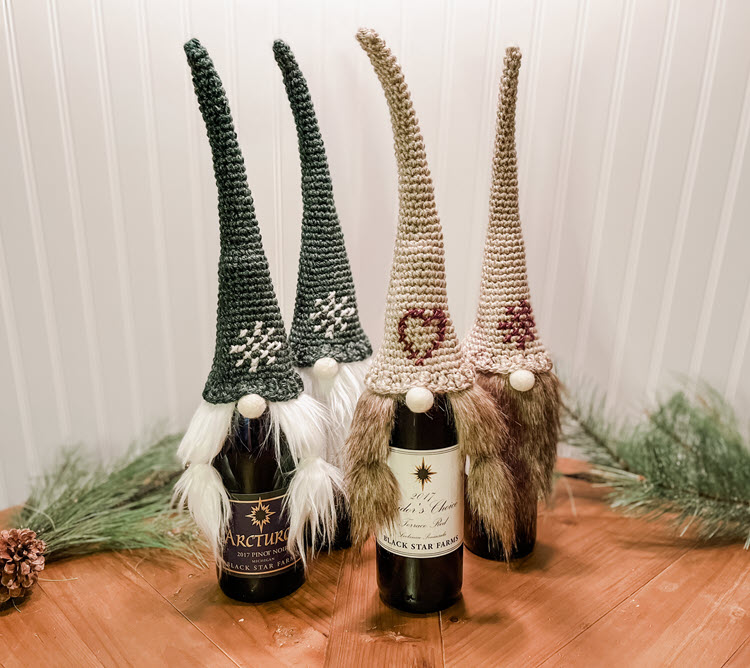
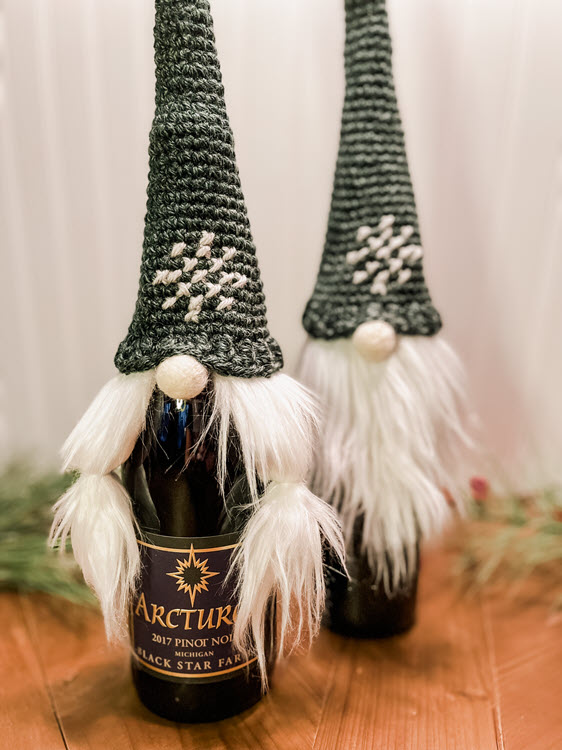
Week 5 brings us the Gnome Bottle Topper.
The Gnome Bottle Topper is the perfect small project for gift giving. It works up extremely quick, displays beautifully and will have the whole room talking. It is also ideal as a craft fair or bazaar item! Just to give you an example of how quickly it moves, I sent a picture of the prototype I made for this pattern to my brother and sister-in-law. The response was, “Can you make 14 of those by the beginning of December for corporate gifts?” Luckily, because they are a fast make, I could! Then, another family member: “I’ll take as many as you can make for the holidays!”
I’m supposed to be writing patterns, not making them.
But, that just goes to show how well they’re received. They look great in any color and could easily be adapted for a different occasion. Instead of a Christmas gnome, it could be a winter gnome (a blue hat with a white snowflake), or a Valentine’s Day gnome (a pink hat with a red heart). You can even make all kinds of fall colored hats with JOY on them. They are certainly not specific to Christmas.
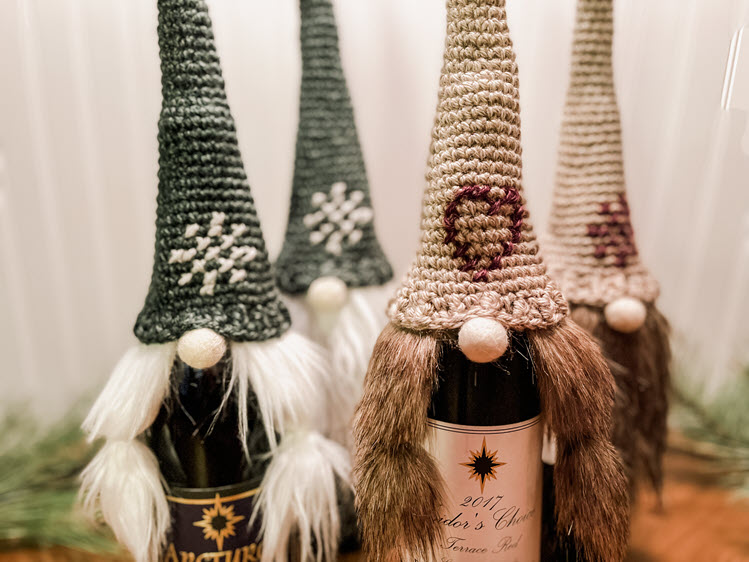
These bottle toppers are a beginner level project using mostly single crochet plus a very small section of single crochet mixed with double crochet and front post double crochet for the ribbing on the brim of the hat. The pattern uses a very small amount of yarn so it is an excellent stash or scrap buster. I used Lion Brand Heartland for this project because I love the soft texture, the ease of using acrylic, and the large color selection. You can get away with any worsted weight yarn though, some good contenders are Hobby Lobby’s I Love This Yarn, Stylecraft Special Aran, or Red Heart Super Saver.
The pattern starts with a magic circle and works in the round, increasing less often at first and then more often towards the opening of the hat. Then you will embroider the cross-stitch pattern of your choice on with a yarn needle and additional yarn in a contrasting color. Last, we’ll sew on the beard/pigtails and the nose with a sewing needle and some thread the same color as the hat. If you don’t have a thread collection, a thread sampler kit or a small sewing repair kit works well for this as they tend to have many different colors of thread in them.
Gauge isn’t super important, but for reference 4 single crochets in a row and 4 rows high gave me 1 square inch.
The finished size of the hat (before beard or pigtails) is about 11.75”, but it’s very stretchy so you could see something a little different than that. Unless it’s super crazy off you’ll be fine. Once you add the beard or pigtails you will be closer to a total of 18” long.
Hook Size:
-5.0mm (H) hook
Yarn:
-Lion Brand Heartland, 5 oz = 251 yards
I used an assortment of colors. You will need approximately 45 yards for the hat and 1.5 yards for the embroidery.
Other Materials You’ll Need:
-Scissors
-Yarn Needle
-Stitch Marker (optional, for the beginning of each row)
-Scrap faux fur, approx. 5” width x 7” tall
-Sewing Needle
-Thread
-Small pom poms in flesh tones for gnome noses
Abbreviations:
-mc = magic circle
-sc = single crochet
-sl st = slip stitch
-st = stitch (sts = stitches)
-dc = double crochet
-fpdc = front post double crochet
-sk = skip
Special Stitches:
-front post double crochet (fpdc): yarn over, insert hook from front to back to front around the post of the next st, yarn over, bring loop back through, yarn over, pull through 2 loops on hook, yarn over, pull through remaining 2 loops on hook.
The PDF pattern for this stocking can be purchased on Etsy here or Ravelry here.
Also, make sure to join our Brooklyn Hookers Crochet Group on Facebook. I’ve gotten into a habit of throwing a code in that group when I release a new pattern…a free download of the PDF pattern through Ravelry. It’s only good for a limited time so make sure to join the group and not miss out on that. You can find it here.
The Hat
*Note: you may want to place a stitch marker at the beginning of each row or increase section to easier keep count
Make 6 sc in a mc and gently tighten
1-3. sc in each st around (6) **These rows can feel a little awkward because you don’t have a lot of space to work in. It will get better as you begin to increase.
4. [ 2 sc in next st (first st of round), sc in next 2 sts ], repeat [ to ] 1 time (8)
5-12. sc in each st around (8)
13. [ 2 sc in next st, sc in next 3 sts ], repeat [ to ] 1 time (10)
14-17. sc in each st around (10)
18. [ 2 sc in next st, sc in next 4 sts ], repeat [ to ] 1 time (12)
19-22. sc in each st around (12)
23. [ 2 sc in next st, sc in next 5 sts ], repeat [ to ] 1 time (14)
24-25. sc in each st around (14)
26. [ 2 sc in next st, sc in next 6 sts ], repeat [ to ] 1 time (16)
27. sc in each st around (16)
28. [ 2 sc in next st, sc in next 7 sts ], repeat [ to ] 1 time (18)
29. sc in each st around (18)
30. [ 2 sc in next st, sc in next 8 sts ], repeat [ to ] 1 time (20)
31. sc in each st around (20)
32. [ 2 sc in next st, sc in next 9 sts ], repeat [ to ] 1 time (22)
33. sc in each st around (22)
34. [ 2 sc in next st, sc in next 10 sts ], repeat [ to ] 1 time (24)
35. sc in each st around (24)
36. [ 2 sc in next st, sc in next 11 sts ], repeat [ to ] 1 time (26)
37. sc in each st around (26)
38. [ 2 sc in next st, sc in next 12 sts ], repeat [ to ] 1 time (28)
39. sc in each st around (28)
40. [ 2 sc in next st, sc in next 13 sts ], repeat [ to ] 1 time (30)
41. sc in each st around (30)
42. [ 2 sc in next st, sc in next 14 sts ], repeat [ to ] 1 time (32)
43. sc in each st around (32)
Now we will work 2 rows to make the brim of the hat.
44. [ 1 dc in next st, 1 sc in next st ], repeat around (32)
45. [ 1 fpdc in next st (dc from row below), 1 sc in next st (sc from row below) ], repeat around (32)
Sl st to next st, fasten off and weave in ends.
The Embroidery
For the embroidery on the front of the hat, choose from 1 of the 3 cross-stitch patterns below:

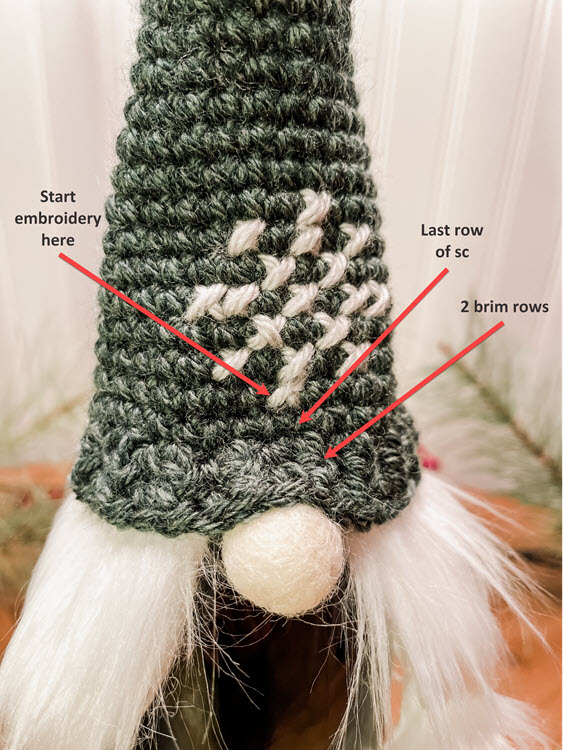
Each box on the cross-stitch graph represents a stitch on your hat. You will perform a cross stitch around a stitch on the hat for each shaded box on the graph.
Thread 1 – 1.5 yards of yarn in a contrasting color onto your yarn needle.
Lay your hat flat and find the middle. Embroider graphic onto the hat with the bottom of the graph lining up 3 rows up from the hat opening (the 2 brim rows plus the last row of sc…rows 43-45). Fasten off and weave in tails.
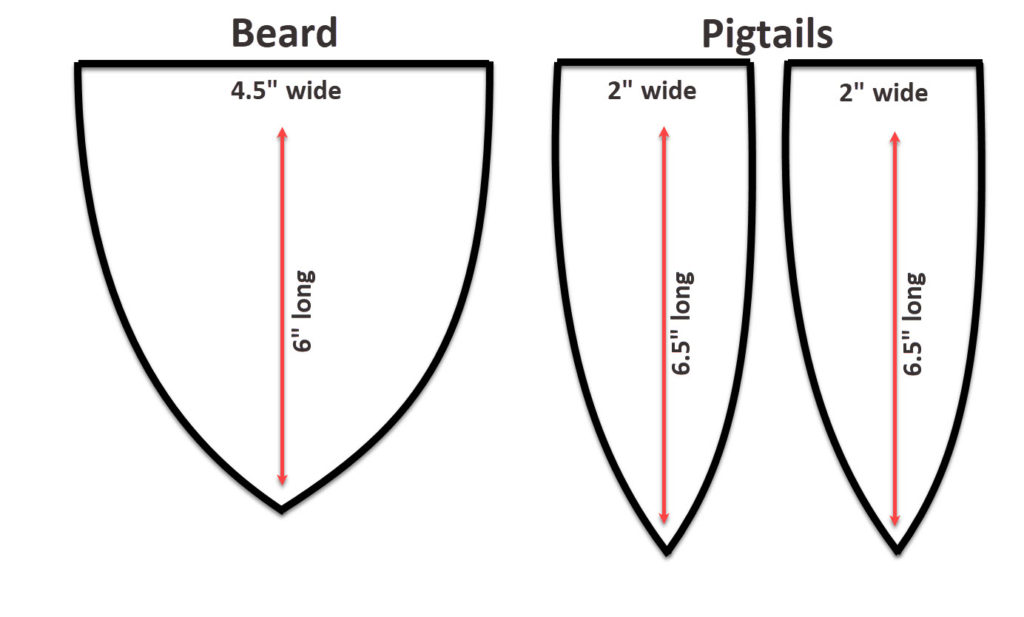
The Beard and Pigtails
It’s important to cut the faux fur with the nap running downward that way the beard and the pigtails look like real hair.
Helpful hint for cutting faux fur: turn it over and use an exacto knife or a razor blade to score the fabric only. This will leave all the fur intact for a nice shaggy look rather than a straight cut edge.
Cut your beard or pigtail fur according to the chart below:
For the beard, using a sewing needle and thread the same color as your hat sew the beard onto the inside of the hat just above the 2 ribbing rows (44-45). The reason we want to sew it above the ribbing rows is because we still have a gnome nose that we want to tuck up into the brim a little bit.
For the pigtails, using a sewing needle and thread the same color as your hat sew each pigtail onto the inside of the hat just above the 2 ribbing rows (44-45). Place the pigtails approximately 1.5” apart to leave room for the nose. The reason we want to sew it above the ribbing rows is because we still have a gnome nose that we want to tuck up into the brim a little bit. Once the pigtails are sewn on, tie a thread or yarn the same color as the fur around each pigtail halfway down to gather it together.
The Nose
Using a sewing needle and thread the same color as the hat, tuck the gnome nose up under the brim ribbing (either on top of the beard or between the pigtails) and sew it to the hat.
Your gnome bottle topper should now be complete!

Thank you SO MUCH for supporting a very small business and designer. I appreciate each and every one of you more than you know!
I love feedback, positive or negative, and I certainly don’t get it right every time. If you have suggestions, criticism, or find anything that needs to be addressed in the pattern, PLEASE feel free to reach out via the Facebook Group below or email: jamie@brooklynhandcrafted.com
Happy Hooking!!
Facebook: https://www.facebook.com/groups/BrooklynHookersCrochetClub
Instagram: https://www.instagram.com/brooklynhandcrafted/ and don’t forget to tag me in your project pictures! @brooklynhandcrafted