Well well, Jamie finally wrote another pattern.
It’s been awhile, and believe me when I tell you that I’m the most disappointed one about that. It was so much fun watching you guys embrace the Farmhouse Pillow pattern…I really would have loved for something else to come out of Brooklyn & Co. before now. Life happens though, for all of us, and designing was only one of the things that got pushed temporarily to the back of my plate.
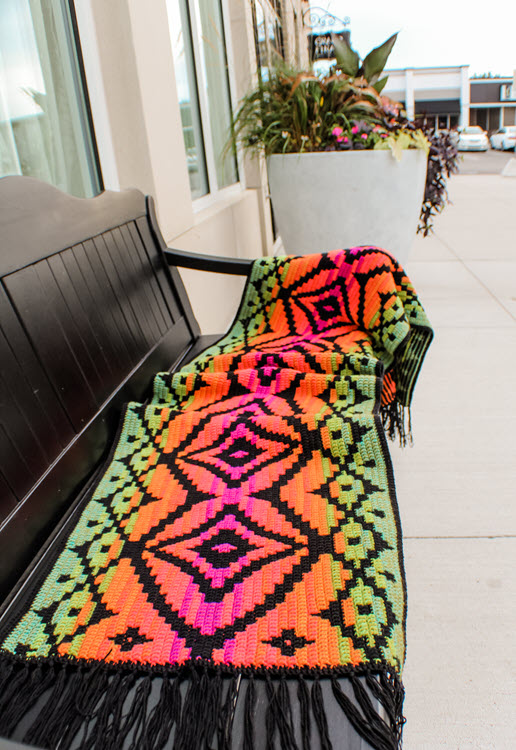
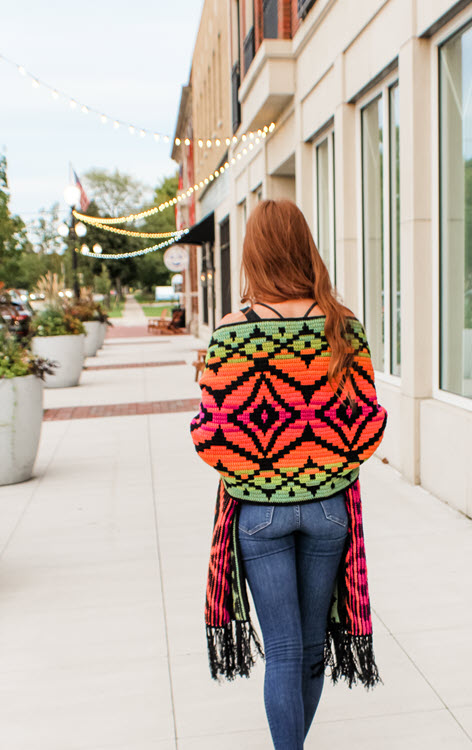
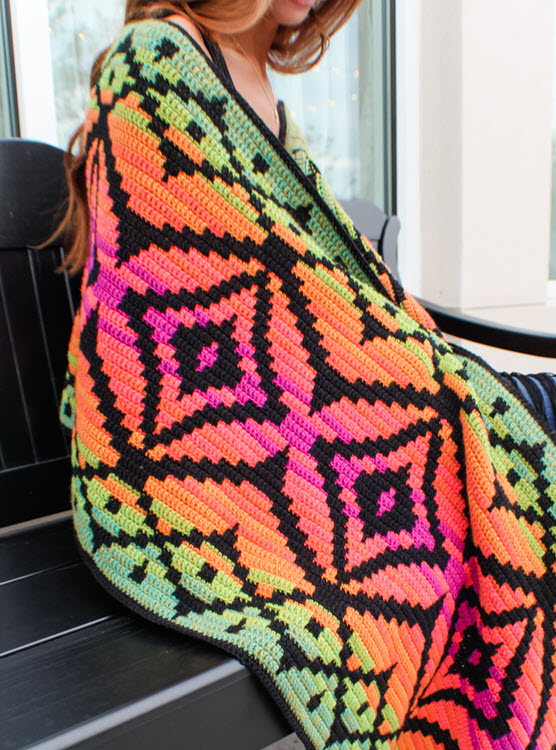
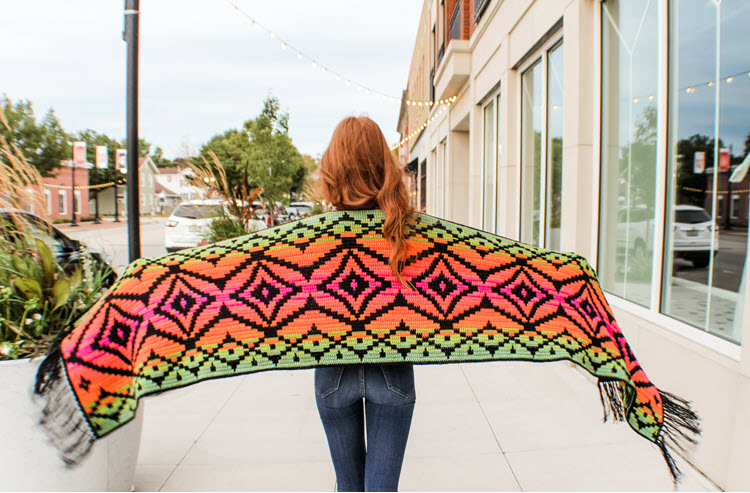
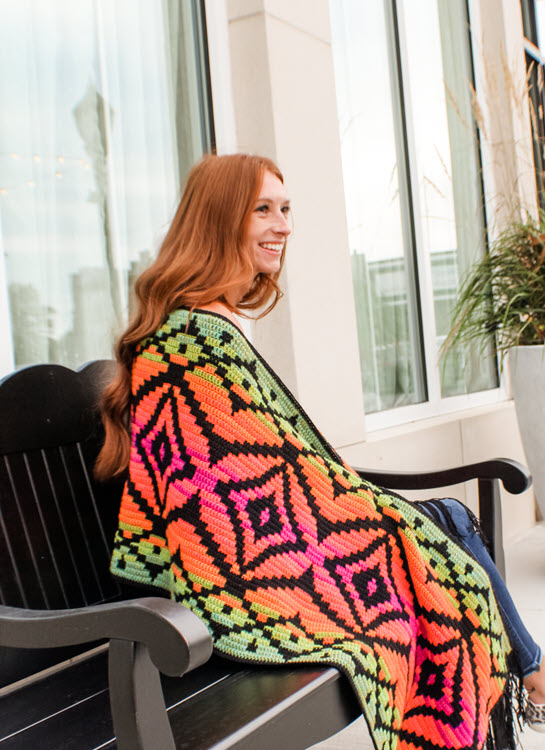
I was not short on inspiration though. I’ve been carting around a picture of mosaic lanterns from Morocco in northern Africa for almost a year. I was so determined to interpret it into a wearable, and I am extremely happy with the way it turned out.
I’ve had a love for color my whole life. I can appreciate neutrals, don’t get me wrong. They match everything and are super easy to wear or decorate. There is just something about vivid ribbons of bright color intertwined together though…it makes me happy to see. I wanted to bring that to the table in this piece, create a conversation starter. Something that everyone notices when it enters the room. I figured mosaic crochet was the best way to do that.
If you haven’t ever tried mosaic crochet, get ready to be hooked. I was introduced to it about 3 years ago and now I can’t put it down. The colors and the patterns you can achieve using this method are arguably the best. And the most wonderful thing of all…it’s so much easier than it looks. Really.
So don’t be afraid to try it. I made a very detailed video of the swatch, which is nothing more than a very small version of the wrap.
The colorful yarn I chose for this project is Scheepjes Riverwashed. I used the colors Amazon (2 skeins), Mersey (2 skeins), Mississippi (2 skeins), Narmada (2 skeins), Nile (2 skeins), and Steenbras (1 skein). I chose it because of the vibrant, mixed colors named after rivers throughout the world.
I also chose a black to really offset the bright color and make the pattern pop. The black I used is Scheepjes Metropolis in Hamburg (6 skeins).
The Riverwashed is a sport weight and the Metropolis is a fingering weight, but after jumping up a little in hook size they played really well together. And the drape factor is divine!
I’m in the USA and I ordered my yarn from Wool Warehouse. They are a wonderful international supplier, but I understand it may not work for everyone. There are a few types of yarn I’ve found to be similar in weight that are available in US stores: Hobby Lobby’s Yarn Bee Must Be Merino (closest match), Hobby Lobby’s Baby Bee Sweet Delight, and Lion Brand LB Collection Superwash Merino. These are not perfect matches so your garment may vary a bit from the finished size listed above.
Some general notes about the pattern:
You will crochet on only the right side of your work, and you will cut your yarn at the end of every row. At the end, you can choose to leave the multi-colored fringe that is created, or weave in your ends and leave the edges clean. You can even add a different type of fringe like I have in my piece.
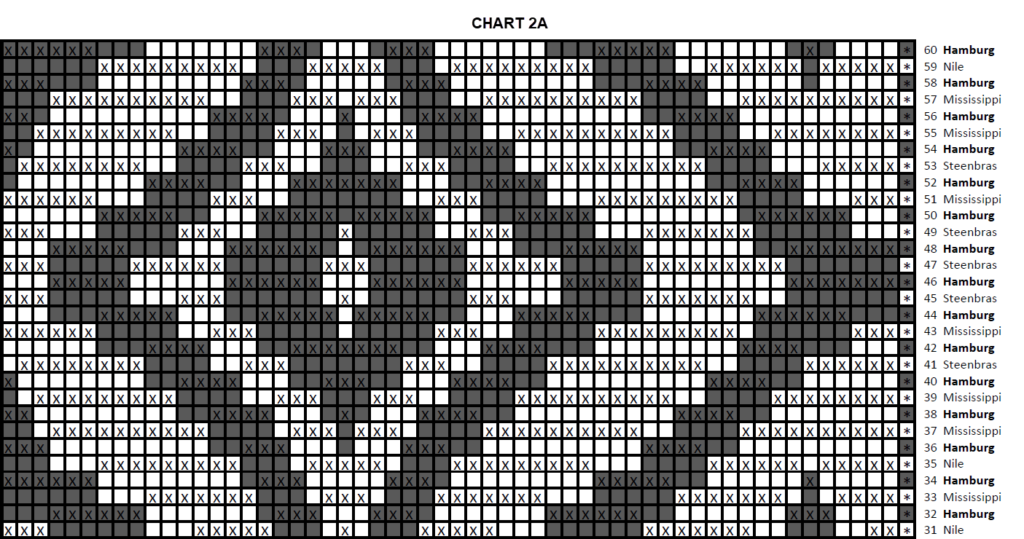
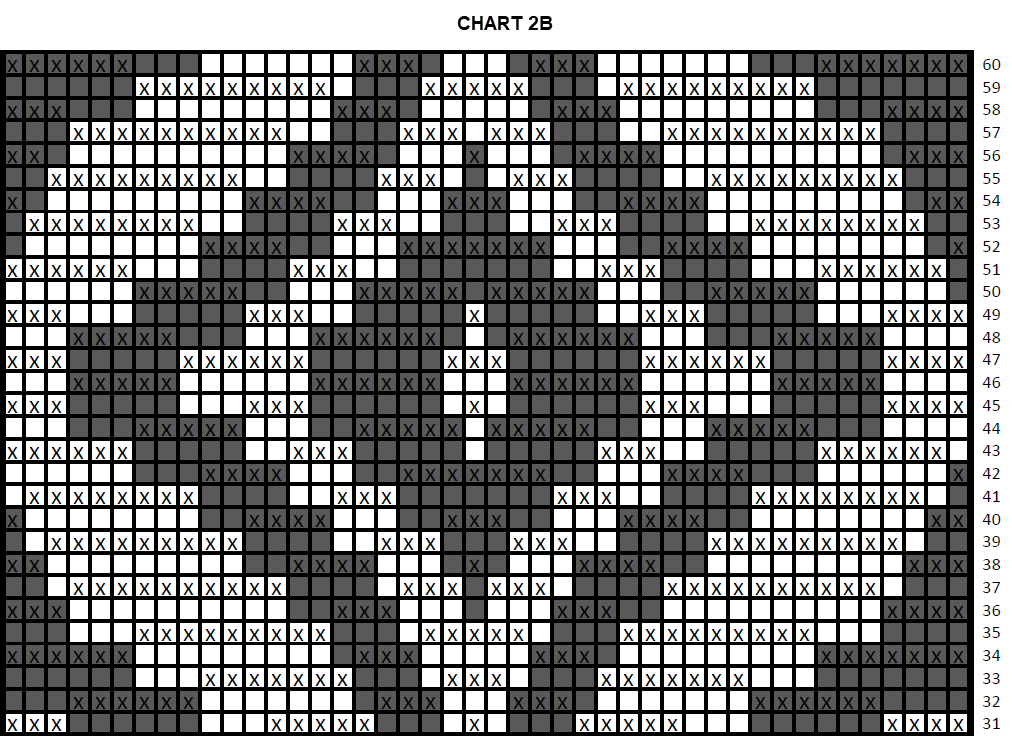
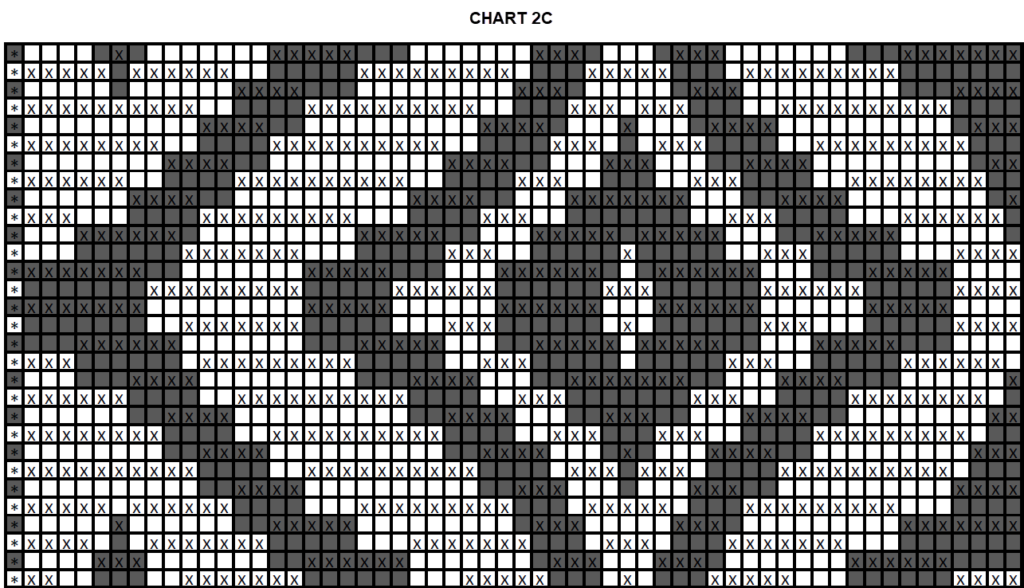
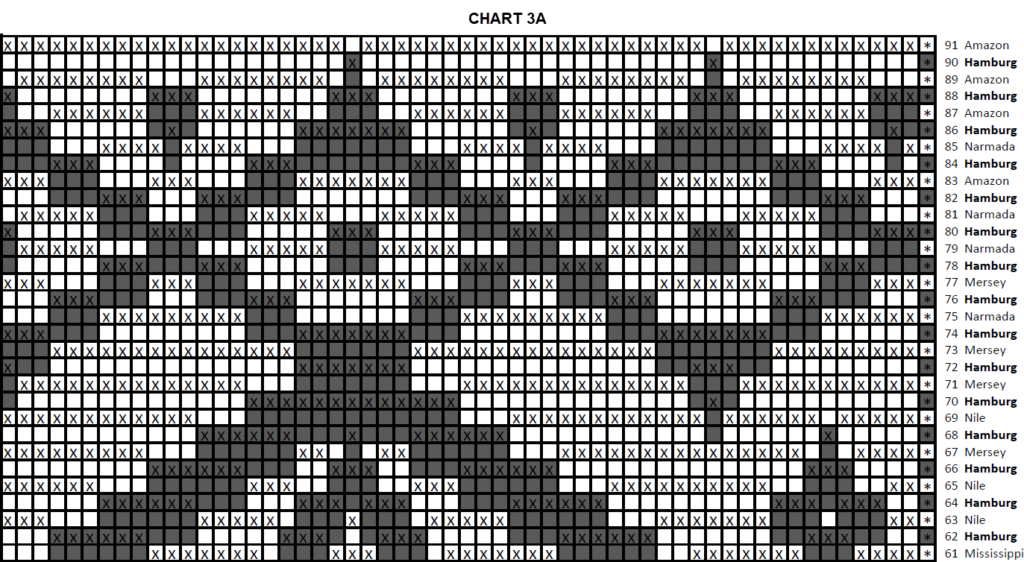
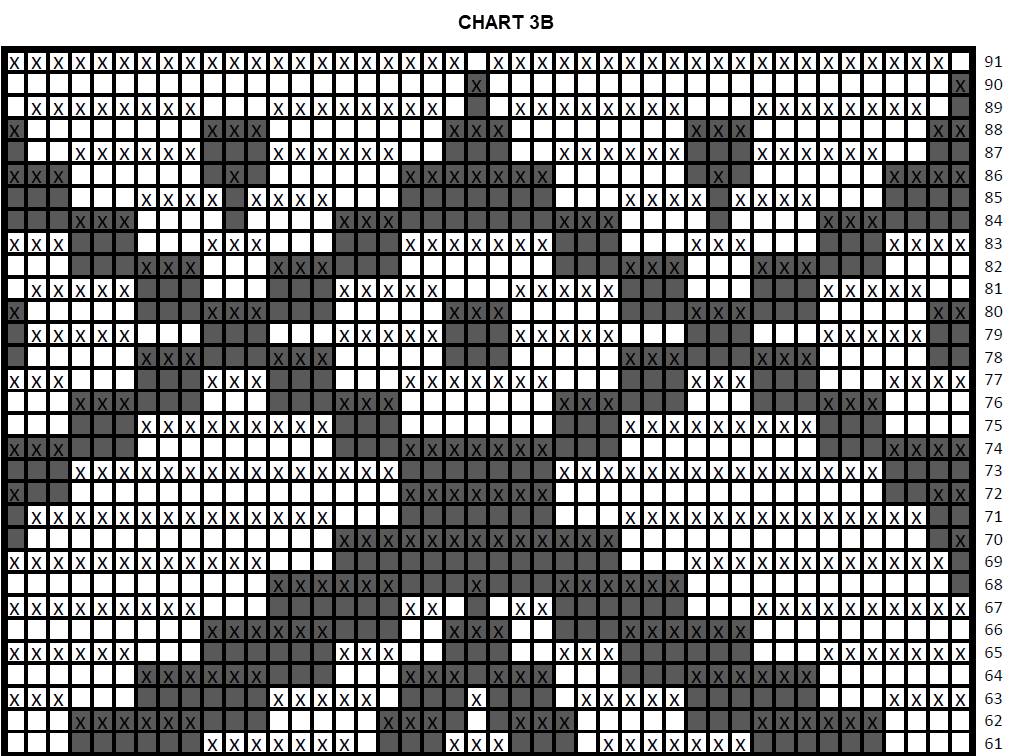
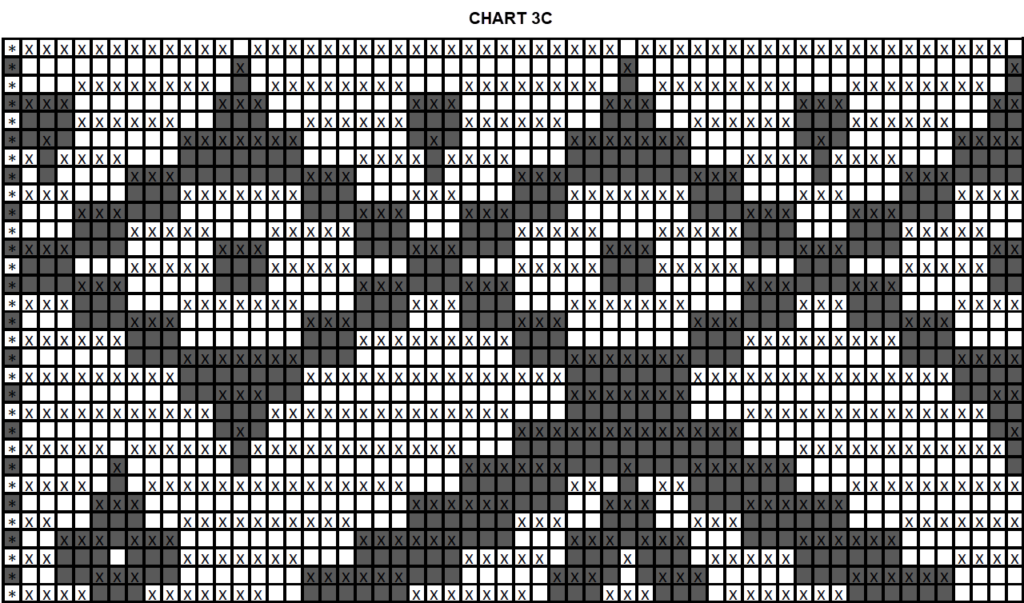
You will work from a chart. You read the chart from bottom to top, and from right to left. Once you start working the chart you will single crochet in the back loop only, and you will double crochet in the front loop of the stitch two rows under the working row.
After your two rows of foundation, you will begin every row and end every row with an anchor stitch. It is denoted by a * on the chart. How you will work your first anchor stitch to begin your row is this: With your new yarn color, slip stitch into BOTH loops of the anchor stitch, complete a single crochet in the same stitch. Now your yarn is secure and you are ready to continue working the chart. You will make all single crochets (denoted by empty cells on the chart) in the back loop only, and all double crochets (denoted by an x on the charts) in the front loop of the stitch from TWO rows down.
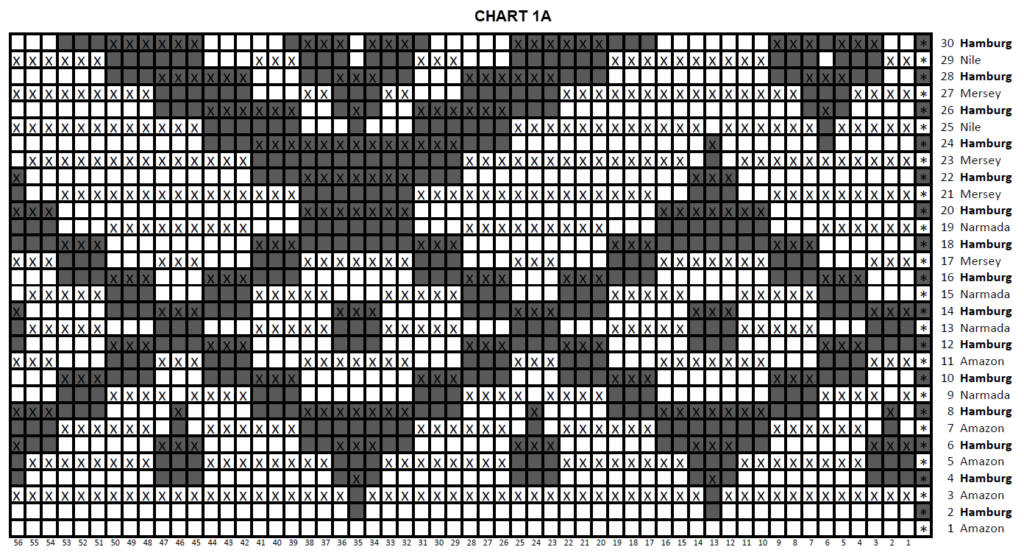
The PDF pattern that is for purchase on Etsy HERE or Ravelry HERE includes a master chart with the entire pattern which is best printed on 11×17 paper otherwise it can be difficult to read.
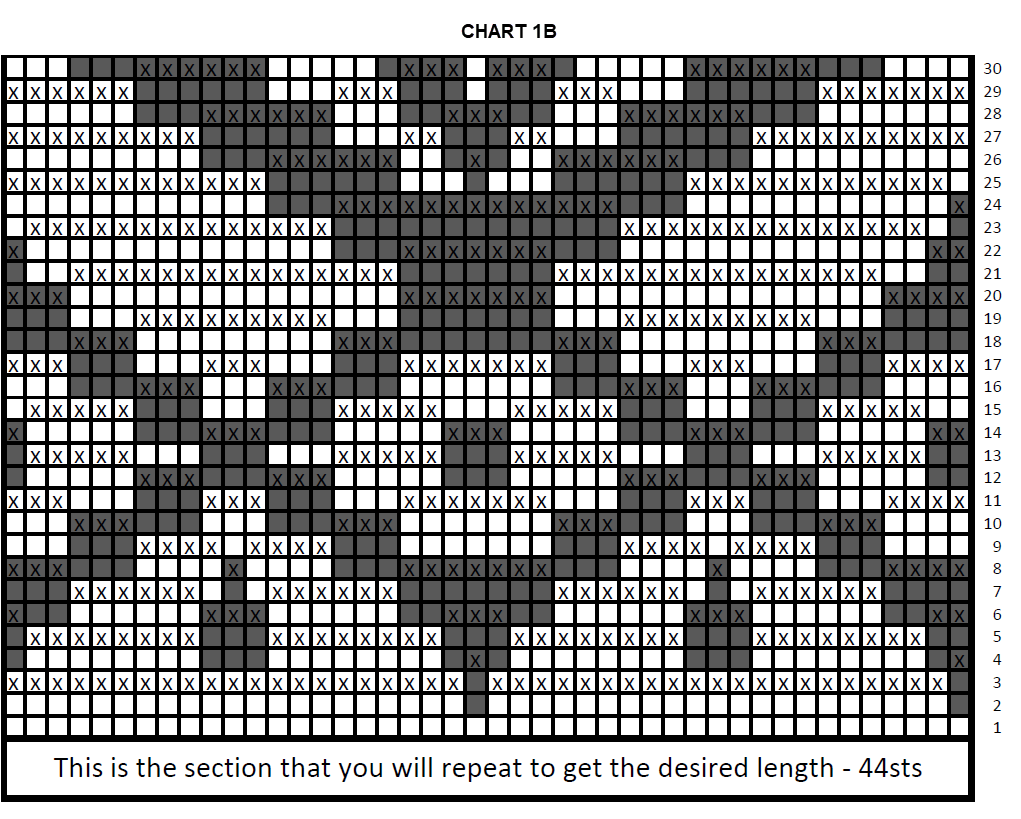
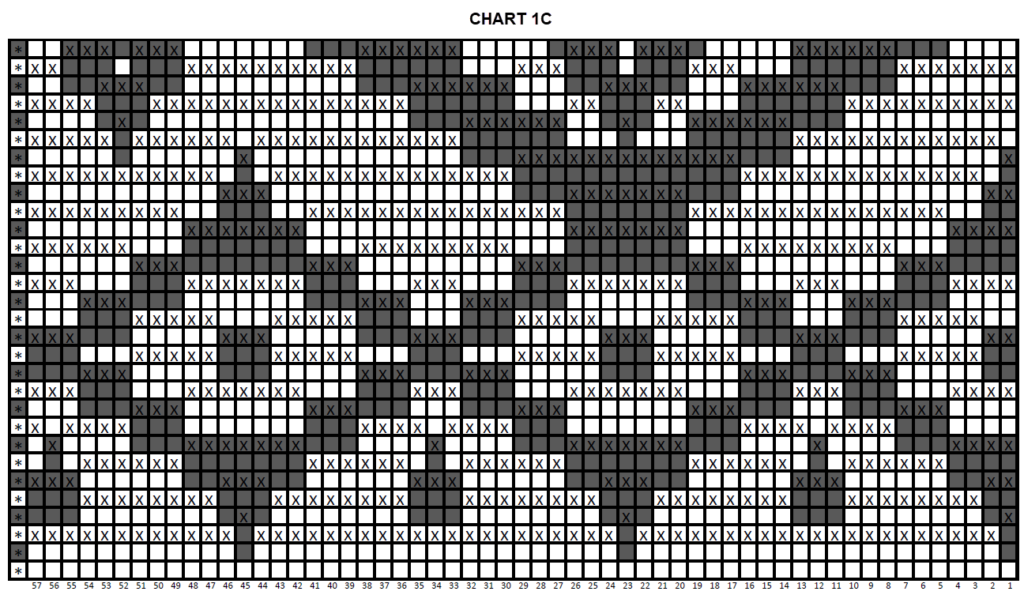
I have blown up the chart in sections on the blog here so it’s easier to see. The sections are labeled and should be worked in the following order:
| 3C | 3B | 3A |
| 2C | 2B | 2A |
| 1C | 1B | 1A |
You will start at the bottom right and work from bottom to top, right to left. The B section is the repeat section. This is the section (44 stitches) that you will repeat 6 times in order to achieve the appropriate length. For example, you will begin with the bottom row (row 1 in color Amazon) with your anchor stitch on Chart 1A (denoted by *), then you will work from right to left working the next 56 stitches. You will then move to Chart 1B. You will work row 1 on Chart 1B from right to left 6 times in a row (so after completing stitch 44 you will go back and start at the beginning of the row again). After you have completed Chart 1B 6 times, move on to Chart 1C and complete those 57 stitches in row 1, again working from right to left. Your final stitch is your anchor stitch at the end of the row. Fasten off and cut your yarn.
I came close to using all my yarn on a couple of the Riverwashed colors so make sure you are paying attention to gauge otherwise you may need to purchase additional yarn. I was especially close with Amazon and Steenbras. You can always size up or down a hook to match gauge. If you are doing a swatch (such as the one I’ve provided here in the pattern and video) make sure to use scrap yarn as to not waste your project yarn.
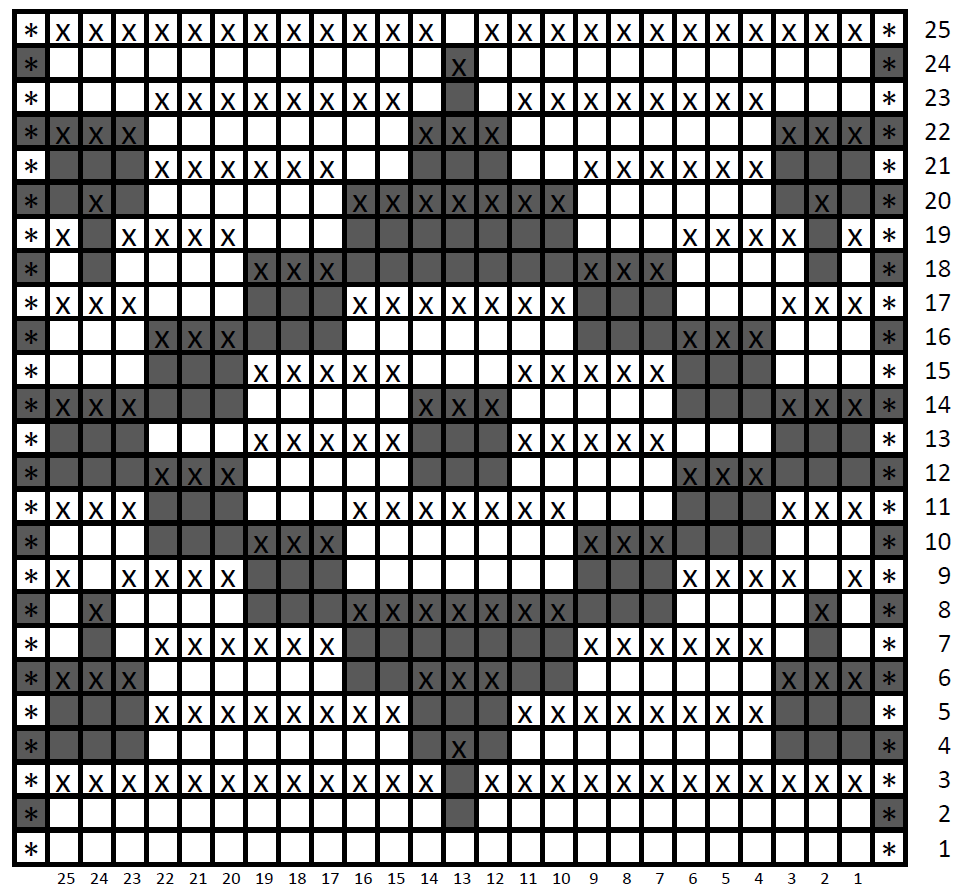
If you are a beginner to mosaic crochet, I HIGHLY recommend watching the video and making a swatch. It will be immensely helpful!
To get started with the swatch you will need some scrap yarn in two different colors, an appropriate hook for the yarn, and a pair of scissors.
Foundation (also explained in the video): Using Color A of your scrap yarn, chain 28. Sc in 2nd chain from hook and in each chain across to the end. Ch 1. Turn. Sc in each chain across to end. Fasten off and cut yarn.
Now you will begin working the chart. You can access the video HERE. It will walk you through, step by step, how to read the chart and what your work should look like. The chart for the swatch is below.
Supplies Needed In Addition to Yarn Listed Above:
D/3.25mm hook
Yarn Needle
Scissors
Abbreviations:
ch – chain
sc – single crochet
st(s) – stitch(es)
yo – yarn over
dc – double crochet
Gauge:
20 double crochets = 4” width
Finished Size:
19” x 78”
The Pattern:
Foundation: Using Hamburg and a 3.25mm hook, chain 380. Sc in 2nd chain from hook and in each chain across to the end. Ch 1. Turn. Sc in each chain across to end. Fasten off and cut yarn.
Now you will begin working the Chart. I will write out the first few rows so you learn how to read it, but then you can continue by working off the Chart.
Rows 1 and 2 are sc only. There are no characters in the cells on the chart, this is how you know they are sc. They may be a different color, but they are still sc’s. Dc’s would be denoted by an x in the cell.
Row 1: Using Amazon, work anchor stitch in the first stitch as described above (both loops). Sc in back loop only across to the last stitch. Work anchor stitch in the last stitch (both loops). Fasten off and cut yarn.
Row 2: Using Hamburg, work your anchor stitch in the first stitch as described above (both loops). Sc in back loop only across to the last stitch. Work anchor stitch in the last stitch (both loops). Fasten off and cut yarn.
Row 3: This is our first row with dc’s. Using Amazon, work anchor stitch in the first stitch as described above (both loops). For the next 12 stitches you will see an x in the cells. We will work dc’s for those stitches in the front loop of the stitch 2 rows down (also Amazon in color). You are overlaying the stitch, connecting the colors, and creating a pattern by doing this. After you have completed the 12 dc’s, sc in back loop only of next st (there is not an x in this cell), [ dc in the front loop of the stitch 2 rows down for the next 21 sts, sc in back loop only of next st ], repeat [ to ] 15 more times (because we are repeating the middle 44 sts 6 times to get the appropriate length), sc in back loop only of next st, dc in the front loop of the stitch 2 rows down for the next 12 sts, work anchor stitch in last stitch (both loops). Fasten off and cut yarn.
As you continue, you will alternate colors every row following the colors listed along the right edge of the chart (to the right of the row number).
Continue working the charts. Don’t get frustrated or overthink it…take it one cell at a time. If there’s an x it’s a dc and if there’s not it’s a sc.
Now that the chart is complete, we can move on to finishing.
Using Hamburg, attach yarn to first st (anchor st). Work a sc in BOTH LOOPS in each st across to the end. Ch 1. Turn. Work a sc in BOTH LOOPS in each st across to the end. Fasten off and cut yarn.
Your project can technically be complete now! If you like the multi-colored fringe you can simply trim it all the same length and start wearing your new wrap.
For my wrap, I chose to weave in all my ends (I know, I know…ugh!) and crochet the following border on either end:
Working with right side facing, attach Hamburg to very corner of first end. Sc in the end of each row all the way across (should be 95 across). Ch 1. Turn. Sc in each st across to end. Fasten off and cut yarn.
Repeat along other end.
I added black fringe by cutting 14” strands of Hamburg. I used 3 strands at a time. I pulled the three ends through the first st along the end of my wrap (a crochet hook is helpful to fish them through). I centered the strands so the middle was in the stitch of the border and all 6 ends were meeting. Then I tied an overhead knot nice and close to the border. I repeated this every third stitch along the border on each end.
This method gives a bit thicker monochromatic fringe.
Thank you SO MUCH for supporting a very small business and designer. I appreciate you more than you know. I hope you enjoy your new mosaic wrap!
I love feedback, positive or negative, and I certainly don’t get it right every time. If you have suggestions, criticism, or find anything that needs to be addressed in the pattern, PLEASE feel free to reach out via the Facebook Group below or email: jamie@brooklynhandcrafted.com
Facebook: https://www.facebook.com/groups/BrooklynHookersCrochetClub
Instagram: https://www.instagram.com/brooklynhandcrafted/ and don’t forget to tag me in your project pictures! @brooklynhandcrafted
Happy Hooking!


jodi m dojnia
BEAUTIFUL!!!
Margarita
This wrap is beautiful! Your video is very helpful, easy to follow and understand what you are doing. I have to give this technique a go.