I was going to put off the launch of my very first pattern on my brand new blog…I thought maybe it wasn’t the right time with everything going on out there right now. I say “out there” because I’m in Michigan and our quarantine went into effect March 16, so I quite literally haven’t been “out there” in some time. The silver lining though, is that I’ve had the time (a commodity that wasn’t in abundance with two tween age kids) to do all kinds of fun yarny things. And I also became a pro at sewing a mask…who knew! Being able to really exercise my creativity has been such a nice and welcome distraction for me…maybe that means it’s actually the perfect time to publish something non COVID-19 related. So, here goes nothing!
First off, I am beyond nervous about this whole thing. I have never formally published a pattern…I have loads that I’ve jotted down or are still in my head, but this is new territory for me. I get the most wonderful feeling creating something new though. And I get a very similar feeling when I download a pattern of someone else’s that I’m super excited to work on. I’ve got to believe the ultimate icing on the cake is being able to inspire someone else like that. Therefore, I bring you the Farmhouse Pillow.
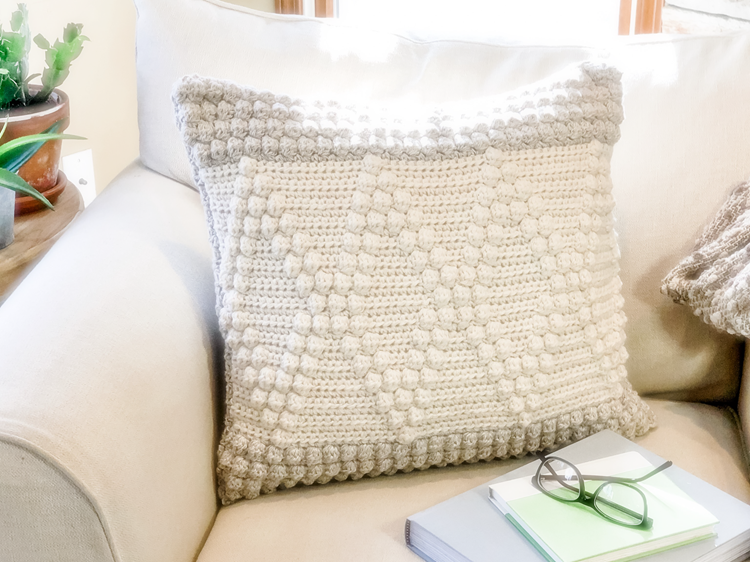
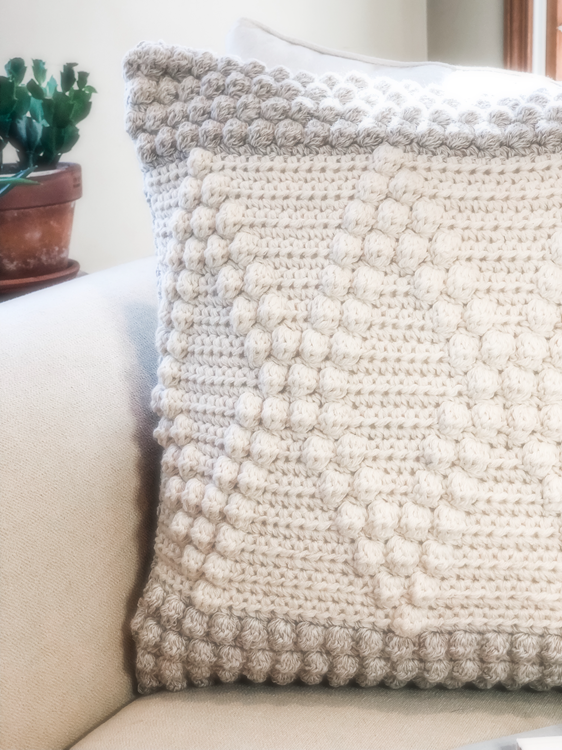
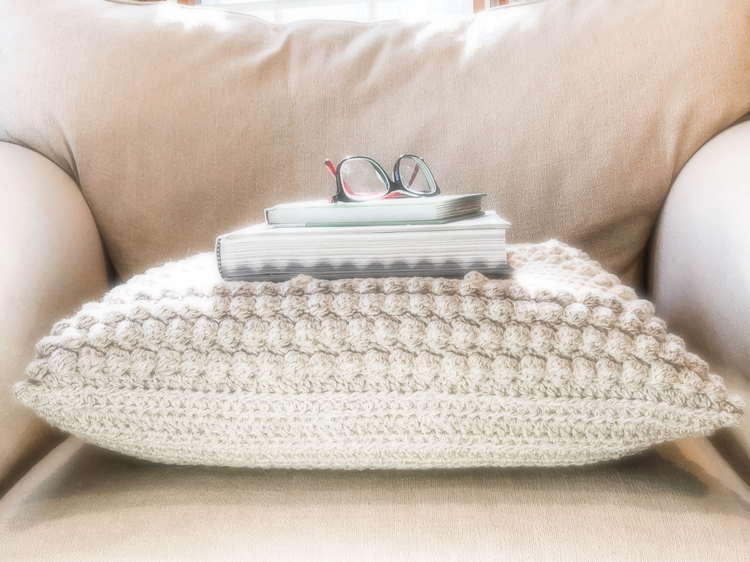
I was channeling my inner fixer upper when I designed this pillow. Does anyone else watch that show from Texas and just want to promptly tear out the kitchen cupboards? If only I had a suitcase of money. I love the comfort and simplicity of the neutral tones used often throughout those episodes and really wanted to pull something out of it. The Farmhouse Pillow uses a combination of single crochet (sc), half-double crochet (hdc) and bobble stitches to create a richly textured diamond pattern on the front panel. The back panel is done all in half-double crochet. The result is a very soft and squishy, totally nap-worthy, beautiful throw pillow that can be stitched in any color combination to match any décor.
The yarn I chose for my pillow is Yarn Bee Denim in Color. It’s a line of yarn with washed out colors that are a little more subdued. While I liked the color choices, what really drew me was the texture of the yarn. It’s extremely soft and “light”…perfect for a pillow that will be used often. In my house, I don’t have a prayer of fancy throw pillows that always look nice and are never touched. We’ve got me, a husband, two kids and two dogs up in here so I needed something that could get squished to the max and be forgiving.
Now I know many stores are closed right now. Some are still offering online ordering, but I do think this is the type of project you might be able to visit your stash and use what you have on hand. Denim in Color is considered a medium weight 4 yarn, but I’d say it’s closer to a 5. The weight to yard/meter ratio is 3.5oz to 157yards/143 meters. If you have something close to that, just adjust your hook size to meet the gauge. The colors that I used are slightly different from each other for subtle contrast. If you don’t have two colors that you like together you could take a couple pieces of thread and run them along with your yarn to achieve a marled look in specific sections.
You will also need a 6mm J hook (or size appropriate for matching gauge), a yarn needle, an 18”x18” pillow form (or an old pillow approximately that size), scissors, and a measuring tape (to check for gauge throughout).
You will crochet the front and back panels separately and then sew them together using a running stich for the sides and a whipstitch for the top and bottom. I like using the running stitch for the sides because they have a more “unfinished” look to the edge…the running stitch cleans that up once it’s turned right side out.
If you would like the printable PDF version of this pattern you can purchase it from Ravelry here, or from Etsy here.
Abbreviations:
ch – chain
sc – single crochet
hdc – half double crochet
st(s) – stitch(es)
yo – yarn over
dc – double crochet
Special Stitches:
4 double crochet bobble stitch (bobble): Yo, insert hook into the next st, yo, pull up a loop, yo, pull through two loops on your hook, [ yo, insert hook into same st, yo, pull up a loop, yo, pull through 2 loops on your hook ] work from [ to ] 3 times (you should have 5 loops on your hook), yo, pull through all remaining loops on your hook.
Front Panel
1. chain 59
2. hdc in 3rd ch from hook, hdc in each st across to end (57 sts here and throughout)
3. ch 2, turn, hdc in first st, [ bobble in next st, hdc in next st ], repeat [ to ] to end
4. ch2, turn, sc in first st and in each st across to end
5. ch 3 (counts as first dc of bobble), turn, complete bobble st (you will only have 4 loops on your hook to pull through instead of 5), [ hdc in next st, bobble in next st ], repeat [ to ] to end
6. repeat row 4
7. repeat row 3
8. repeat row 4
9. repeat row 5
10. repeat row 4
*change colors*
11. ch 2, turn, hdc in next 7 sts, bobble in next st, [ hdc in next 13 sts, bobble in next st ], repeat [ to ] 2 more times, hdc in next 7 sts to the end
12. repeat row 4
13. ch 2, turn, hdc in next 6 sts, bobble in next st, hdc in next st, bobble in next st, [ hdc in next 11 sts, bobble in next st, hdc in next st, bobble in next st ], repeat [ to ] 2 more times, hdc in next 6 sts to the end
14. repeat row 4
15. ch 2, turn, hdc in next 5 sts, bobble in next st, hdc in next st, bobble in next st, hdc in next st, bobble in next st, [hdc in next 9 sts, bobble in next st, hdc in next st, bobble in next st, hdc in next st, bobble in next st ], repeat [ to ] 2 more times, hdc in next 5 sts to the end
16. repeat row 4
17. ch 2, turn, hdc in next 4 sts, bobble in next st, hdc in next st, bobble in next st, hdc in next st, bobble in next st, hdc in next st, bobble in next st, [hdc in next 7 sts, bobble in next st, hdc in next st, bobble in next st, hdc in next st, bobble in next st, hdc in next st, bobble in next st ], repeat [ to ] 2 more times, hdc in next 4 sts to the end
18. repeat row 4
19. ch 2, turn, hdc in next 3 sts, bobble in next st, hdc in next st, bobble in next st, hdc in next 3 sts, bobble in next st, hdc in next st, bobble in next st, [ hdc in next 5 sts, bobble in next st, hdc in next st, bobble in next st, hdc in next 3 sts, bobble in next st, hdc in next st, bobble in next st ], repeat [ to ] 2 more times, hdc in next 3 sts to the end
20. repeat row 4
21. ch 2, turn, hdc in next 2 sts, bobble in next st, hdc in next st, bobble in next st, hdc in next 5 sts, bobble in next st, hdc in next st, bobble in next st, [hdc in next 3 sts, bobble in next st, hdc in next st, bobble in next st, hdc in next 5 sts, bobble in next st, hdc in next st, bobble in next st], repeat [ to ] 2 more times, hdc in next 2 sts to the end
22. repeat row 4
23. ch 2, turn, hdc in next st, bobble in next st, hdc in next st, bobble in next st, [ hdc in next 7 sts, bobble in next st, hdc in next st, bobble in next st, hdc in next st, bobble in next st, hdc in next st, bobble in next st ], repeat [ to ] 2 more times, hdc in next 7 sts, bobble in next st, hdc in next st, bobble in next st, hdc in last st
24. repeat row 4
25. ch 3 (counts as first dc of bobble), turn, complete bobble st (you will only have 4 loops on your hook to pull through instead of 5), hdc in next st, bobble in next st, [ hdc in next 9 sts, bobble in next st, hdc in next st, bobble in next st, hdc in next st, bobble in next st ], repeat [ to ] 2 more times, hdc in next 9 sts, bobble in next st, hdc in next st, bobble in last st
26. repeat row 4
27. repeat row 23
28. repeat row 4
29. repeat row 21
30. repeat row 4
31. repeat row 19
32. repeat row 4
33. repeat row 17
34. repeat row 4
35. repeat row 15
36. repeat row 4
37. repeat row 13
38. repeat row 4
39. repeat row 11
*change colors*
40. repeat row 4
41. repeat row 5
42. repeat row 4
43. repeat row 3
44. repeat row 4
45. repeat row 5
46. repeat row 4
47. repeat row 3
48. ch 2, turn, hdc in first st and each st across to end
Fasten off and weave in ends.
Back Panel:
1. ch 59
2. hdc in 3rd ch from hook, hdc in each st across to end (57 sts here and throughout)
3. ch 2, turn, hdc in first st and each st across to end
4. Repeat row 3 for rows 4-40
Fasten off and weave in ends.
Assembly:
Place the two panels with the right side facing each other so when the edges are sewn together they will be inside out.
Cut a 3 yard piece of your Color A yarn.
Using a yarn needle, begin at the lower right hand corner. Leaving a 1 yard tail, slip st into both panels to secure the yarn to your work. Working a ¼” from the edge of the two panels, use the running stitch to sew between each row and connect the two side edges together.
Once you have the right side done, use a whipstitch to sew the two panels together at the top (I like to work through front and back loops of both sets of stitches on a pillow to make sure it’s secure).
Once the top is done, working a ¼” from the left edge use the running stitch to sew the other side edges together. Don’t weave your end in yet.
Now it’s time to turn your pillow right side out.
Place your pillow form inside your pillow case.
Using the 1 yard tail you left when you started sewing side one together, whipstitch the bottom two edges together to seal up the pillow. Your two tails should now be at the same corner.
I’m not normally a fan of knots in my crochet work. Having said that, I did tie a sturdy knot to secure the two tails once I finished sewing my pillow up. I anticipated this pillow being used a lot because it’s so soft and squishy, so I wanted to make sure it was not going to come apart. Also, I figured it would show me right where to cut the yarn in the event I needed to take it apart so I could wash it.
You can now weave in the ends and enjoy your beautiful Farmhouse Pillow!
I truly hope you enjoy the pattern! Being that it’s my first, there’s a strong possibility there are mistakes I overlooked. I would love it if you would drop me a line and let me know if you come across anything unusual or anything that needs further clarification.
If you’re on Instagram, tag me in your final project! @brooklynhandcrafted
If you’re on Facebook, join the Brooklyn Hookers Crochet Club here. It’s also brand new…not a lot yet but loads to come!
Happy hooking!


Maria
Hi, I love your patterns, they are so beautiful that i cant decide which one to try first! The only thing i would ask is if you could possibly take pictures as you go along with the instructions. It makes it easier to understand when it gets tricky.
Thank you !
admin
This is good information to know, I appreciate you passing it along! I will definitely do my best to incorporate more pictures in my upcoming patterns. Thank you!
Leanne
Love this pattern thank you so much for sharing!! It was very easy to follow- my pillow turned out the perfect size and I am obsessed with the finished product!
I was also binging Fixer Upper when I decided to look for fun pillow cover patterns on Pinterest and am so glad I came across this one. Thank you!